Poinsettia Crochet Centerpiece with Holly and a Lace Bow
Advanced
For experienced crocheters who enjoy complex shaping, fine detail, and ambitious construction
Single-Day Project
A satisfying project you can complete in a single afternoon or evening.
Handmade Gift
A beautiful keepsake — free forever. Read online or print at home.
About This Poinsettia Crochet Centerpiece with Holly and a Lace Bow
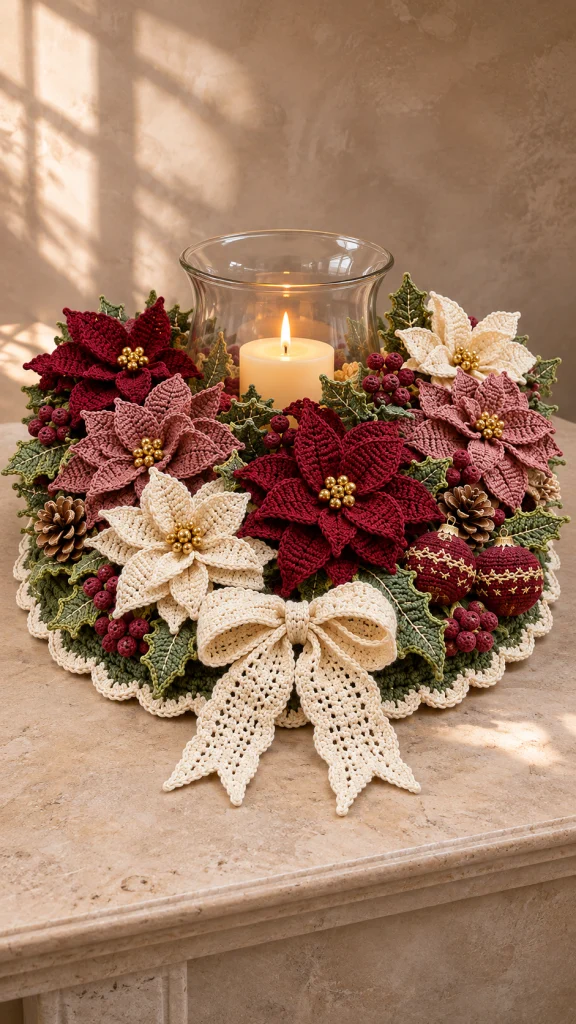
This Poinsettia crochet centerpiece pattern creates a wreath-shaped table decoration with layered burgundy, dusty rose, and ivory flowers surrounding an open center. Olive holly leaves, berry clusters, embroidered ornaments, and a generous cream lace bow give it the full, textured appearance of a traditional Christmas arrangement.
The construction begins with two flat crochet rings enclosing a firm support. You will shape individual petals and leaves, assemble six dimensional flowers, and sew the decorations onto the upper ring. The open center accommodates a separate glass hurricane with a battery-operated candle.
Allow approximately 35–45 hours for crocheting, blocking, embroidery, and assembly. This advanced project suits crocheters who enjoy detailed finishing, consistent shaping, and arranging many small components into a balanced piece.
Materials
- DK cotton yarn: approximately 350 m olive green for the base and leaves.
- DK cotton yarn: approximately 220 m burgundy for two flowers, berries, and ornaments.
- DK cotton yarn: approximately 160 m dusty rose for two flowers.
- DK cotton yarn: approximately 300 m ivory for two flowers, edging, and bow.
- Fine gold embroidery thread, approximately 15 m.
- 3 mm crochet hook, or size needed for gauge.
- Flexible plastic canvas or firm craft mesh large enough to cut one annulus approximately 37 cm outside diameter and 26 cm inside diameter; trim to fit the blocked crochet.
- Small quantity of polyester filling for berries and ornaments.
- Approximately 42 gold beads, 6–8 mm across, for flower centers.
- Two lightweight ornament caps with sewable loops, approximately 12 mm across.
- Three small natural pinecones, approximately 4–5 cm long.
- Strong matching sewing thread and a fine sewing needle.
- Tapestry needle, stitch markers, scissors, ruler, and blocking pins.
- Separate glass hurricane approximately 16–18 cm across, with a battery-operated pillar candle.
Abbreviations
chchainsl stslip stitchscsingle crochetdcdouble crochetsc2togsingle crochet two stitches togetherincwork two single crochets into one stitchMRmagic ringststitchstsstitchesAnnular Foundation Panels — Make Two
- With olive, ch 144 loosely. Join with a sl st to the first ch without twisting. The chain ring should measure approximately 80 cm around.
- Round 1: Ch 2, dc in every ch, join. 144 sts.
- Round 2: Ch 2, repeat [dc in next 11 sts, 2 dc in next st] 12 times, join. 156 sts.
- Round 3: Ch 2, repeat [dc in next 12 sts, 2 dc in next st] 12 times, join. 168 sts.
- Round 4: Ch 2, repeat [dc in next 13 sts, 2 dc in next st] 12 times, join. 180 sts.
- Round 5: Ch 2, repeat [dc in next 14 sts, 2 dc in next st] 12 times, join. 192 sts.
- Round 6: Ch 2, repeat [dc in next 15 sts, 2 dc in next st] 12 times, join. 204 sts.
- Round 7: Ch 2, repeat [dc in next 16 sts, 2 dc in next st] 12 times, join. 216 sts. Fasten off.
- Block both panels flat to approximately 39 cm outside diameter with a 25 cm opening. Match their dimensions before cutting the support.
Foundation Joining and Scalloped Edge
- Cut the support to fit between the panels, leaving approximately 5 mm clear around both crochet edges. Round off any sharp cut points.
- Place panels with wrong sides together and the support between them. Align their 216 outer stitches. With olive, work 1 sc through both layers in every corresponding outer stitch pair; join. 216 sts. Fasten off.
- Join olive at the inner opening. Work 1 sc through both layers in each corresponding foundation-chain pair; join. 144 sts. Fasten off. Do not add stuffing to the foundation.
- Join ivory in any outer joining sc. Repeat [sc in next st, skip 2 sts, 5 dc in next st, skip 2 sts] 36 times. Join to the first sc and fasten off. There are 36 scallops, each using 6 foundation stitches.
Large Poinsettia Petals — Make Thirty
- Make 10 petals in burgundy, 10 in dusty rose, and 10 in ivory. Five large petals form the lower layer of each flower. Leave a 15 cm beginning tail on every petal.
- Row 1: Ch 2, sc in second ch from hook. 1 st. Ch 1 and turn after every row except the last.
- Row 2: Work 3 sc in the st. 3 sts.
- Row 3: Inc, sc in next st, inc. 5 sts.
- Row 4: Inc, sc in next 3 sts, inc. 7 sts.
- Row 5: Inc, sc in next 5 sts, inc. 9 sts.
- Row 6: Sc in all 9 sts. 9 sts.
- Row 7: Sc in all 9 sts. 9 sts.
- Row 8: Sc2tog, sc in next 5 sts, sc2tog. 7 sts.
- Row 9: Sc2tog, sc in next 3 sts, sc2tog. 5 sts.
- Row 10: Sc2tog, sc in next st, sc2tog. 3 sts.
- Row 11: Insert the hook into each of the three stitches, drawing up a loop in each; yarn over and draw through all four loops. 1 st. Fasten off.
- Block each petal to approximately 5.5 cm long and 5 cm wide. Keep the narrow beginning end as the flower base and the final decrease as the outward tip.
Small Poinsettia Petals — Make Thirty
- Make 10 in each flower color. Five small petals form the upper layer of each flower. Leave a 15 cm beginning tail.
- Row 1: Ch 2, sc in second ch from hook. 1 st. Ch 1 and turn after every row except the last.
- Row 2: Work 3 sc in the st. 3 sts.
- Row 3: Inc, sc in next st, inc. 5 sts.
- Row 4: Inc, sc in next 3 sts, inc. 7 sts.
- Row 5: Sc in all 7 sts. 7 sts.
- Row 6: Sc in all 7 sts. 7 sts.
- Row 7: Sc2tog, sc in next 3 sts, sc2tog. 5 sts.
- Row 8: Sc2tog, sc in next st, sc2tog. 3 sts.
- Row 9: Draw up a loop in each of the three stitches, yarn over and draw through all four loops. 1 st. Fasten off.
- Block to approximately 4.5 cm long and 4 cm wide. Do not flatten the fabric completely; a slight lengthwise cup helps the upper petals stand above the lower layer.
Flower Centers and Layered Assembly — Make Six
- For each backing disk, use the matching flower color. Round 1: Work 6 sc in MR. 6 sts.
- Round 2: Inc in every st. 12 sts. Sl st in next st and fasten off, leaving a 30 cm sewing tail.
- Arrange five large petals around a disk, with their beginning ends meeting over its center. Overlap adjacent bases slightly and sew the lowest 1 cm of every petal firmly to the disk.
- Place five matching small petals above the lower layer, positioning each small petal between two large petals. Sew their bases through the lower layer and disk. Leave the pointed ends free.
- Sew seven gold beads into a compact center cluster on each flower, passing through the backing disk with each attachment. Make two flowers in each color. Finished flowers measure approximately 11–12 cm across.
Picot Holly Leaves — Make Twenty-Four
- With olive, work Rows 1–11 of the large petal instructions. Do not fasten off after Row 11. The final single stitch is the leaf tip.
- Define a picot as ch 3, sl st into the first of those 3 chains. Picot chains do not count toward the edging stitch count.
- Ch 1. Work 1 sc into each of the 11 row ends down the first side, adding a picot immediately after the sc at Rows 9, 7, 5, and 3. Work 1 sc into the unused side of the beginning chain at the leaf base.
- Work 1 sc into each of the 11 row ends up the opposite side, adding a picot immediately after the sc at Rows 3, 5, 7, and 9. Work 1 sc into the top of the Row 11 stitch and add one picot. Join to the first edging sc. 24 edging sc and 9 picots. Fasten off with a sewing tail.
- With gold thread, embroider one central vein from base to tip and three short diagonal branches on each side. Keep the thread relaxed so the leaf does not pucker.
- Block the leaves with their points spread. Expect approximately 6 cm length including the tip picot.
Berries — Make Thirty-Six
- With burgundy, Round 1: Work 6 sc in MR. 6 sts.
- Round 2: Inc in every st. 12 sts.
- Round 3: Sc in every st. 12 sts.
- Round 4: Sc in every st. 12 sts. Add a small pinch of filling.
- Round 5: Sc2tog 6 times. 6 sts. Fasten off with a 20 cm tail. Pass the tail through the front loops of the remaining stitches and draw closed.
- Sew berries into six groups of six, arranging each group as a compact bunch. Use the remaining tails to attach the bunches during final assembly.
Embroidered Baubles — Make Two
- With burgundy, Round 1: Work 6 sc in MR. 6 sts.
- Round 2: Inc in every st. 12 sts.
- Round 3: Repeat [sc in next st, inc] 6 times. 18 sts.
- Round 4: Repeat [sc in next 2 sts, inc] 6 times. 24 sts.
- Round 5: Repeat [sc in next 3 sts, inc] 6 times. 30 sts.
- Round 6: Repeat [sc in next 4 sts, inc] 6 times. 36 sts.
- Round 7: Sc in every st. 36 sts.
- Round 8: Sc in every st. 36 sts.
- Round 9: Sc in every st. 36 sts.
- Round 10: Sc in every st. 36 sts.
- Round 11: Sc in every st. 36 sts.
- Round 12: Repeat [sc in next 4 sts, sc2tog] 6 times. 30 sts.
- Round 13: Repeat [sc in next 3 sts, sc2tog] 6 times. 24 sts.
- Round 14: Repeat [sc in next 2 sts, sc2tog] 6 times. 18 sts. Stuff firmly enough to hold a round shape without stretching the stitches.
- Round 15: Repeat [sc in next st, sc2tog] 6 times. 12 sts.
- Round 16: Sc2tog 6 times. 6 sts. Fasten off and draw the remaining front loops closed.
- Using gold thread, embroider six evenly spaced crosses around Round 8 and six around Round 10, offsetting the second band between the first band’s crosses. Each cross spans approximately two stitches and two rounds.
- Sew an ornament cap over the closed pole. Leave a separate burgundy tail for attaching each bauble to the foundation. Finished baubles measure approximately 5–6 cm across.
Lace Bow Loop
- With ivory, ch 18. Row 1: Sc in second ch from hook and each remaining ch. 17 sts.
- Row 2: Ch 1, turn, sc in first st; repeat [ch 1, skip next st, sc in next st] 8 times. 9 sc and 8 ch-1 spaces.
- Row 3: Ch 1, turn, sc in every sc and every ch-1 space. 17 sts.
- Rows 4–59: Repeat Rows 2–3 twenty-eight times. Each mesh row has 9 sc and 8 spaces; each solid row has 17 sts.
- Row 60: Sc in every st, using ch 1 and turning first. 17 sts. Fasten off with a sewing tail. Block the strip to approximately 9.5 cm wide and 30 cm long.
- Join the short ends edge to edge with a whipstitch, matching all 17 stitches. Flatten the resulting loop with the seam centered at the back. Gather across the middle and secure with several wraps of matching yarn to form two equal loops.
Pointed Bow Tails — Make Two
- With ivory, ch 18. Row 1: Sc in second ch from hook and each remaining ch. 17 sts.
- Row 2: Ch 1, turn, sc in first st; repeat [ch 1, skip next st, sc in next st] 8 times. 9 sc and 8 spaces.
- Row 3: Ch 1, turn, sc in every sc and every space. 17 sts.
- Rows 4–29: Repeat Rows 2–3 thirteen times. Each mesh row has 9 sc and 8 spaces; each solid row has 17 sts.
- Row 30: Ch 1, turn, sc2tog, sc in next 13 sts, sc2tog. 15 sts.
- Row 31: Ch 1, turn, sc2tog, sc in next 11 sts, sc2tog. 13 sts.
- Row 32: Ch 1, turn, sc2tog, sc in next 9 sts, sc2tog. 11 sts.
- Row 33: Ch 1, turn, sc2tog, sc in next 7 sts, sc2tog. 9 sts.
- Row 34: Ch 1, turn, sc2tog, sc in next 5 sts, sc2tog. 7 sts.
- Row 35: Ch 1, turn, sc2tog, sc in next 3 sts, sc2tog. 5 sts.
- Row 36: Ch 1, turn, sc2tog, sc in next st, sc2tog. 3 sts.
- Row 37: Ch 1, turn, draw up a loop in each of the three stitches, yarn over and draw through all four loops. 1 st. Fasten off.
- Block each tail to approximately 18.5 cm long. Overlap their straight ends beneath the gathered bow center and sew securely.
Bow Center Wrap
- With ivory, ch 7. Row 1: Sc in second ch from hook and each remaining ch. 6 sts.
- Rows 2–12: Ch 1, turn, sc in every st. 6 sts per row. Fasten off with a 25 cm tail.
- Wrap the strip around the gathered bow and tail attachment. Join its short ends at the back, matching the 6 stitches. Sew through the wrap, gathered loop, and tail tops so nothing can slide out.
Arrangement and Attachment
- Place the foundation flat and mark the front at 6 o’clock. Set the empty hurricane inside the opening temporarily to establish clearance.
- Pin the six flowers with their centers approximately 15 cm from the foundation center: burgundy at 10 and 5 o’clock, ivory at 1 and 7 o’clock, and dusty rose at 3 and 9 o’clock. Allow the petal tips to overlap naturally.
- Distribute four holly leaves around each flower, making 24 leaves total. Slide their bases beneath the flower backings and direct the points toward gaps or the outside edge. Keep every leaf outside the central opening.
- Remove the hurricane. Sew each leaf base and its lower central vein to the upper foundation panel. Sew every flower backing disk around its perimeter to that same panel, avoiding the support beneath.
- Sew one six-berry bunch into each gap between neighboring flowers. Anchor every bunch at two points.
- Position both baubles together near 4:30, between the right rose flower and front burgundy flower. Sew each ball to the upper panel at two points near its underside, leaving its cap visible.
- Place the pinecones near 2, 4, and 8 o’clock. With strong thread, pass beneath several lower cone scales and through the upper crochet panel at least three times per cone. Knot beneath the surrounding foliage.
- Sew the bow center to the outer front edge at 6 o’clock with at least four passes through the wrap and foundation. Let the tails extend over the front edge.
Finishing
- Weave yarn ends into the backs of their own components, changing direction at least once. Bury berry and bauble ends inside their filling.
- Lift the upper petals gently and arrange the holly points so the ivory scallops remain visible around the outside. Tack any petal base that twists, while keeping the tips free.
- Check the decoration on a level table. Every ornament should remain secure when the foundation is lifted carefully with both hands.
- Return the separate hurricane to the open center and add the battery-operated candle. Keep the glass on the tabletop, with no crochet trapped beneath it.
The finished arrangement should feel full without hiding the individual flowers. A little space between the upper petals lets the gold centers and embroidered leaves catch the light.
Store the centerpiece flat in a roomy box, supporting the bow loops with loose tissue. Remove the glass before moving the arrangement and lift from beneath the foundation.
Tips for Success
- Block one large and one small petal first; compare their proportions before making the remaining fifty-eight petals.
- Keep the foundation joining stitches relaxed so they do not draw the ring into a bowl.
- Use the beginning tails to attach petal bases; reserve the pointed ends for shaping and arranging.
- Pin the entire arrangement before sewing so the six flowers share the available space evenly.
- Work gold embroidery with short lengths of thread to reduce tangling and abrasion.
Common Mistakes to Avoid
- Counting the ch-2 as a base stitch adds unwanted stitches. Begin each round in the first actual dc and count before joining.
- Placing both petal layers directly above one another hides the lower layer. Rotate the upper layer so its petals fill the gaps.
- Overfilling berries opens the fabric. Use only enough filling to round the surface.
- Cutting the support before blocking can leave it protruding. Trace the blocked panels and allow clearance on both edges.
- Sewing through only one strand can loosen heavy decorations. Catch several strands of the upper panel at every anchor point.
Ways to Customize This Pattern
- Replace dusty rose with muted terracotta while retaining the burgundy and ivory flowers for the same six-flower layout.
- Use dark olive for the foundation and lighter olive for the holly; keep the yarn weight and gauge consistent.
- Replace the gold beads with seven small embroidered French knots per flower for a bead-free finish.
- Lengthen each bow tail by adding two mesh-and-solid row pairs before Row 30, adding approximately 2 cm at the stated gauge.
- Omit the natural pinecones and fill their three positions with extra six-berry bunches, requiring eighteen additional berries.
Frequently asked questions
It is a flat, supported table centerpiece with an open center for a separate hurricane. The attachment layout and foundation are designed for horizontal display.
Use a battery-operated candle for this arrangement. The yarn, filling, bow, and pinecones sit close to the central glass, and the glass alone does not make those materials suitable beside a flame.
Check the dc gauge, stitch counts, and turning-chain convention first. Small irregularities may block flat; pronounced rippling or cupping calls for another swatch and a hook adjustment before making the second panel.
Spot-clean it gently with a damp cloth. The enclosed support, natural pinecones, beads, and ornament caps make machine washing unsuitable. Wash and block the crochet pieces before assembly if needed.
The finished Poinsettia Crochet Centerpiece with Holly and a Lace Bow

