Poinsettia Star Crochet Christmas Centerpiece Pattern
Advanced
For experienced crocheters who enjoy complex shaping, fine detail, and ambitious construction
Single-Day Project
A satisfying project you can complete in a single afternoon or evening.
Handmade Gift
A beautiful keepsake — free forever. Read online or print at home.
About This Poinsettia Star Crochet Christmas Centerpiece Pattern
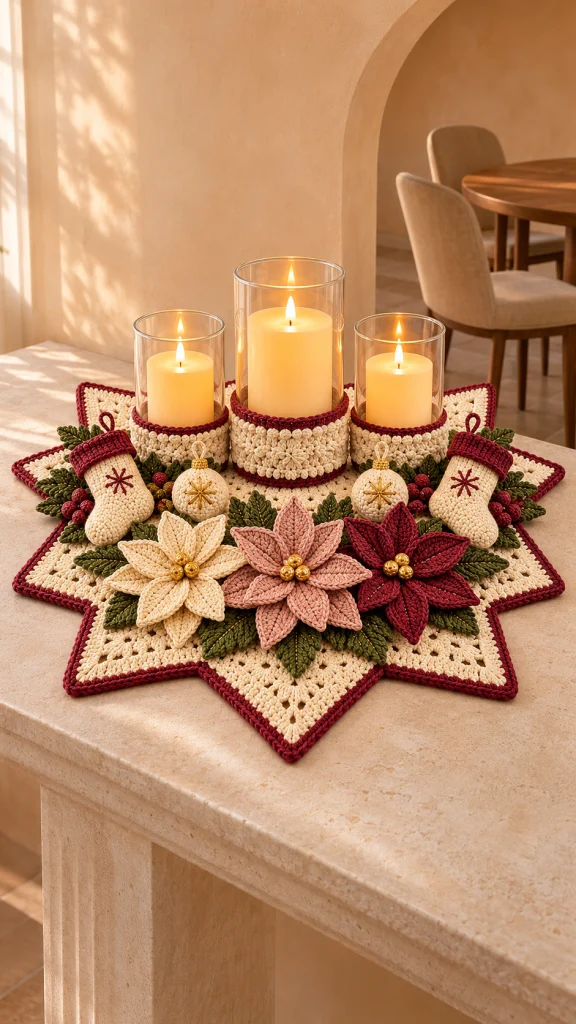
This crochet Christmas centerpiece pattern brings together a cream eight-point star, burgundy edging, layered poinsettias and a trio of matching glass sleeves. Olive leaves, tiny stockings and embroidered baubles frame the arrangement, with blush, cream and wine-colored flowers across the front.
The project is decorative tableware with several separately worked components. Its advanced techniques include an expanding octagon, individually shaped star points, double-sided petals, fitted cylindrical sleeves and carefully balanced assembly. Allow approximately 30–40 hours, including blocking and sewing.
The instructions create a star mat approximately 44–48 cm across, three removable glass sleeves and a collection of small ornaments. Use battery-operated LED candles throughout the display. Arrange the glasses on a firm, level surface and keep their bases clear of raised crochet decorations.
Materials
- DK cotton yarn: approximately 300 g cream, 100 g burgundy, 75 g olive green and 50 g dusty blush; quantities assume approximately 110 m per 50 g.
- 3.5 mm crochet hook for the mat, sleeves, petals, leaves and stockings.
- 3 mm crochet hook for berries and baubles.
- Three straight-sided glass cylinders: two approximately 9 cm in outside diameter and one approximately 12 cm in outside diameter.
- Three battery-operated LED candles sized to fit the glass cylinders.
- Small amount of polyester stuffing for berries and baubles.
- Nine gold-colored 8–10 mm beads for flower centers.
- Gold embroidery thread for baubles and optional leaf veins.
- Tapestry needle and fine embroidery needle.
- Stitch markers, scissors and measuring tape.
- Blocking mat and rustproof pins.
- Optional thin nonslip mat cut smaller than the cream octagon.
Abbreviations
chchainsl stslip stitchscsingle crochethdchalf double crochetdcdouble crochettrtreble crochetsc2togsingle crochet two stitches togetherMRmagic ringststitchstsstitchesRSright sideCream Octagon Foundation
- Round 1: With cream and the 3.5 mm hook, work 8 hdc into MR. Tighten and join with sl st to the first hdc. Place a marker in every stitch. These eight marked stitches establish the corners. 8 sts.
- Round 2: Ch 1, work 2 hdc in each marked stitch. Move each marker to the second stitch of its increase. Join. 16 sts.
- Round 3: Ch 1, work 1 hdc in each unmarked stitch and 2 hdc in each marked stitch. Move each marker to the second stitch of its increase; join. 24 sts.
- Rounds 4–15: Work each round separately as Round 3, increasing at all eight markers. The stitch counts are 32, 40, 48, 56, 64, 72, 80, 88, 96, 104, 112 and 120. Each marked corner gains one stitch per round.
- Round 16: Ch 1, repeat the following eight times: hdc in the next stitch, then repeat ch 1, skip 1 stitch, hdc in the next stitch seven times; work one additional hdc in that last stitch, which is the marked corner. Move the marker to the additional hdc. Join and fasten off. Each sector contains 9 hdc and seven ch-1 spaces, equivalent to 16 working positions; 72 hdc and 56 spaces total.
- Lay the octagon flat. Each edge is the 16-position sector beginning immediately after one marked corner and ending at the next marked corner. Keep all eight corner markers in place for attaching the points.
Eight Shaped Star Points
- Point 1, Row 1: With RS facing, join cream in the first position after a marked corner. Ch 1, sc in every hdc and once in every ch-1 space across this sector, ending in the next marked corner. Turn. 16 sc.
- Row 2: Ch 1, sc2tog over the first 2 sts, sc in the next 14 sts. Turn. 15 sc.
- Row 3: Ch 1, sc2tog, sc in the next 13 sts. Turn. 14 sc.
- Row 4: Ch 1, sc2tog, sc in the next 12 sts. Turn. 13 sc.
- Row 5: Ch 1, sc2tog, sc in the next 11 sts. Turn. 12 sc.
- Row 6: Ch 1, sc2tog, sc in the next 10 sts. Turn. 11 sc.
- Row 7: Ch 1, sc2tog, sc in the next 9 sts. Turn. 10 sc.
- Row 8: Ch 1, sc2tog, sc in the next 8 sts. Turn. 9 sc.
- Row 9: Ch 1, sc2tog, sc in the next 7 sts. Turn. 8 sc.
- Row 10: Ch 1, sc2tog, sc in the next 6 sts. Turn. 7 sc.
- Row 11: Ch 1, sc2tog, sc in the next 5 sts. Turn. 6 sc.
- Row 12: Ch 1, sc2tog, sc in the next 4 sts. Turn. 5 sc.
- Row 13: Ch 1, sc2tog, sc in the next 3 sts. Turn. 4 sc.
- Row 14: Ch 1, sc2tog, sc in the next 2 sts. Turn. 3 sc.
- Row 15: Ch 1, sc2tog, sc in the last st. Turn. 2 sc.
- Row 16: Ch 1, sc2tog. Fasten off. 1 sc. Alternating the decrease edge by turning centers the tip over the base.
- Points 2–8: Repeat Rows 1–16 over each remaining 16-position sector. Each octagon position is used once; adjacent points meet at the boundaries without sharing base stitches.
Burgundy Star Border
- Preparation: Mark the tip stitch of every point and each valley between points. With RS facing, join burgundy at a valley.
- Round 1: Ch 1. For each point, work 15 sc evenly up the first sloping edge, work sc, ch 2, sc in the marked tip, then work 15 sc evenly down the second sloping edge. Sl st into the valley between this point and the next. Repeat around all eight points and join to the first sc. 256 sc, eight ch-2 tip spaces and eight valley sl sts. Do not add another stitch at the starting valley.
- Round 2: Ch 1. For each point, sc in its next 16 sc, work sc, ch 2, sc in the tip space, sc in its next 16 sc, then sl st in the valley sl st. Repeat eight times and join. 272 sc, eight ch-2 spaces and eight valley sl sts. Fasten off.
- Blocking: Wet-block the star with each point equally extended. Pin the octagon flat first, then the eight tips. Allow it to dry completely before attaching decorations.
Three Fitted Glass Sleeves
- Foundation: Make two small sleeves with cream ch 44 and one large sleeve with cream ch 60. Without twisting, join each chain into a ring. These starting counts suit the stated glasses only if your sc gauge is approximately 18 sts per 10 cm.
- Round 1: Ch 1, sc in every chain and join. 44 sts for each small sleeve; 60 sts for the large sleeve. Test the ring on the empty glass. It should stretch slightly and sit securely around the lower wall. Adjust the foundation by multiples of 4 if necessary.
- Round 2: Ch 1, sc in every st and join. 44 or 60 sts.
- Round 3: Ch 1, repeat sc in the next 3 sts, bobble in the next st around; join. To make a bobble, work four unfinished dc in the same stitch, then yarn over and draw through all five loops. The closing loop is not an extra stitch. 11 or 15 bobbles; 44 or 60 sts total.
- Round 4: Ch 1, sc in every stitch, including each bobble top, and join. 44 or 60 sts.
- Round 5: Ch 1, repeat sc in the next st, bobble in the next st, sc in the next 2 sts around; join. 11 or 15 bobbles; 44 or 60 sts total.
- Round 6: Repeat Round 4.
- Round 7: Repeat Round 3.
- Round 8: Repeat Round 4.
- Round 9: Repeat Round 5.
- Round 10: Repeat Round 4. Fasten off cream.
- Round 11: Join burgundy, ch 1, sc in every stitch and join. 44 or 60 sts.
- Round 12: Sl st loosely in every stitch and fasten off. 44 or 60 sl sts. Keep this round loose enough to remove the sleeve.
- Lower trim: Join burgundy to an unused loop along the foundation chain. Work one sc per foundation chain, join and fasten off. 44 or 60 sc.
- Fit check: Slide the dry sleeves onto the lower walls of the empty glasses, with their bottom edges above the glass bases. The completed sleeves should be approximately 5–6 cm tall. Do not crochet underneath the glasses.
Layered Poinsettia Petals
- Quantity: Make one cream flower, one blush flower and one burgundy flower. Each flower requires six large petals and five small petals: 18 large and 15 small petals altogether.
- Large petal, Round 1: Ch 13. Starting in the second chain from the hook, work sl st, sc, hdc, dc in the next 2 chains, tr in the next 4 chains, dc, hdc, then 3 sc in the final chain. Rotate to work along the unused side of the chain: hdc, dc, tr in the next 4 chains, dc in the next 2 chains, hdc, sc, sl st. Join to the first sl st. 25 sts.
- Large petal, Round 2: Ch 1, sc in the first 11 sts, work 2 sc in the next st, work sc, ch 2, sc in the next st, work 2 sc in the next st, then sc in the remaining 11 sts. Join and fasten off with a sewing tail. 28 sc and one ch-2 tip space.
- Small petal, Round 1: Ch 10. Starting in the second chain, work sl st, sc, hdc, dc in the next 2 chains, tr in the next 2 chains, dc, then 3 sc in the final chain. Along the other side work dc, tr in the next 2 chains, dc in the next 2 chains, hdc, sc, sl st. Join. 19 sts.
- Small petal, Round 2: Ch 1, sc in the first 8 sts, work 2 sc in the next st, work sc, ch 2, sc in the next st, work 2 sc in the next st, then sc in the remaining 8 sts. Join and fasten off with a sewing tail. 22 sc and one ch-2 tip space.
- Petal shaping: Fold each petal lengthwise with RS outward. Make three small stitches through the two edges at the narrow base only, creating a shallow cupped shape. Leave the pointed end open.
- Flower assembly: Overlap the narrow bases of six large petals in a circle and stitch them securely together. Add five small petals above them, staggered over the lower layer. Stitch through all bases several times.
- Centers: Sew three gold beads into each flower center, passing through each bead and the crochet at least three times. Each flower should measure approximately 12–14 cm across after gentle shaping.
Olive Leaves and Berry Clusters
- Leaves: Make 24 in olive. For each leaf, ch 11. Starting in the second chain, work sl st, sc, hdc, dc in the next 2 chains, tr in the next 2 chains, dc, hdc, then 3 sc in the final chain. Along the unused side work hdc, dc, tr in the next 2 chains, dc in the next 2 chains, hdc, sc, sl st. Join and fasten off with a sewing tail. 21 sts.
- Leaf shaping: Fold the leaf gently along its foundation chain. With olive yarn, make three small stitches along the lower half of the central chain to hold a shallow ridge. Add a gold running-stitch vein if desired.
- Berry Round 1: With burgundy and the 3 mm hook, work 6 sc into MR. Work in a spiral and mark the first stitch. 6 sts.
- Berry Round 2: Work 2 sc in every st. 12 sts.
- Berry Round 3: Sc in every st. 12 sts. Add a tiny pinch of stuffing.
- Berry Round 4: Work sc2tog six times. 6 sts. Fasten off, thread the tail through the remaining front loops and close.
- Clusters: Make 12 berries total. Sew them into four clusters of three, securing each cluster to the bases of two leaves. Reserve the remaining 16 leaves for the flower arrangement.
Two Miniature Stockings
- Toe Round 1: With cream and the 3.5 mm hook, work 6 sc into MR. Continue in a spiral. 6 sts.
- Round 2: Work 2 sc in every st. 12 sts.
- Round 3: Repeat sc in the next st, 2 sc in the next st six times. 18 sts.
- Rounds 4–9: Sc in every st for six rounds. 18 sts each round.
- Heel Row 1: Sc in the next 9 sts, leaving the remaining 9 sts unworked. Turn. 9 sts.
- Heel Row 2: Ch 1, sc2tog, sc in the next 5 sts, sc2tog. Turn. 7 sts.
- Heel Row 3: Ch 1, sc2tog, sc in the next 3 sts, sc2tog. Turn. 5 sts.
- Heel Row 4: Ch 1, sc2tog, sc in the next st, sc2tog. Turn. 3 sts.
- Leg Round 1: Ch 1, sc in the 3 heel-top sts, work 3 sc down the first heel edge, sc in the 9 unworked foot sts, then work 3 sc up the second heel edge. Join. 18 sts.
- Leg Rounds 2–8: Ch 1, sc in every st and join each round. 18 sts per round. Fasten off cream after Round 8.
- Cuff Round 1: Join burgundy, ch 1, work hdc in every st and join. 18 sts.
- Cuff Rounds 2–3: Ch 1, hdc in every st and join each round. 18 sts per round. Fasten off.
- Hanging loop: Join burgundy at the back of the cuff, ch 12 and sl st into the same attachment point. Fasten off and secure both ends inside.
- Embroidery: Flatten the stocking with its toe pointing outward. Use burgundy yarn to embroider an eight-spoke star on the upper foot, keeping the stitches on the front layer only. Leave the stockings unstuffed and gently shape them flat.
Two Embroidered Baubles
- Round 1: With cream and the 3 mm hook, work 6 sc into MR. Work in a spiral. 6 sts.
- Round 2: Work 2 sc in every st. 12 sts.
- Round 3: Repeat sc in the next st, 2 sc in the next st six times. 18 sts.
- Round 4: Repeat sc in the next 2 sts, 2 sc in the next st six times. 24 sts.
- Rounds 5–7: Sc in every st for three rounds. 24 sts per round.
- Round 8: Repeat sc in the next 2 sts, sc2tog six times. 18 sts.
- Round 9: Repeat sc in the next st, sc2tog six times. 12 sts. Stuff evenly.
- Round 10: Work sc2tog six times. 6 sts. Fasten off and close the remaining opening.
- Decoration: Embroider an eight-spoke star in gold thread on the front of each bauble. Make each spoke approximately 1 cm long, meeting at a shared center.
- Top loop: Join cream at the closed top, ch 10 and sl st at the same point. Secure the ends. Wrap gold thread six times around the bottom of the loop and stitch the wrap in place to suggest an ornament cap.
Finishing and Table Arrangement
Weave in the mat and sleeve ends before assembly. Check the fully dry mat on the table where it will be used. All eight points should rest flat, and the center should support the glasses without rocking.
Place the large sleeved glass at the back center of the octagon and the two smaller glasses slightly forward on either side. Leave a small gap between glasses. Mark their footprints with removable yarn and lift them away before sewing.
Arrange the cream, blush and burgundy flowers across the front half of the mat. Fan the 16 loose leaves beneath them. Keep flowers and leaves outside the marked glass footprints. Sew the leaf bases first, then attach each flower through its center and at three separate lower-petal bases.
Place one stocking on each side, with toes angled toward the front. Position the two baubles between the stockings and the center flower. Sew these pieces at three discreet points each so they hold their positions without being flattened.
Add two berry clusters on each side, tucking their leaf bases beneath the stockings or flower edges. Remove the footprint markers, replace the glasses and insert the LED candles. Turn the arrangement to check that the burgundy star outline remains visible.
Tips for Success
- Move each octagon marker into the second stitch of its increase; this keeps all eight sectors equal.
- Block the undecorated star first so the flowers do not prevent its center from drying evenly.
- Keep the sleeve bobbles facing outward and test the sleeve after its plain fourth round.
- Use small sewing stitches through several yarn strands when anchoring the heavy flower centers.
- Photograph the pinned decoration layout before sewing so the spacing stays balanced.
Common Mistakes to Avoid
- Counting a beginning chain as a stitch changes the sector counts. Count only the stitches specified.
- Working into both ends of a shared sector boundary adds extra point stitches. Each point uses exactly 16 positions, ending at its own marked corner.
- Pulling the sleeve’s final slip stitches tight can trap it on the glass. Work loosely and check removal before fastening off.
- Sewing leaves underneath a glass base makes the display unstable. Keep every raised component outside the marked footprints.
- Using burning candles beside yarn creates a fire hazard. Use battery-operated LED candles for this arrangement.
Ways to Customize This Pattern
- Replace blush with a second shade of red while keeping the cream mat and olive leaves.
- Make all three sleeves for equal-sized glasses by using the same fitted foundation count, always divisible by four.
- Omit gold leaf embroidery for a softer finish while retaining the gold flower centers.
- Make the ornaments removable by sewing small yarn ties to their backs and tying them through the mat.
- For a larger mat, add octagon increase rounds before the eyelet round. If the preceding solid round has N stitches per sector, work hdc, then repeat ch 1, skip 1, hdc across the sector, adding a second hdc at the marked corner; use an odd N. Each resulting sector has N + 1 positions. Start each point with that many sc and decrease once per row to one stitch. Recalculate the edge stitches to match the longer slopes.
Frequently asked questions
Use battery-operated LED candles. The yarn sleeves and raised floral decorations sit close to the glasses, so a protective cylinder does not make this design suitable for an open flame.
Measure the outside circumference where the sleeve will sit. Multiply that measurement in centimeters by your sc stitches per centimeter, then choose a nearby multiple of four for a slightly snug fit. Crochet and test the first two rounds before continuing. Use straight-sided glasses.
First check that every solid round adds exactly eight stitches. If the count is correct, wet-block the octagon before adding points. Persistent cupping or rippling means your stitch proportions differ from the sample targets; adjust your hook or yarn and remake the foundation before adding decorations.
Remove the glasses and LED candles. Hand-wash the crochet gently in cool water if the yarn, beads and embroidery thread are washable. Press out water in a towel, reshape the star and petals, and dry flat. Do not wring the stuffed baubles or berries.
The finished Poinsettia Star Crochet Christmas Centerpiece Pattern

