Poinsettia Wreath Amigurumi Centerpiece
Advanced
For experienced crocheters who enjoy complex shaping, fine detail, and ambitious construction
Single-Day Project
A satisfying project you can complete in a single afternoon or evening.
Handmade Gift
A beautiful keepsake — free forever. Read online or print at home.
About This Poinsettia Wreath Amigurumi Centerpiece
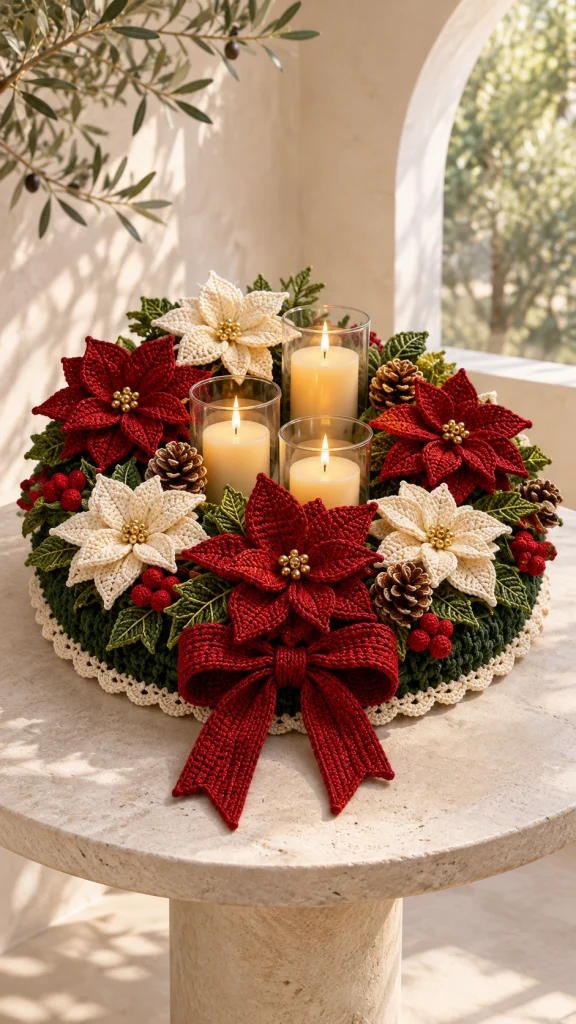
This poinsettia wreath amigurumi pattern brings deep red flowers, warm ivory petals, and richly veined green leaves together in a Christmas table centerpiece. Six layered poinsettias sit around a padded crochet ring, with small stuffed berries, textured pinecones, and a generous red bow filling the spaces between them.
The advanced construction combines separate shaped petals, fitted annular panels, embroidered foliage, and carefully balanced assembly. Allow approximately 35–45 hours, including sewing and blocking. It suits confident crocheters who enjoy detailed decorative work and are comfortable adjusting a fitted cover to a measured form.
The finished arrangement measures approximately 38 cm across before the hanging bow tails. Leave the central opening clear for a separate tray of battery-operated LED candles; the candles are removable and are never attached to the crochet.
Materials
- DK cotton yarn: approximately 250 g forest green for the ring and backing.
- DK cotton yarn: approximately 180 g deep red for flowers, berries, and bow.
- DK cotton yarn: approximately 100 g warm ivory for three flowers and the edging.
- DK cotton yarn: approximately 70 g olive green for leaves.
- DK cotton yarn: approximately 35 g brown for pinecones.
- Small amounts of pale gold and light olive yarn for embroidery.
- 3.0 mm crochet hook, or size needed for gauge.
- Flat, firm foam wreath form measuring 30 cm outside diameter, 18 cm inside diameter, and 2 cm thick.
- Polyester stuffing for berries and pinecone cores.
- Tapestry needle, embroidery needle, scissors, and stitch markers.
- Blocking mat, rustproof pins, and removable assembly pins.
- Optional washable fabric stiffener for petal and leaf edges.
- Optional separate candle tray no wider than 16 cm, with battery-operated LED candles only.
Abbreviations
chchainMRmagic ringscsingle crochethdchalf double crochetdcdouble crochetsl stslip stitchinc2 single crochet in one stitchdecsingle crochet 2 stitches togetherststitchstsstitchesAnnular Ring Panels — Make Two in Forest Green
- Foundation: Ch 72 loosely and sl st to the first chain without twisting. The chain opening should measure approximately 18 cm across. Check it against the form before continuing. (72 chains)
- Round 1: Sc in every chain; join. (72 sts)
- Round 2: Repeat (11 sc, inc) 6 times; join. (78 sts)
- Round 3: Repeat (12 sc, inc) 6 times; join. (84 sts)
- Round 4: Repeat (13 sc, inc) 6 times; join. (90 sts)
- Round 5: Repeat (14 sc, inc) 6 times; join. (96 sts)
- Round 6: Repeat (15 sc, inc) 6 times; join. (102 sts)
- Round 7: Repeat (16 sc, inc) 6 times; join. (108 sts)
- Round 8: Repeat (17 sc, inc) 6 times; join. (114 sts)
- Round 9: Repeat (18 sc, inc) 6 times; join. Fasten off the front panel. Leave the rear panel attached for its outer wall. Each panel should lie flat and cover one face of the form. (120 sts)
Outer and Inner Ring Walls
- Outer wall, round 1: Continue from the rear panel and sc in every stitch; join. This begins the outside wall. (120 sts)
- Outer wall, round 2: Sc around; join. (120 sts)
- Outer wall, round 3: Sc around; join. Fasten off with a long sewing tail. (120 sts)
- Inner wall, round 1: Attach forest green to an unused foundation-chain loop at the rear panel’s inner opening. Work 1 sc into each of the 72 foundation chains; join. (72 sts)
- Inner wall, round 2: Sc around; join. (72 sts)
- Inner wall, round 3: Sc around; join. Fasten off with a long sewing tail. (72 sts)
- Fitting: Put the rear panel under the foam with both walls facing upward. Place the front panel over the foam. Sew the outer wall to its 120 outer stitches, then sew the inner wall to its 72 foundation chains, matching stitches one for one. The foam supplies the padding; do not add loose stuffing. (120 outer seam pairs; 72 inner seam pairs)
Ivory Scalloped Border
- Round 1: With the front facing you, attach ivory at the outer seam. Work 1 sc through each matched outer seam pair; join. (120 sts)
- Round 2: Repeat (skip 1 st, 5 dc in the next st, skip 1 st, sl st in the next st) 30 times. Fasten off and weave in the ends. Keep this trim along the lower outer edge when positioning the flowers. (30 shells; 180 worked sts)
Large Poinsettia Petals — Make 36
- Color allocation: Make 18 deep red and 18 ivory petals. Each flower uses 6 large petals. Ch 3 for each petal. (3 chains)
- Row 1: Sc in the second chain from the hook and in the last chain. Ch 1, turn. (2 sts)
- Row 2: Inc in both stitches. Ch 1, turn. (4 sts)
- Row 3: Inc, 2 sc, inc. Ch 1, turn. (6 sts)
- Row 4: Inc, 4 sc, inc. Ch 1, turn. (8 sts)
- Row 5: Inc, 6 sc, inc. Ch 1, turn. (10 sts)
- Row 6: Sc across. Ch 1, turn. (10 sts)
- Row 7: Dec, 6 sc, dec. Ch 1, turn. (8 sts)
- Row 8: Dec, 4 sc, dec. Ch 1, turn. (6 sts)
- Row 9: Dec, 2 sc, dec. Ch 1, turn. (4 sts)
- Row 10: Dec twice. Ch 1, turn. (2 sts)
- Row 11: Dec. Fasten off, leaving a 30 cm tail. The narrow foundation is the base and this final stitch is the outer point. Do not stuff. Lightly block, then embroider a same-color straight vein from base to tip without pulling it tight. (1 st)
Small Poinsettia Petals — Make 36
- Color allocation: Make 18 deep red and 18 ivory petals. Each flower uses 6 small petals. Ch 3 for each petal. (3 chains)
- Row 1: Sc in the second chain from the hook and the last chain. Ch 1, turn. (2 sts)
- Row 2: Inc twice. Ch 1, turn. (4 sts)
- Row 3: Inc, 2 sc, inc. Ch 1, turn. (6 sts)
- Row 4: Inc, 4 sc, inc. Ch 1, turn. (8 sts)
- Row 5: Sc across. Ch 1, turn. (8 sts)
- Row 6: Dec, 4 sc, dec. Ch 1, turn. (6 sts)
- Row 7: Dec, 2 sc, dec. Ch 1, turn. (4 sts)
- Row 8: Dec twice. Ch 1, turn. (2 sts)
- Row 9: Dec. Fasten off with a sewing tail. Block and embroider a same-color central vein. Leave unstuffed. (1 st)
Flower Centers and Layering — Make Six
- Round 1: With forest green, work 6 sc in MR. (6 sts)
- Round 2: Inc in every stitch. Sl st to the next stitch and fasten off with a long sewing tail. Make six backing discs. (12 sts per disc)
- Lower layer: Arrange 6 large petals of one color around a disc, with foundation ends meeting at the center. Sew each petal base to 2 consecutive disc stitches. Overlap neighboring bases slightly and tack their lower side edges together. (6 petals secured across 12 disc sts)
- Upper layer: Position 6 matching small petals above the gaps between the large petals. Sew their foundation ends firmly through the center of the lower layer and backing disc. Keep the outer points free. Repeat to make 3 red and 3 ivory flowers. (12 petals per flower)
- Center embroidery: Work 9 closely grouped pale-gold French knots through all layers at the middle of each flower, wrapping the needle twice for each knot. Secure thread ends behind the backing disc. (9 knots per flower)
Veined Leaves — Make 24 in Olive Green
- Foundation: Ch 3. (3 chains)
- Row 1: Sc in the second chain from the hook and the last chain. Ch 1, turn. (2 sts)
- Row 2: Inc twice. Ch 1, turn. (4 sts)
- Row 3: Inc, 2 sc, inc. Ch 1, turn. (6 sts)
- Row 4: Inc, 4 sc, inc. Ch 1, turn. (8 sts)
- Row 5: Sc across. Ch 1, turn. (8 sts)
- Row 6: Dec, 4 sc, dec. Ch 1, turn. (6 sts)
- Row 7: Dec, 2 sc, dec. Ch 1, turn. (4 sts)
- Row 8: Dec twice. Ch 1, turn. (2 sts)
- Row 9: Dec. Fasten off with a sewing tail. The foundation is the leaf base. Do not stuff. (1 st)
- Surface detail: Embroider 1 light-olive central vein from base to tip and 3 short branching veins on each side. Keep the embroidery loose enough for the leaf to remain flat. (7 embroidered vein lines per leaf)
Red Berries — Make 18
- Round 1: With deep red, work 6 sc in MR. (6 sts)
- Round 2: Inc in every stitch. (12 sts)
- Round 3: Sc around. (12 sts)
- Round 4: Sc around. Add a small amount of stuffing. (12 sts)
- Round 5: Dec 6 times. Fasten off with a sewing tail, thread through the front loops of the remaining stitches, and close. Group into 6 clusters of 3 during assembly. (6 sts)
Pinecone Cores — Make Four in Brown
- Round 1: Work 6 sc in MR. This is the narrow top. (6 sts)
- Round 2: Inc in every stitch. (12 sts)
- Round 3: Repeat (sc, inc) 6 times. (18 sts)
- Round 4: Sc around. (18 sts)
- Round 5: Sc around. (18 sts)
- Round 6: Sc around. (18 sts)
- Round 7: Repeat (sc, dec) 6 times. Stuff firmly enough to hold the shape without stretching the fabric. (12 sts)
- Round 8: Dec 6 times. Fasten off, close through the remaining front loops, and retain a long attachment tail at this wider base. (6 sts)
Pinecone Scale Strips — Make Twelve
- Foundation: With brown, ch 13. Make 3 strips for each pinecone. (13 chains)
- Row 1: Beginning with the second chain from the hook, repeat (skip 1 chain, work sc, hdc, dc, hdc, sc all in the next chain, skip 1 chain) 4 times. Fasten off with a long sewing tail. (4 scales; 20 sts)
- Scale highlights: With ivory yarn, embroider a short straight highlight across the outer tip of each scale, leaving its base brown. Secure ends on the reverse. (4 highlights per strip)
- Attachment: Curve one strip around core round 3, one around round 5, and one around round 7. Sew only the foundation edges to the core; let the scallops lift outward. Offset the scales between tiers. (3 strips and 12 scales per pinecone)
Bow Loop Band — Make One in Deep Red
- Foundation: Ch 61. (61 chains)
- Row 1: Sc in the second chain from the hook and across. Ch 1, turn. (60 sts)
- Row 2: Sc across. Ch 1, turn. (60 sts)
- Row 3: Sc across. Ch 1, turn. (60 sts)
- Row 4: Sc across. Ch 1, turn. (60 sts)
- Row 5: Sc across. Ch 1, turn. (60 sts)
- Row 6: Sc across. Ch 1, turn. (60 sts)
- Row 7: Sc across. Ch 1, turn. (60 sts)
- Row 8: Sc across. Fasten off with a long sewing tail. (60 sts)
- Shaping: Sew the two short ends together, matching the 8 row ends. Flatten the resulting loop with the seam at the back center, then gather and stitch through its middle to form 2 equal loops. (8 seam pairs; 2 bow loops)
Pointed Bow Tails — Make Two in Deep Red
- Foundation: Ch 25. (25 chains)
- Row 1: Sc in the second chain from the hook and across. Ch 1, turn. (24 sts)
- Row 2: Inc in the first stitch, sc in the next 21 stitches, dec over the final 2 stitches. Ch 1, turn. (24 sts)
- Row 3: Dec, sc in the next 21 stitches, inc in the last stitch. Ch 1, turn. (24 sts)
- Row 4: Inc, 21 sc, dec. Ch 1, turn. (24 sts)
- Row 5: Dec, 21 sc, inc. Ch 1, turn. (24 sts)
- Row 6: Inc, 21 sc, dec. Ch 1, turn. (24 sts)
- Row 7: Dec, 21 sc, inc. Ch 1, turn. (24 sts)
- Row 8: Inc, 21 sc, dec. Fasten off with a long sewing tail. Block into a slanted ribbon shape. Each tail’s long direction follows its 24 stitches. (24 sts)
- Attachment preparation: Overlap one short end of each tail behind the gathered loop band, angling the free ends apart. Sew through all layers at the bow center. (2 tails attached)
Bow Center Wrap — Make One in Deep Red
- Foundation: Ch 13. (13 chains)
- Row 1: Sc in the second chain from the hook and across. Ch 1, turn. (12 sts)
- Row 2: Sc across. Ch 1, turn. (12 sts)
- Row 3: Sc across. Ch 1, turn. (12 sts)
- Row 4: Sc across. Fasten off with a long tail. (12 sts)
- Wrapping: Place the strip around the gathered bow center, with its 12-stitch length encircling the layers. Overlap and sew the short ends behind the bow, then stitch the wrap to the underlying gathering stitches. (1 secured center wrap)
Finishing
Block all petals, leaves, and ribbon pieces before final assembly. If using stiffener, apply it sparingly to the reverse of the petals and leaves, following the product directions, and let everything dry completely. Keep sewing areas flexible.
Place the wreath flat with the intended front at six o’clock. Pin red flowers at approximately ten, two, and six o’clock. Pin ivory flowers at twelve, four, and eight o’clock. Rotate each flower so its points interlock with the neighboring flowers without flattening their upper layers. Sew each backing disc securely to the covered form, then add two small anchoring stitches through lower petals where needed.
Arrange four leaves around each flower, sliding their bases underneath the petals and allowing their embroidered tips to show. Sew each leaf at its base and add a discreet stitch near its middle. Position the four pinecones in gaps between flowers with their narrow tops tilted outward. Sew through each core base and the ring cover several times.
Place one three-berry cluster near each flower. Sew each berry individually to the cover, then tack neighboring berries together so the cluster cannot swivel. Attach the bow at six o’clock beneath the front red flower, sewing through the center wrap and the back of both loops. Let the tails extend over the outer edge.
Weave in every remaining end and remove all pins. Check that the wreath sits flat and that all attached pieces resist a gentle tug. Set any LED candle tray independently inside the opening, with no pressure against the crochet. This centerpiece is a decorative item, not a toy, and must never be used with real flames.
Tips for Success
- Fit both annular panels before adding the walls; a panel that already cups will not lie smoothly over the flat form.
- Use the same yarn weight for both flower colors so the six flowers have comparable size and structure.
- Keep the small petal tips free when sewing the upper layers; this creates the raised poinsettia shape.
- Secure pinecone scale strips only along their foundation edges so the scales remain distinct.
- Pin the complete arrangement before sewing and check the balance from directly above.
Common Mistakes to Avoid
- Using a round foam torus: the shallow walls are designed for a flat form. Choose the specified form before making the cover.
- Counting the joining slip stitch as a stitch: exclude it and the starting chain from every joined-round total.
- Pulling leaf embroidery too tight: loosen any vein that makes the leaf curl into a tube.
- Sewing through the outer ends of every petal: attach the bases and only a few lower-layer anchor points to preserve depth.
- Overstuffing berries: use small tufts so the decreases close cleanly and the stitches do not separate.
Ways to Customize This Pattern
- Replace deep red with burgundy while keeping the ivory flowers and olive leaves for the same balanced layout.
- Use three shades of green for the leaves, keeping the yarn weight consistent and the veins lighter than their backgrounds.
- Replace ivory pinecone highlights with pale tan for a quieter woodland finish.
- Omit the candle tray and place a small, lightweight decorative bowl independently inside the opening.
- Make a shorter bow by beginning each tail with 19 chains and working 18 stitches per row; replace each 21-sc section in rows 2–8 with 15 sc.
Frequently asked questions
Yes, but the fitted cover needs recalculation. Match the foundation circumference to the inner opening and the final round circumference to the outside edge using your blocked stitch gauge. The six-flower arrangement also needs a new spacing check.
Use firm cotton fabric, block the petals, and sew their bases through the backing discs. A small amount of fabric stiffener on the reverse can support the tips. Keep the upper petals free so the flowers retain their layered shape.
No. Glass holders do not make yarn, stuffing, or foam safe around flame or heat. Use battery-operated LED candles on a separate tray inside the opening.
Dust with a soft brush and spot-clean gently according to the yarn and foam care instructions. Avoid soaking the assembled centerpiece. Store it flat in a roomy box with tissue beneath the flower tips and bow loops.
The finished Poinsettia Wreath Amigurumi Centerpiece

