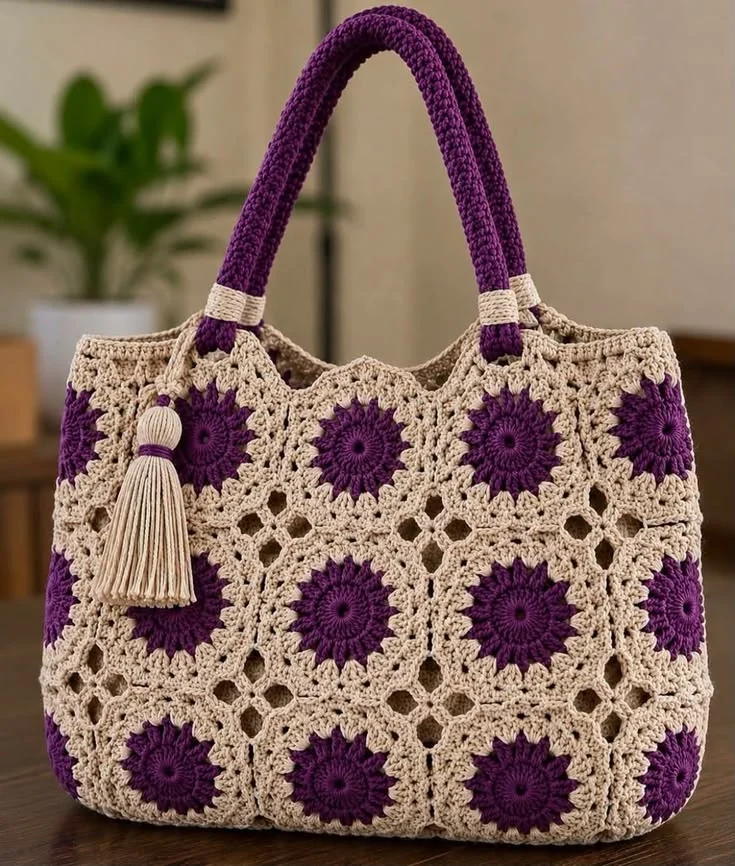
Purple and Cream Crochet Granny Square Tote Bag – Free Floral Bag Pattern
Create a stunning handmade accessory with this purple and cream crochet granny square tote bag pattern. Featuring rich plum-purple flower centers, delicate cream lace motifs, sturdy crocheted shoulder handles, and a beautiful decorative tassel, this elegant bag combines vintage charm with modern everyday style.
The bag is constructed from individual floral granny squares joined together to create a spacious, softly structured tote. Each square features a textured purple flower surrounded by intricate cream crochet stitches, giving the finished bag a romantic, bohemian appearance.
This free crochet floral tote bag pattern is perfect for crocheters who enjoy granny square projects, handmade accessories, and elegant color combinations.
Pattern Information
- Skill Level: Intermediate
- Finished Width: Approximately 34–38 cm
- Finished Height: Approximately 30–33 cm, excluding handles
- Depth: Approximately 8–10 cm
- Handle Drop: Approximately 22–25 cm
- Yarn Weight: Worsted-weight cotton yarn
- Hook Size: 4 mm
- Terminology: US crochet terms
- Construction: Floral granny square motifs, joined panels, reinforced upper edge, and crocheted shoulder handles
- Estimated Time: 12–18 hours
Materials Needed
- Approximately 350–450 g cream or natural cotton yarn
- Approximately 200–250 g deep plum-purple cotton yarn
- 4 mm crochet hook
- 3.5 mm crochet hook for finishing details
- Yarn needle
- Scissors
- Stitch markers
- Measuring tape
- Optional cotton fabric lining
- Optional magnetic snap closure
- Small amount of cream yarn for the decorative tassel
Crochet Abbreviations
- ch: Chain
- sc: Single crochet
- hdc: Half double crochet
- dc: Double crochet
- tr: Treble crochet
- sl st: Slip stitch
- st: Stitch
- sp: Space
- sk: Skip
- MR: Magic ring
- FO: Fasten off
- CL: Cluster stitch
- RS: Right side
- WS: Wrong side
Special Crochet Stitches
Three-Double-Crochet Cluster (CL)
Yarn over, insert the hook into the indicated stitch or space, yarn over and pull up a loop.
Yarn over and pull through two loops.
Repeat this process two more times in the same stitch or space.
Yarn over and pull through all four loops remaining on the hook.
Shell Stitch
Work five double crochet stitches into the same stitch or chain space.
This creates a rounded decorative shell that can be used around the floral motifs.
Part 1: Crochet the Purple Flower Center
Each granny square begins with a beautiful deep-purple flower motif.
Use plum-purple yarn and a 4 mm crochet hook.
Round 1
Make a magic ring.
Ch 3 (counts as first dc).
Work 11 dc into the ring.
Pull the ring closed.
Join with a sl st to the top of the beginning ch-3. (12 dc)
Round 2
Ch 3.
Work 2 dc in the same stitch.
Work 3 dc in each remaining stitch around.
Join with a sl st. (36 dc)
Round 3: Flower Petals
Ch 1.
*Sc in the next stitch, skip 1 stitch, work 5 dc in the following stitch, skip 1 stitch.*
Repeat around, adjusting the final repeat to maintain an even flower shape.
Join with a sl st.
The raised double crochet groups create the textured flower petals.
Round 4
Ch 1.
Work sc stitches evenly around the outer edge of the flower.
Join with a sl st.
FO, leaving a short tail for weaving.
Part 2: Create the Cream Granny Square Border
The cream lace border transforms the purple flower into a decorative square motif.
Round 5
Attach cream yarn to the outer edge of the flower.
Ch 3.
Work 2 dc in the same stitch.
Ch 2.
*Skip 2 stitches, work 3 dc in the next stitch, ch 2.*
Repeat around.
Join with a sl st.
Round 6
Sl st into the first ch-2 space.
Ch 3, work 2 dc in the same space, ch 2.
*Work 3 dc in the next ch-2 space, ch 2.*
Repeat around.
Join with a sl st.
Round 7: Square Formation
Begin shaping the round motif into a square.
Sl st into the first ch-2 space.
Ch 3, work 2 dc, ch 2, and 3 dc in the same space to form a corner.
Continue working groups of 3 dc in the following chain spaces.
Create four evenly spaced corners using (3 dc, ch 2, 3 dc).
Join with a sl st.
Round 8
Ch 3.
Work dc stitches along each side.
At each corner, work (2 dc, ch 2, 2 dc).
Continue around.
Join with a sl st.
Round 9: Decorative Lace
Ch 1.
Sc in the first stitch.
*Ch 3, skip 2 stitches, sc in the next stitch.*
Repeat along each side.
At each corner, work (sc, ch 3, sc).
Join with a sl st.
Round 10
Work a final round of sc stitches around the square.
Work 3 sc into each corner space.
Join with a sl st.
FO and weave in ends.
Block the finished motif into a neat square measuring approximately 10–12 cm.
Part 3: Make the Granny Square Motifs
Repeat the flower and border instructions to create enough motifs for the bag.
For a medium-sized tote, begin with approximately 24–30 granny squares, depending on the finished size of each motif.
Arrange the squares with their purple flower centers facing outward.
Keep the cream borders consistent so the motifs join neatly.
Tip: Make one complete sample square first and measure it before deciding how many motifs are needed.
Part 4: Arrange the Bag Panels
The bag uses a rectangular front panel, a matching back panel, and additional motifs for the sides and base.
Front Panel
Arrange the granny squares into three horizontal rows.
Use four squares per row for a wider tote.
Make sure all purple flowers face the same direction.
Back Panel
Repeat the same arrangement for the back panel.
Side Panels
Use additional granny squares or narrow crochet strips to create the side gussets.
Bottom Panel
Use a sturdy rectangle of single crochet stitches or additional joined motifs to form the base.
The finished base should measure approximately 8–10 cm deep.
Part 5: Join the Granny Squares
Use cream yarn for a neat, nearly invisible finish.
Step 1
Place two granny squares together with right sides facing.
Step 2
Insert the hook through the corresponding edge stitches of both squares.
Step 3
Attach cream yarn.
Step 4
Work sc stitches through both layers along the edge.
Step 5
FO and weave in ends.
Step 6
Repeat until all squares in the front and back panels are connected.
Step 7
Join the side panels and base using the same method.
Step 8
Turn the bag right side out.
Check that all seams are secure and the bag maintains a symmetrical shape.
Part 6: Crochet the Upper Border
The upper edge features a neat cream crochet finish with a subtle decorative scallop.
Round 1
Attach cream yarn at the top edge.
Ch 1.
Work sc stitches evenly around the opening.
Join with a sl st.
Round 2
Ch 1.
Sc in each stitch around.
Join with a sl st.
Round 3
Ch 2.
Hdc in each stitch around.
Join with a sl st.
Round 4: Decorative Edge
*Skip 1 stitch, work 5 dc in the next stitch, skip 1 stitch, sl st in the following stitch.*
Repeat around, adjusting the final repeat if necessary.
FO and weave in ends.
Part 7: Crochet the Purple Shoulder Handles
The bag features two thick plum-purple crocheted handles designed for comfortable shoulder carrying.
Step 1
Using purple yarn, ch 85–95.
Step 2
Sc in the second chain from the hook.
Step 3
Sc in each remaining chain.
Step 4
Ch 1 and turn.
Step 5
Continue working rows of sc until the strap measures approximately 4 cm wide.
Step 6
Fold the strap lengthwise.
Step 7
Join the long edges with sl st to create a thick, rounded handle.
Step 8
FO, leaving long tails for attachment.
Step 9
Repeat to create the second handle.
For extra strength, insert a narrow cotton cord inside each handle before closing it.
Part 8: Attach the Handles
Step 1
Lay the bag flat.
Step 2
Position the first handle on the front panel.
Step 3
Place each end approximately 8–10 cm from the nearest side edge.
Step 4
Sew the handle ends securely to the upper border.
Step 5
Repeat for the second handle on the back panel.
Step 6
Use additional stitches to reinforce each attachment point.
Step 7
Wrap a short strip of cream yarn around each handle attachment to create the decorative cream bands shown in the design.
Step 8
Secure the cream bands with discreet stitches.
Part 9: Make the Cream Tassel
The decorative cream tassel adds a beautiful finishing touch to the purple and cream tote.
Step 1
Cut approximately 30 strands of cream yarn, each measuring 20 cm.
Step 2
Fold the strands in half.
Step 3
Use a separate strand of yarn to tie the folded center securely.
Step 4
Wrap another strand around the tassel approximately 2 cm below the top.
Step 5
Tie securely and hide the ends.
Step 6
Trim the tassel to approximately 10–12 cm long.
Step 7
Wrap a small amount of purple yarn around the upper tassel section for a coordinating accent.
Step 8
Create a small hanging cord using cream yarn.
Step 9
Attach the tassel near the upper left handle.
Part 10: Add an Optional Fabric Lining
A fabric lining improves durability and prevents small items from slipping through the lace openings.
Step 1
Measure the interior dimensions of the finished bag.
Step 2
Cut two pieces of matching cotton fabric, allowing approximately 1 cm for seam allowances.
Step 3
Sew the side seams and bottom seam.
Step 4
Create boxed corners to match the bag’s depth.
Step 5
Fold and press the upper edge of the lining.
Step 6
Insert the lining into the crochet bag.
Step 7
Hand-sew the lining along the upper edge using small, discreet stitches.
For additional functionality, add an interior pocket or magnetic snap closure.
Color Variations
This floral granny square tote bag can be customized with many beautiful color combinations.
- Plum Purple and Cream: Elegant, romantic, and vintage-inspired.
- Sage Green and Ivory: Soft botanical cottagecore style.
- Dusty Rose and Beige: Feminine and delicate.
- Navy Blue and White: Classic coastal elegance.
- Terracotta and Natural Cotton: Warm bohemian charm.
- Chocolate Brown and Cream: Rich earthy sophistication.
- Mustard Yellow and Ivory: Cheerful retro-inspired design.
- Black and Cream: Timeless modern contrast.
Helpful Crochet Tips
- Use cotton yarn for a durable, structured tote.
- Make a sample granny square before starting the full project.
- Block all squares to the same dimensions before joining.
- Keep your purple flower centers consistent.
- Use stitch markers to identify corners.
- Count stitches carefully when shaping each square.
- Maintain even tension throughout the project.
- Join squares with matching cream yarn.
- Reinforce the handle attachment points.
- Use a cotton cord inside the handles for extra durability.
- Add a fabric lining to protect personal belongings.
- Weave in all yarn ends securely.
- Trim the decorative tassel evenly.
- Avoid carrying excessively heavy objects.
- Lay the finished bag flat to dry after washing.
Frequently Asked Questions
Is this crochet granny square tote bag beginner-friendly?
This pattern is best suited to intermediate crocheters who are familiar with working in rounds, creating granny squares, joining motifs, and constructing crochet bags.
What yarn is best for this crochet tote bag?
Worsted-weight cotton yarn is recommended because it provides durability, structure, and clear stitch definition.
How many granny squares do I need?
Approximately 24–30 squares may be needed for a medium-sized tote, depending on the size of each square and the chosen bag construction.
Can I make the bag larger?
Yes. Add more granny squares to the front, back, and side panels to increase the overall dimensions.
Can I make the bag smaller?
Absolutely. Use fewer granny squares or a smaller crochet hook with finer yarn.
Does the bag need a lining?
A lining is optional but highly recommended because the openwork granny squares contain decorative holes.
Can I use acrylic yarn?
Yes, although cotton yarn generally offers better structure and durability for everyday bags.
How can I prevent the handles from stretching?
Use firm crochet stitches, reinforce the attachment points, and consider inserting cotton cord inside the handles.
Can I remove the decorative tassel?
Yes. The tassel is completely optional and can be omitted for a simpler appearance.
Can I sell finished bags made from this pattern?
Yes. You may sell handmade bags created using this original pattern. Credit to the pattern designer is appreciated.
Care Instructions
- Hand wash gently in cool water.
- Use mild detergent suitable for cotton yarn.
- Avoid harsh scrubbing.
- Do not wring or twist the bag.
- Reshape while damp.
- Lay flat to dry.
- Avoid direct heat.
- Do not tumble dry.
- Spot clean the decorative tassel if necessary.
- Store in a clean, dry place.
Final Thoughts
This purple and cream crochet granny square tote bag is a beautiful combination of classic crochet techniques and modern handmade fashion. The rich plum-purple flowers, delicate cream lace borders, sturdy shoulder handles, and charming tassel create an elegant accessory that is both practical and eye-catching.
Whether you make this bag for yourself, give it as a thoughtful handmade gift, or add it to your crochet shop collection, this floral granny square design is a rewarding project that celebrates the timeless beauty of crochet.
Love this free crochet floral tote bag pattern? Save it to Pinterest and share it with your crochet-loving friends for more beautiful handmade inspiration!

