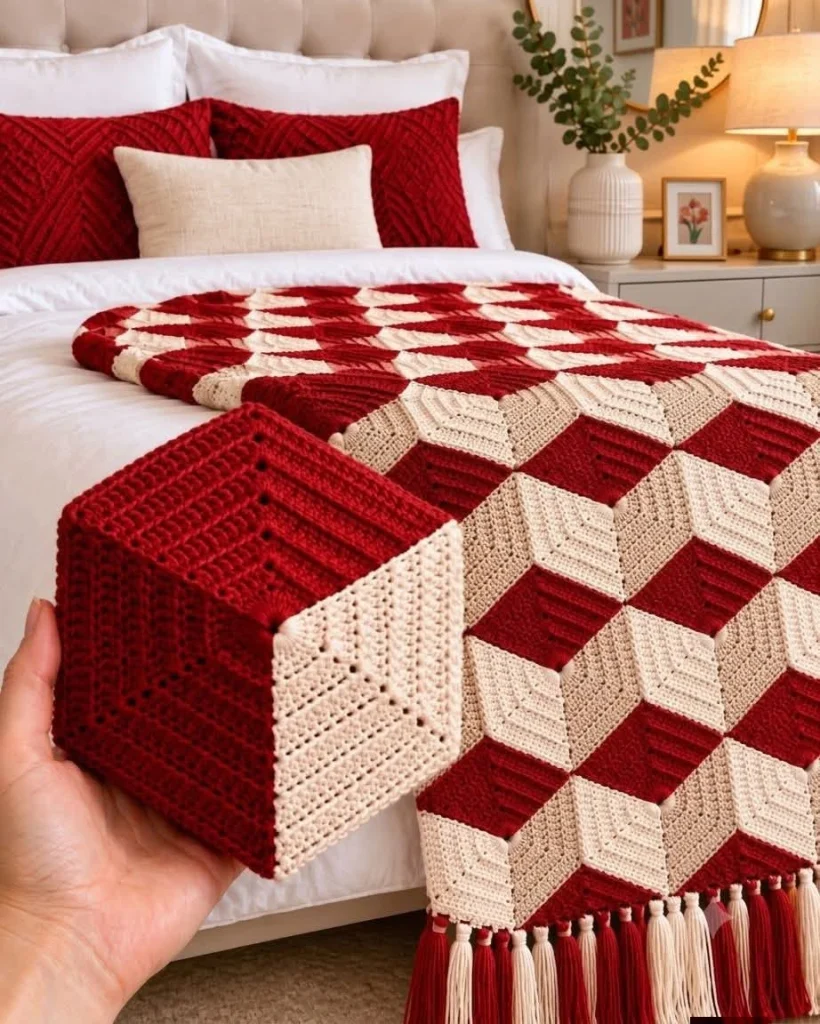
Red and Cream Crochet 3D Cube Blanket Pattern – A Stunning Handmade Geometric Throw
Some crochet blankets are beautiful because of their colors. Others stand out because of their texture. But this gorgeous red and cream crochet 3D cube blanket combines both with a fascinating geometric design that looks almost three-dimensional.
Featuring rich burgundy-red and soft ivory crochet motifs arranged into repeating optical illusion cubes, this handmade blanket brings warmth, elegance, and timeless charm to any bedroom.
The carefully arranged geometric blocks create the illusion of raised and recessed cubes, while the decorative red and cream tassels add a soft, playful finishing touch.
Whether you’re making a cozy bed throw, a meaningful handmade gift, or a statement piece for your home, this crochet blanket is a wonderful project for anyone who loves creative crochet designs.
In this tutorial, we’ll explore the materials, crochet techniques, motif construction, color arrangement, assembly, and finishing details needed to create your own beautiful geometric blanket.
Design note: This is an original interpretation inspired by the photograph. The precise stitch construction and assembly of the photographed blanket cannot be verified from the image alone. The pattern below creates a similar three-dimensional geometric effect rather than an exact reproduction.
Project Overview
- Project: Crochet 3D Cube Blanket
- Style: Geometric, modern farmhouse, optical illusion
- Skill Level: Intermediate
- Technique: Crochet diamond motifs, textured stitches, seaming
- Colors: Burgundy red, ivory cream, warm beige
- Suggested Size: 120 × 160 cm throw
- Yarn: Worsted-weight yarn
- Hook: 5 mm, or size needed to achieve gauge
- Finishing: Decorative red and cream tassels
Materials You’ll Need
- Burgundy-red worsted-weight yarn
- Ivory-cream worsted-weight yarn
- Warm beige worsted-weight yarn
- 5 mm crochet hook
- Yarn needle
- Scissors
- Stitch markers
- Measuring tape
- Blocking mats and pins
- Optional tassel maker or small cardboard template
Choosing the Best Yarn
For a comfortable bed throw, choose a soft acrylic, cotton-blend, or washable wool-blend yarn.
A medium-weight yarn provides enough structure to define the geometric motifs while keeping the blanket soft and flexible.
For the strongest optical illusion effect, use three contrasting shades:
- Dark shade: Burgundy red
- Light shade: Ivory cream
- Medium shade: Warm beige
The combination of light, medium, and dark colors is what makes the cube design appear three-dimensional.
Crochet Abbreviations – US Terms
- ch: Chain
- sc: Single crochet
- hdc: Half double crochet
- dc: Double crochet
- sl st: Slip stitch
- st: Stitch
- inc: Increase
- dec: Decrease
- FO: Fasten off
- RS: Right side
- WS: Wrong side
Understanding the 3D Cube Design
The secret behind this beautiful crochet blanket is the arrangement of diamond-shaped motifs.
Three diamonds in contrasting colors are positioned together to create the appearance of a cube.
Each color represents a different face of the cube:
- The burgundy diamond creates the darkest face.
- The ivory diamond creates the lightest face.
- The beige diamond creates the middle-toned face.
When these diamonds are joined together in the correct orientation, they form a repeating geometric pattern that looks dimensional.
This design is sometimes called a tumbling blocks pattern or a crochet optical illusion blanket.
Part 1 – Crochet the Basic Diamond Motif
Each cube is assembled from three similarly sized diamond-shaped crochet pieces.
The following instructions describe a simple textured diamond made using half double crochet stitches.
Row 1
Ch 3.
Work 1 hdc into the third chain from the hook.
Ch 2 and turn.
Row 2
Work 2 hdc into the first stitch.
Ch 2 and turn.
Row 3
Work 2 hdc into the first stitch.
Work 1 hdc into the remaining stitch.
Ch 2 and turn.
Continue Increasing
Continue adding one stitch at the beginning of each row until the piece reaches the desired width.
For a medium-sized motif, aim for approximately 15–18 stitches across the widest row.
Begin Decreasing
Once the motif reaches its widest point, begin decreasing one stitch at the beginning of each row.
Continue until only one stitch remains.
FO and weave in the ends.
Block the finished piece into a neat diamond shape.
Important: This section is a construction overview, not a fully tested row-by-row diamond pattern. To create matching 60-degree rhombus motifs for a true tumbling-block layout, use a tested diamond chart and verify the angles and stitch counts before making the full blanket.
Part 2 – Add Textured Crochet Details
The beautiful blanket in the inspiration photograph features subtle ridged textures across the geometric shapes.
These textures add dimension and make the cube pattern more visually interesting.
Option 1 – Back Loop Crochet
Work selected rows through the back loop only.
This creates gentle horizontal ridges across the surface.
Option 2 – Front Post Stitches
Use front post double crochet stitches to create raised lines.
These can emphasize the direction of each diamond face.
Option 3 – Surface Crochet
After finishing a motif, add a few rows of surface slip stitches to highlight the geometric structure.
Keep the textures consistent across motifs of the same color.
Part 3 – Create the Three Color Variations
For every complete cube, crochet:
- 1 burgundy-red diamond
- 1 ivory-cream diamond
- 1 warm beige diamond
All three pieces should have the same dimensions.
Blocking each motif before assembly helps maintain the geometric appearance.
Make a small sample cube before starting the full blanket to ensure the pieces fit together correctly.
Part 4 – Arrange the Crochet Cubes
Lay the finished diamond motifs on a flat surface.
Position one dark, one light, and one medium-colored diamond together to create the illusion of a three-dimensional cube.
Arrange the diamonds so their pointed ends meet at the center.
Repeat this arrangement to form rows of connected cubes.
The direction of the color placement should remain consistent throughout the blanket.
Design Tip
Take a photograph of your layout before joining the motifs.
This makes it easier to remember the correct color arrangement and avoid mistakes during assembly.
Part 5 – Join the Crochet Motifs
Once all the motifs are arranged, begin joining them.
Method 1 – Whip Stitch Seam
Place two motifs with their right sides facing each other.
Use a yarn needle and matching yarn to sew along the edges.
Keep the tension even to avoid puckering.
Method 2 – Slip Stitch Join
Hold the motifs together and work slip stitches through corresponding edge stitches.
This creates a neat, slightly raised seam.
Method 3 – Single Crochet Join
Work single crochet stitches along the edges of the motifs.
This method creates a more visible decorative join.
For the smoothest optical illusion effect, use a discreet seam that does not overpower the color arrangement.
Part 6 – Build the Blanket
Begin joining the individual cubes into rows.
Then connect the rows together to form the complete blanket.
Check the geometric alignment frequently.
Lay the blanket flat after joining each row to make sure the edges remain even.
The number of motifs required depends on the size of your diamonds and the desired blanket dimensions.
Suggested Blanket Sizes
- Baby Blanket: Approximately 75 × 95 cm
- Lap Blanket: Approximately 100 × 130 cm
- Throw Blanket: Approximately 120 × 160 cm
- Large Bed Throw: Approximately 150 × 200 cm
Make a sample of three joined diamonds, measure it after blocking, and use those measurements to calculate how many motifs you need.
Part 7 – Crochet the Blanket Border
Once the blanket is assembled, add a simple border to give it a polished finish.
Round 1
Attach ivory yarn at any corner.
Work sc evenly around the blanket.
At each corner, work 3 sc into the corner space.
Join with a sl st.
Round 2
Ch 2.
Work hdc into each stitch around.
At each corner, work 3 hdc into the center corner stitch.
Join with a sl st.
Round 3
Change to burgundy yarn.
Work sc evenly around the blanket.
Join and FO.
Weave in all loose ends securely.
If your assembled blanket has zigzag or pointed edges, first work a shaping border to create the desired outline before following the rectangular border instructions.
Part 8 – Make the Decorative Tassels
The alternating red and cream tassels are a beautiful finishing detail that gives this blanket a cozy, handmade appearance.
Step 1
Cut a piece of cardboard approximately 10–12 cm wide.
Step 2
Wrap yarn around the cardboard 20–30 times.
Step 3
Slide a separate strand of yarn under the wrapped strands and tie securely at the top.
Step 4
Remove the yarn from the cardboard.
Step 5
Wrap another strand around the bundle approximately 1–2 cm below the top.
Step 6
Cut the loops at the bottom and trim the ends evenly.
Step 7
Attach the tassel to the blanket border using the top yarn strands.
Alternate burgundy and ivory tassels for a coordinated finish.
Space them evenly along the short edges or around the entire blanket, depending on your preferred style.
How to Make the Blanket Look More Luxurious
- Choose soft yarn with excellent stitch definition.
- Keep all diamond motifs the same size.
- Use three clearly contrasting colors.
- Maintain the same cube orientation throughout.
- Block every motif before joining.
- Use neat, even seams.
- Add consistent textured ridges.
- Trim all tassels to the same length.
- Weave in yarn ends carefully.
- Block the completed blanket for a professional finish.
Creative Color Combinations
Christmas Red and Cream
Deep red, warm beige, and ivory for a cozy festive bedroom.
Sage Green and Ivory
Sage green, cream, and taupe for a peaceful farmhouse aesthetic.
Chocolate and Caramel
Dark brown, caramel, and cream for a warm autumn-inspired throw.
Dusty Rose and Beige
Soft rose, beige, and ivory for a romantic bedroom.
Navy Blue and Gray
Navy, silver gray, and white for a modern geometric design.
How to Care for Your Crochet Cube Blanket
To keep your handmade blanket looking beautiful, always follow the care instructions for the yarn you choose.
- Use a gentle washing cycle if the yarn is machine washable.
- Place delicate blankets inside a large laundry bag.
- Use mild detergent.
- Avoid harsh bleach.
- Lay flat to dry whenever possible.
- Reshape the blanket while damp.
- Store folded in a cool, dry place.
For blankets with long tassels, hand washing may help prevent tangling.
Frequently Asked Questions
Is the crochet 3D cube blanket difficult to make?
This project is best for intermediate crocheters because it requires consistent motif sizing, geometric arrangement, and careful joining.
What creates the 3D cube illusion?
The illusion comes from combining three diamond-shaped motifs in contrasting light, medium, and dark shades.
Can beginners make this blanket?
Confident beginners can practice the individual motifs, but should use a tested diamond pattern before attempting a full-size blanket.
What yarn works best?
Soft worsted-weight acrylic or cotton-blend yarn is a practical choice for a comfortable and durable blanket.
Can I make this blanket without tassels?
Yes. The geometric cube design looks beautiful with or without tassels.
Can I change the colors?
Absolutely! Choose any three colors with enough contrast to preserve the optical illusion effect.
How many motifs will I need?
The number depends on your gauge, motif size, and desired blanket dimensions. Make and measure a sample before calculating the full quantity.
Can I use this design for a cushion?
Yes! The geometric motif arrangement also works beautifully for cushion covers, wall hangings, table runners, and smaller home accessories.
Final Thoughts
This beautiful red and cream crochet 3D cube blanket is more than a cozy home accessory. It’s a creative combination of color, texture, and geometric design that transforms simple crochet motifs into a striking handmade statement piece.
The rich burgundy tones, soft cream details, repeating optical illusion cubes, and playful tassels create a timeless blanket that looks beautiful in both modern and traditional bedrooms.
Whether you’re making it for your own home or as a thoughtful handmade gift, this project is a wonderful opportunity to explore the beauty of geometric crochet.
Save this idea, gather your favorite yarn colors, and start planning your next cozy crochet masterpiece.
Happy crocheting! 🧶❤️

