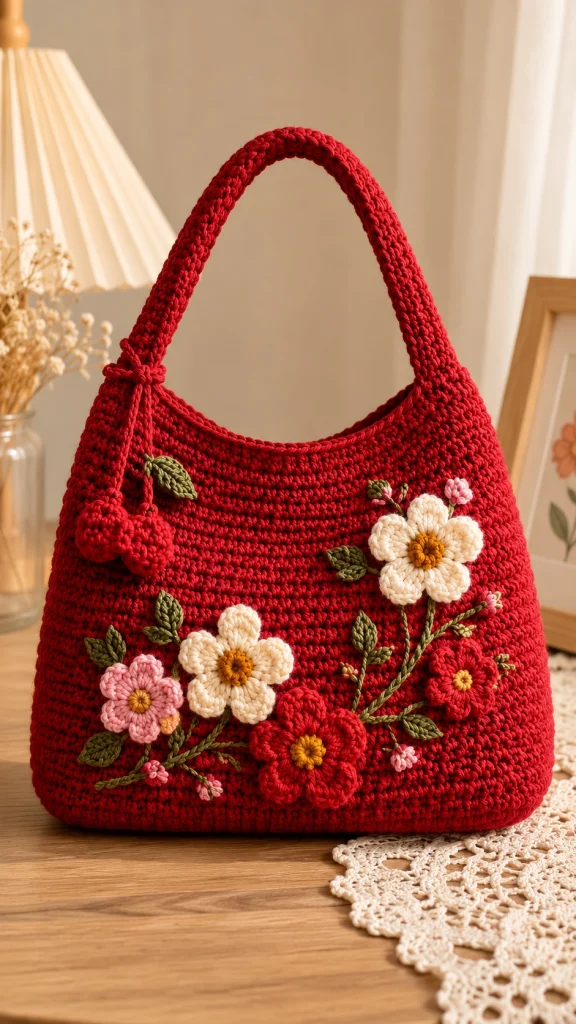
Red Floral Crochet Hobo Bag – Free Pattern
Create a stunning handmade accessory with this red floral crochet hobo bag pattern. Featuring a rich crimson body, dimensional crochet flowers, delicate green vines, and playful cherry charms, this bag combines romantic cottagecore details with a practical everyday design.
The softly rounded silhouette and integrated-looking shoulder strap make this crochet purse both elegant and comfortable to carry. Its floral decorations add texture and personality without overwhelming the beautiful red background.
This free crochet bag pattern guides you through making the structured base, main body, reinforced shoulder strap, decorative flowers, embroidered leaves, and cherry embellishments.
The instructions below are an original construction inspired by the reference photograph, rather than an exact reproduction of an existing designer pattern.
Pattern at a Glance
Materials and Supplies
- Approximately 450–550 g of sturdy cotton or cotton-blend yarn in crimson red, depending on yarn weight and gauge.
- Small quantities of cream, soft pink, bright red, golden yellow, and olive-green cotton yarn for decorations.
- 4 mm crochet hook for the main bag, or size needed to achieve a firm fabric.
- 3 mm crochet hook for flowers and small decorations.
- Stitch markers.
- Yarn needle.
- Scissors.
- Measuring tape.
- Optional cotton lining fabric.
- Optional magnetic snap closure.
- Optional lightweight plastic canvas for reinforcing the base.
Abbreviations
Gauge and Sizing
Suggested gauge
Approximately 18 sc and 20 rounds = 10 cm using the main red yarn and a 4 mm hook.
Work a 15 × 15 cm sample in single crochet, then measure the central 10 cm.
The finished dimensions depend on your yarn thickness, tension, and blocking.
For a larger bag, add additional increase rounds to the oval base and increase the body height.
Part 1: Crochet the Oval Bag Base
Begin with crimson red yarn and the 4 mm crochet hook.
Foundation and base rounds
Foundation: Ch 37.
Round 1: Starting in the second chain from the hook, sc in the next 35 chains, 3 sc in the last chain. Continue along the opposite side of the foundation chain, sc in the next 34 chains, then 2 sc in the remaining end chain. (74 sc)
Round 2: Sc in the next 35 stitches, inc in each of the next 3 stitches, sc in the next 34 stitches, inc in each of the next 2 stitches. (79 sc)
Round 3: Sc evenly around, adding increases at the curved ends as necessary to keep the oval flat.
Rounds 4–8: Continue increasing around the curved ends, spacing increases evenly and checking that the base remains flat.
Stop when the oval measures approximately 34 cm long and 10 cm wide.
Mark the beginning of the round.
Part 2: Build the Main Bag Body
Body construction
Round 1: Working in BLO, sc in every stitch around the oval base.
This creates a defined turning edge between the base and sides.
Rounds 2–10: Sc in every stitch around without increases.
Continue working in continuous spiral rounds, moving the stitch marker after each completed round.
The sides will begin rising vertically from the oval base.
Rounds 11–45: Continue sc evenly around.
Measure the body periodically. Stop when the sides reach approximately 25 cm above the base.
Maintain firm, even tension to create the closely textured surface shown in the reference image.
Part 3: Shape the Upper Opening
The bag features a gently curved upper edge that creates a soft hobo silhouette.
Upper shaping
- Lay the bag flat and mark the center front and center back.
- Place additional markers approximately 7 cm to either side of each center point.
- Continue crocheting around the upper edge.
- Use short rows or gradual decreases near the side sections to create a shallow curved opening.
- Keep both sides symmetrical.
- Finish with one round of sc around the entire opening.
The front and back should curve slightly downward toward the center, with taller side areas supporting the shoulder strap.
At the center, aim for a body height of approximately 28–30 cm from the bottom edge.
Part 4: Crochet the Reinforced Shoulder Strap
The wide red strap is one of the most distinctive features of this handmade bag.
Shoulder strap instructions
Using crimson red yarn:
Foundation: Ch 11.
Row 1: Sc in the second chain from the hook and in each chain across. (10 sc)
Rows 2–120: Ch 1, turn. Sc in every stitch across. (10 sc)
Adjust the number of rows until the strap measures approximately 60–65 cm before attachment.
FO, leaving a long sewing tail.
Reinforce the strap
- Crochet a second identical strap piece.
- Place both pieces together with the right sides facing outward.
- Join them by working sc evenly around the edges.
- Optionally insert a narrow strip of nonstretch cotton webbing between the layers before closing.
- Secure all ends carefully.
This creates a thick, comfortable shoulder strap that is less likely to stretch under the weight of the bag.
Part 5: Attach the Shoulder Strap
Strap assembly
- Lay the bag flat.
- Identify the left and right side sections.
- Position one end of the strap against the inside of the left side.
- Overlap approximately 5 cm of strap with the bag body.
- Sew firmly using matching red yarn.
- Repeat on the right side.
- Reinforce each attachment with several rows of secure stitching.
Check that the strap forms a smooth arch without twisting.
Try the bag on your shoulder before permanently finishing the attachment.
Part 6: Crochet the Large Five-Petal Flowers
The decorative flowers give the bag its beautiful romantic appearance.
Make approximately five large flowers in cream, soft pink, and red.
Large flower pattern
Use a 3 mm hook and your chosen flower color.
Round 1: Make a MR, ch 1, work 10 sc into the ring. Join with sl st. (10 sc)
Round 2: *Ch 3, skip 1 stitch, sl st into the next stitch.* Repeat five times to create five petal loops.
Round 3: Into each chain-3 loop, work:
- 1 sc
- 1 hdc
- 3 dc
- 1 hdc
- 1 sc
Repeat for all five petals.
Round 4: Work a round of sc around the petals, adding an extra sc near each petal tip if a fuller shape is desired.
FO, leaving a long tail for sewing.
Gently shape the petals outward.
Part 7: Crochet the Golden Flower Centers
Flower center pattern
Using golden yellow yarn:
Round 1: MR, work 6 sc into the ring. (6 sc)
Round 2: Inc in each stitch around. (12 sc)
FO, leaving a sewing tail.
Position the golden center over the middle of each flower.
Sew securely in place, adding a small amount of stuffing underneath if you want a slightly raised center.
Part 8: Crochet the Small Pink Flower Buds
Small pink blossoms fill the spaces between the larger flowers.
Mini flower pattern
Make approximately six to eight small flowers.
Round 1: MR, work 5 sc into the ring.
Round 2: *Ch 2, dc into the same stitch, ch 2, sl st into the same stitch.* Repeat in each of the five stitches.
FO, leaving a sewing tail.
Attach the flowers along the decorative vines to create a delicate floral arrangement.
Part 9: Crochet the Olive-Green Leaves
Green leaves add contrast and create a beautiful botanical effect against the red bag.
Leaf pattern
Using olive-green yarn:
Foundation: Ch 10.
Starting in the second chain from the hook:
- Sl st in the first chain.
- Sc in the next chain.
- Hdc in the next chain.
- Dc in each of the next 3 chains.
- Hdc in the next chain.
- Sc in the next chain.
- Work 3 sc into the last chain.
- Continue along the opposite side of the foundation chain, mirroring the stitches.
- Join with a sl st.
FO, leaving a long tail.
Make approximately 12–16 leaves in varying sizes.
For smaller leaves, begin with fewer chains and shorten the center section.
Part 10: Add the Decorative Vines
The floral arrangement is connected with delicate olive-green stems.
Embroidered vine instructions
- Thread a yarn needle with olive-green yarn.
- Lay the bag flat with the front facing upward.
- Plan a gently curved vine across the lower front.
- Use chain stitch or stem stitch embroidery to create the main vine.
- Add smaller branching stems toward the upper right and lower left.
- Secure the embroidery ends on the inside of the bag.
Use the reference photograph as inspiration for the placement of the branches.
Keep the vine arrangement asymmetrical for a natural botanical appearance.
Part 11: Crochet the Cherry Charms
The pair of dangling red cherries adds a playful handmade detail near the upper left side of the bag.
Cherry pattern – Make 2
Using crimson red yarn and a 3 mm hook:
Round 1: MR, 6 sc. (6)
Round 2: Inc in each stitch. (12)
Round 3: *Sc 1, inc* repeat 6 times. (18)
Rounds 4–6: Sc around. (18)
Round 7: *Sc 1, dec* repeat 6 times. (12)
Stuff lightly.
Round 8: Dec around. (6)
FO and close the opening securely.
Cherry stems
Ch 20 using matching red yarn for each cherry stem.
Attach one end to the top of the cherry and the other to the upper side of the bag.
Position the two cherries at slightly different heights.
Part 12: Arrange and Attach the Flowers
Floral placement guide
| Decoration | Suggested placement |
|---|---|
| Large cream flower | Upper right |
| Medium cream flower | Lower left-center |
| Large red flower | Lower center |
| Soft pink flower | Lower left |
| Small red flower | Lower right |
| Olive-green leaves | Along the vines |
| Mini pink buds | Between large flowers |
| Cherry charms | Upper left side |
Pin the decorations in place before sewing.
Check the overall composition and adjust the spacing until the flowers look balanced.
Use the long yarn tails to sew each appliqué securely to the bag surface.
Part 13: Add an Optional Fabric Lining
A lining helps protect the crochet stitches and gives the bag a more professional finish.
Lining instructions
- Measure the interior width, height, and depth of the finished bag.
- Cut two lining panels and a base panel, allowing approximately 1 cm seam allowance.
- Sew the lining pieces together to form a bag-shaped insert.
- Turn the top edge of the lining inward.
- Place the lining inside the crochet bag.
- Hand-stitch the lining around the upper opening.
- Keep the lining slightly loose to avoid pulling on the crochet fabric.
For extra structure, insert lightweight plastic canvas between the crochet base and lining.
Part 14: Add an Optional Magnetic Closure
Closure installation
- Mark the center of the front and back upper edges.
- Position the magnetic snap approximately 2 cm below the opening.
- Install the closure through reinforced lining fabric.
- Use small fabric reinforcement patches behind each snap component.
- Check that the closure aligns correctly.
A magnetic snap helps keep smaller belongings secure inside the bag.
Part 15: Final Finishing
Finishing checklist
- Weave in all remaining yarn tails.
- Check the strap attachment points.
- Reinforce loose flower petals if needed.
- Make sure all leaves and embroidered vines are secure.
- Gently shape the bag by hand.
- Check that the base sits evenly.
- Allow the bag to dry completely if gentle wet shaping was used.
Your red floral crochet hobo bag is now ready to use!
How to Customize Your Crochet Bag
Romantic pink version
Use dusty pink yarn for the body and ivory flowers for a delicate feminine design.
Classic cream version
Choose an ivory body with red and pink flowers for an elegant cottagecore accessory.
Autumn floral version
Use terracotta yarn with mustard, cream, and olive-green decorations.
Minimalist version
Keep the red body and add only one large cream flower near the lower corner.
Garden-inspired version
Add extra flowers, tiny buds, and embroidered leaves across the front panel.
Tips for a Professional Finish
- Use cotton yarn for better shape retention.
- Keep the main body stitches firm and even.
- Reinforce the shoulder strap to reduce stretching.
- Attach appliqués before installing the lining.
- Use matching thread or yarn for invisible seams.
- Do not overcrowd the floral arrangement.
- Keep cherry charms short enough to avoid snagging.
- Test the bag with lightweight items before everyday use.
- Add a lining for durability and a neat interior.
Frequently Asked Questions
Is this floral crochet bag suitable for beginners?
This project is best suited to intermediate crocheters. Beginners familiar with single crochet, increases, decreases, and basic sewing can also attempt it with patience.
What yarn works best for a crochet shoulder bag?
Cotton or cotton-blend yarn is a good choice because it produces sturdy stitches and helps the bag retain its shape.
How do I stop the shoulder strap from stretching?
Use a dense stitch pattern, double the strap thickness, and consider adding nonstretch cotton webbing inside the strap.
Can I make the bag larger?
Yes. Increase the oval base dimensions and add more body rounds. You may also lengthen the strap to maintain comfortable proportions.
Can I remove the floral decorations?
Absolutely. The red crochet bag can be used without appliqués for a clean, minimalist look.
Do I need to add a lining?
A lining is optional, but recommended for everyday use because it helps prevent small objects from slipping through stitches and reduces wear on the crochet fabric.
Care Instructions
- Spot-clean with mild detergent whenever possible.
- Hand-wash gently in cool water if your yarn allows it.
- Avoid twisting or wringing the bag.
- Reshape while damp.
- Dry flat away from direct heat.
- Do not hang the bag while wet.
- Store with light tissue paper inside to preserve its shape.
Final Thoughts
This red floral crochet hobo bag is a beautiful combination of practical handmade design and romantic botanical details.
With its bold crimson color, comfortable shoulder strap, delicate crochet flowers, embroidered vines, and charming cherry embellishments, it makes a lovely everyday accessory or thoughtful handmade gift.
Experiment with different colors and floral arrangements to create a truly personal version of this crochet bag.
Love this free floral crochet bag pattern? Save it to Pinterest and share it with your crochet friends for more beautiful handmade inspiration!

