Ribbed Crochet Christmas Bauble Ornament Pattern
Beginner Friendly
Perfect for those just starting their crochet journey, with clear instructions and simple techniques
Single-Day Project
A satisfying project you can complete in a single afternoon or evening.
Handmade Gift
A beautiful keepsake — free forever. Read online or print at home.
About This Ribbed Crochet Christmas Bauble Ornament Pattern
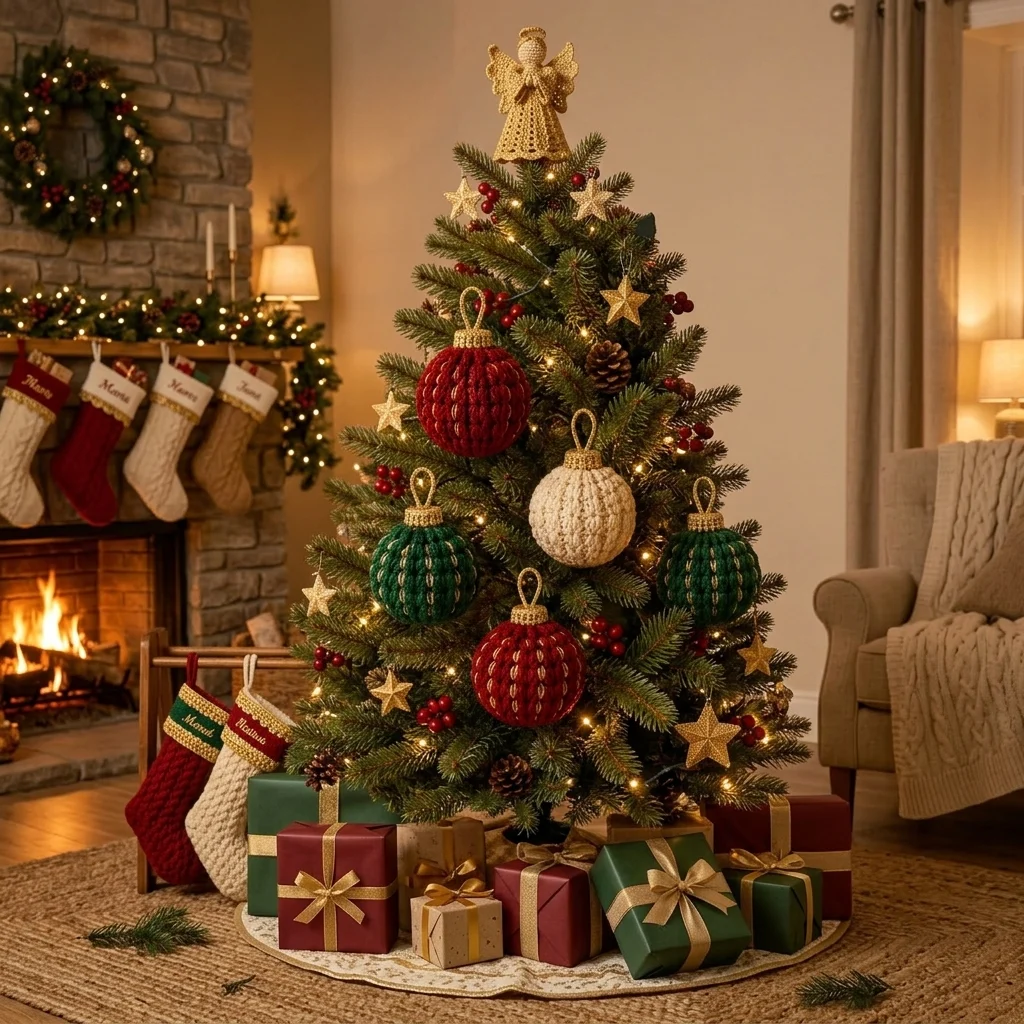
This crochet Christmas bauble pattern creates richly textured round ornaments with deep vertical ribs, subtle gold highlights, a structured metallic cap, and a matching hanging loop. Worked in classic Christmas red, evergreen, and warm cream, the finished baubles have the substantial handmade texture of the ornaments shown in the reference photo while remaining light enough to hang comfortably from a tree branch.
The construction combines spherical amigurumi shaping with raised post-stitch ribs rather than relying on a plain crocheted ball. The red and green versions include fine gold accent lines between selected ribs, while the cream version lets the sculptural stitch texture stand on its own. A separately crocheted gold cap hides the closing rounds and creates the polished appearance of a traditional glass Christmas ornament.
This is an advanced pattern that takes approximately 2-3 hours per bauble. It is suited to crocheters comfortable with increases and decreases, front-post stitches, maintaining stitch counts while shaping a sphere, working with metallic thread, firm stuffing, surface embroidery, and assembling small structured pieces. A complete set in all three colors makes a coordinated handmade Christmas-tree collection.
Materials
- DK / light worsted cotton or cotton-blend yarn in deep Christmas red approximately 35-40 m per bauble
- DK / light worsted cotton or cotton-blend yarn in evergreen approximately 35-40 m per bauble
- DK / light worsted cotton or cotton-blend yarn in warm cream approximately 35-40 m per bauble
- Fine metallic gold crochet thread or embroidery thread approximately 8-10 m per bauble
- 3.5 mm crochet hook for the bauble body
- 2.5 mm crochet hook for the gold cap and hanging loop
- Polyester fiberfill approximately 15-20 g per bauble
- Yarn needle for closing, embroidery, and assembly
- Embroidery needle for metallic gold details
- Stitch markers at least 2
- Scissors 1 pair
- Optional 7-8 cm lightweight foam ball instead of fiberfill for an especially perfect sphere
Abbreviations
MRmagic ringchchainsl stslip stitchscsingle crochethdchalf double crochetdcdouble crochetFPdcfront post double crochetinc2 single crochet in the same stitchdecinvisible single crochet decreaseststitchstsstitchesFLOfront loop onlyBLOback loop onlyRibbed Bauble Body – Make 1 per Ornament
- Round 1: With red, evergreen, or cream yarn, make 6 sc in MR. Do not join; continue in a spiral. (6 sts)
- Round 2: Inc in each st around. (12 sts)
- Round 3: (Sc in next st, inc in next st) 6 times. (18 sts)
- Round 4: (Sc in next 2 sts, inc in next st) 6 times. (24 sts)
- Round 5: (Sc in next 3 sts, inc in next st) 6 times. (30 sts)
- Round 6: (Sc in next 4 sts, inc in next st) 6 times. (36 sts)
- Round 7: (Sc in next 5 sts, inc in next st) 6 times. (42 sts)
- Round 8: (Sc in next 6 sts, inc in next st) 6 times. (48 sts)
- Round 9: (Sc in next 7 sts, inc in next st) 6 times. (54 sts)
- Rounds 10-17: Sc in each st around. (54 sts per round)
- Round 18: (Sc in next 7 sts, dec) 6 times. (48 sts)
- Round 19: (Sc in next 6 sts, dec) 6 times. (42 sts)
- Round 20: (Sc in next 5 sts, dec) 6 times. (36 sts)
- Begin stuffing firmly and evenly. Shape the center into a round sphere without flattening the bottom.
- Round 21: (Sc in next 4 sts, dec) 6 times. (30 sts)
- Round 22: (Sc in next 3 sts, dec) 6 times. (24 sts)
- Add more stuffing, concentrating small amounts around the upper curve. Keep the top centered.
- Round 23: (Sc in next 2 sts, dec) 6 times. (18 sts)
- Round 24: (Sc in next st, dec) 6 times. (12 sts)
- Finish stuffing. The ball should feel firm but not so tight that the stitches spread apart.
- Round 25: Dec 6 times. (6 sts)
- Fasten off, thread the tail through the front loops of the remaining 6 sts, pull tightly closed, and secure the yarn inside the ball.
Raised Vertical Ribs – Make 12 per Ornament
- Mark 12 evenly spaced vertical paths around the bauble. Each rib should run from near the lower center to near the upper closing point.
- Join matching body-color yarn approximately 1 cm from the bottom center. Work upward using surface sl sts through the body stitches, following one marked vertical path.
- On the next pass, work FPdc-style raised stitches around the surface slip-stitch ridge wherever the fabric allows, keeping each stitch snug against the ball. This produces the thick corded rib visible in the reference ornaments.
- Stop approximately 1 cm below the upper closing point. Fasten off and hide both ends inside the ornament.
- Repeat for the remaining 11 ribs, keeping the spacing as even as possible around the circumference.
- After completing all ribs, roll the ornament gently between your palms to restore the spherical shape without flattening the raised texture.
Gold Accent Lines – Red and Green Baubles
- Thread a long strand of fine metallic gold yarn onto an embroidery needle. Do not double the thread unless it is extremely fine.
- Beginning close to the lower center, bring the needle to the surface between two raised ribs.
- Work a vertical chain-style surface embroidery line toward the top of the ornament, following the valley between the ribs. Keep the metallic stitches loose enough to follow the sphere without cutting into the crochet.
- Stop approximately 1 cm below the upper center. Secure the thread inside the bauble.
- Repeat in alternating valleys around the ornament for 6 evenly spaced gold lines. Leave the cream version without these lines for the softer monochromatic appearance shown in the reference.
Gold Ornament Cap – Make 1 per Bauble
- Round 1: With metallic gold yarn and 2.5 mm hook, make 6 sc in MR. Join with sl st. (6 sts)
- Round 2: Ch 1, inc in each st around. Join. (12 sts)
- Round 3: Ch 1, (sc in next st, inc) 6 times. Join. (18 sts)
- Round 4: Working in BLO, sc in each st around. Join. (18 sts)
- Round 5: Sc in each st around. Join. (18 sts)
- Round 6: (Sc in next 2 sts, inc in next st) 6 times. Join. (24 sts)
- Round 7: Working in FLO, (sl st in next st, ch 2, hdc in same st, sl st in next st) 12 times to create a subtle decorative lower rim.
- Fasten off leaving a 30 cm tail for attaching the cap to the bauble.
Gold Hanging Loop – Make 1 per Bauble
- With metallic gold yarn and 2.5 mm hook, ch 36.
- Beginning in second ch from hook, sl st in each chain back to the beginning. (35 sl sts)
- Fasten off leaving two long ends. Fold the cord in half to form a loop approximately 7-8 cm long.
- Thread both ends through the center opening of the gold cap from top to bottom.
- Tie the ends securely together beneath the cap, then stitch the knot to the top center of the bauble so the hanging loop cannot pull free.
Optional Extra-Textured Rib Overlay
- For the strongly sculpted red and green appearance in the reference photo, join matching yarn at the bottom end of one completed rib.
- Work surface sl sts upward along the center of the rib, inserting the hook beneath each raised stitch rather than through the stuffed body.
- At every third rib stitch, make one slightly elongated sl st to emphasize the braided texture without increasing the width.
- Fasten off beneath the future gold cap. Repeat on all 12 ribs.
- For the cream ornament, use the same technique with cream yarn but omit metallic accents for a softer tone-on-tone texture.
Cap Assembly
- Center the gold cap directly over the closed top of the stuffed bauble. The decorative rim should cover the ends of the vertical ribs and metallic accent lines.
- Pin the cap in place at four evenly spaced points. Check that the hanging loop emerges vertically from the center before sewing.
- Using the long gold tail, sew through the bottom edge of the cap and corresponding body stitches around the entire circumference.
- Make a second reinforcing pass around the cap if the ornament will be handled frequently. Keep all reinforcing stitches underneath the decorative rim.
- Secure the yarn firmly and hide the end inside the ornament.
Red Christmas Bauble
- Crochet the complete spherical body using deep Christmas red yarn.
- Add all 12 raised ribs in matching red yarn.
- Add 6 metallic gold accent lines in alternating valleys between the ribs.
- Attach one metallic gold cap and matching hanging loop.
- Shape the ribs with your fingers so they curve evenly from the lower center toward the gold cap.
Evergreen Christmas Bauble
- Crochet the complete spherical body using deep evergreen yarn.
- Add all 12 raised ribs in matching evergreen yarn.
- Add 6 metallic gold accent lines between alternating ribs, keeping their placement identical to the red ornament.
- Attach one metallic gold cap and matching hanging loop.
- Check the ornament beside the red version and reshape if necessary so both baubles have matching diameters.
Cream Christmas Bauble
- Crochet the complete spherical body using warm cream yarn.
- Add all 12 raised ribs using matching cream yarn for a fully textured monochromatic surface.
- Omit the vertical gold embroidery lines so the cream stitches remain the main visual feature.
- Attach the same metallic gold cap and hanging loop used on the red and green ornaments.
- Shape the finished ornament gently so the cream ribs remain symmetrical and clearly separated.
Finishing
Inspect the ornament from every angle before weaving in the final ends. The 12 ribs should be evenly distributed, the gold accent lines should run through the valleys rather than across the raised stitches, and the cap should sit horizontally at the top of the sphere. If one section looks flatter than the others, massage the stuffing through the crochet until the curve becomes even.
Secure every metallic thread end carefully because metallic fibers can be more slippery than ordinary yarn. Shape the hanging loop into a narrow oval and make sure its base cannot move independently of the cap. Do not aggressively steam the finished bauble, especially if the yarn contains synthetic fibers or metallic thread. Gentle hand shaping is usually enough to produce a polished round ornament.
Tips for Success
- Stuff in several small stages rather than one large stage. Even stuffing is essential because the raised vertical ribs make irregularities in the underlying sphere more noticeable.
- Mark the 12 rib positions before adding any surface crochet. Measuring first prevents the final few ribs from becoming crowded together.
- Use slightly relaxed tension with metallic thread. Pulling it tightly into the valleys can compress the sphere and make the gold lines disappear between the ribs.
- Make all ornaments intended for one set with the same hook, yarn weight, and stuffing density so the red, green, and cream baubles finish at matching sizes.
- Secure the hanging loop directly to the stuffed body before sewing on the decorative cap. The cap should conceal the attachment rather than carry the ornament’s entire weight.
Common Mistakes to Avoid
- Do not overstuff the ornament. If the spaces between stitches become visible, remove a small amount of filling and reshape the sphere before closing it.
- Do not estimate rib spacing by eye as you work. Mark all 12 paths first; otherwise one side may have narrow ribs while the opposite side has wide gaps.
- Avoid pulling the gold embroidery too tightly. Metallic lines should rest on the crochet surface without creating vertical dents in the bauble.
- Do not sew the cap on before checking the hanging loop. Once the cap is firmly attached, correcting an off-center loop requires unnecessary unpicking.
- Do not use a loose gauge for the spherical body. Fiberfill showing between stitches will be especially noticeable on the cream ornament. Switch to a smaller hook if necessary.
Ways to Customize This Pattern
- Create a traditional set using burgundy, forest green, ivory, and antique gold rather than bright Christmas colors.
- Replace the gold accent lines with silver metallic thread and use icy blue, white, and charcoal yarn for a winter-themed collection.
- Add a small gold bead to the bottom center of each ornament for a more elaborate vintage finish.
- Make miniature baubles by stopping the increase sequence at 36 stitches and shortening the even middle section before beginning symmetrical decreases.
- Embroider tiny gold stars or French knots between selected ribs instead of adding continuous metallic lines.
Frequently asked questions
Use the symmetrical increase and decrease sequence exactly as written, keep a consistent gauge, and add small amounts of stuffing as the upper half closes. Rotate the bauble frequently while stuffing so one side does not become firmer than another. A lightweight foam sphere can also be used instead of fiberfill when an especially precise shape is wanted.
Divide the circumference into 12 sections before beginning the surface work and mark each path from bottom to top. Complete one rib, then work the rib directly opposite it before filling the spaces between them. This makes small spacing errors easier to correct.
Yes. Substitute mustard, ochre, or warm beige cotton yarn for the metallic gold. The ornament will have a softer handmade appearance and the cap will generally be easier to crochet because standard cotton yarn has more grip than metallic thread.
The top closing point or hanging loop is probably off center. Before attaching the cap, place the bauble on a flat surface, identify the true top of the sphere, and pin the cap at four opposite points. Adjust those pins until the rim is level, then sew it permanently in place.
Yes. Use ordinary cotton yarn instead of metallic thread, avoid beads or detachable embellishments, secure the hanging loop directly through several body stitches, and embroider all decorative details. The finished ornaments remain soft and lightweight, although they should still be checked regularly for loose threads.
The finished Ribbed Crochet Christmas Bauble Ornament Pattern