Royal Plum Floral Lace Crochet Bedspread – Elegant Handmade Blanket & Matching Pillow Pattern
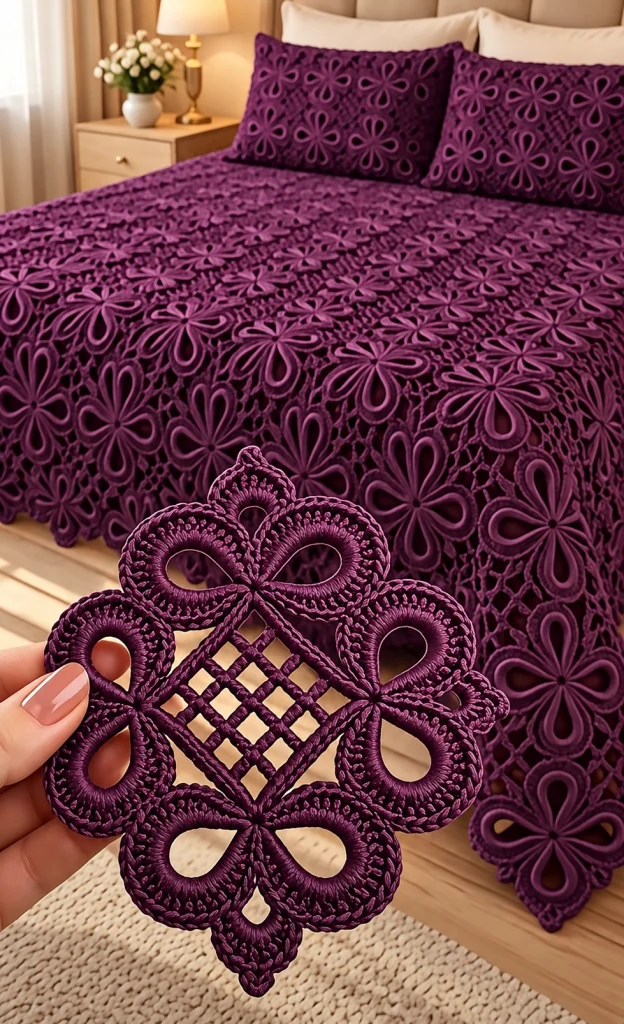
Imagine transforming your bedroom with a beautiful handmade crochet bedspread featuring delicate floral motifs, intricate lacework, and a rich royal plum color.
This stunning floral lace crochet bedspread combines vintage-inspired craftsmanship with an elegant modern bedroom aesthetic. Its beautiful flower-shaped motifs create a luxurious textured surface, while the matching crochet pillow covers complete the coordinated look.
The deep plum-purple yarn gives this design a romantic, sophisticated appearance, making it especially beautiful in bedrooms decorated with cream bedding, warm wood furniture, and soft neutral accessories.
One of the most interesting features of this project is its repeating floral motif. Each individual crochet square can be made separately and then joined with other motifs to create a larger bedspread.
In this tutorial, you’ll learn how to create an original openwork floral motif inspired by the design, connect the motifs into a bedspread, and make matching pillow covers.
Pattern note: This is an original interpretation inspired by the reference image, not an exact or tested reconstruction of its intricate looped floral lace. The photograph appears to feature unusually sculpted, raised loop petals. The instructions below create a practical crochet alternative using chain-loop flowers and openwork joins.
Project Overview
- Project: Floral Lace Crochet Bedspread
- Skill Level: Intermediate to Advanced
- Style: Vintage Floral Lace
- Main Color: Royal Plum Purple
- Construction: Individual Floral Motifs Joined Together
- Suggested Yarn: DK Cotton or Cotton Blend
- Hook Size: 3.5–4 mm
- Finished Size: Customizable
- Matching Accessories: Two Crochet Pillow Covers
- Terminology: US Crochet Terms
Materials You’ll Need
- Royal plum or deep purple cotton-blend yarn
- 3.5 mm or 4 mm crochet hook
- Yarn needle
- Stitch markers
- Scissors
- Measuring tape
- Blocking mats
- Rust-proof blocking pins
- Two pillow inserts
- Optional matching fabric for pillow backing
How Much Yarn Will You Need?
Yarn requirements depend on your finished bedspread size, chosen yarn, stitch tension, and the size of your individual floral motifs.
For a large bedspread, expect to need a substantial amount of yarn, especially if you choose raised, dimensional floral details.
Make one complete motif first, weigh it, and multiply its weight by the number of motifs required. Add approximately 15–20% extra for joining, borders, and finishing.
Crochet Abbreviations
- ch: Chain
- sc: Single Crochet
- hdc: Half Double Crochet
- dc: Double Crochet
- tr: Treble Crochet
- sl st: Slip Stitch
- st: Stitch
- sp: Space
- MR: Magic Ring
- FO: Fasten Off
Step 1 – Create the Center of the Floral Motif
The repeating floral motif is the foundation of this beautiful crochet bedspread.
Using royal plum yarn and a 3.5 mm crochet hook:
Round 1: Make a magic ring. Ch 3 (counts as first dc), work 11 dc into the ring. Join with sl st to the top of the beginning ch-3. (12 dc)
Round 2: Ch 1, sc in the same stitch. Repeat (ch 5, skip 1 stitch, sc in next stitch) around, adjusting the final repeat so you have six evenly spaced ch-5 loops. Join.
You should now have six open chain loops radiating from the center.
These loops form the foundation for the flower petals.
Step 2 – Crochet the First Layer of Flower Petals
Each petal is worked into one of the chain loops created in the previous round.
Round 3: Sl st into the first ch-5 loop.
Work the following into the same loop:
1 sc, 1 hdc, 3 dc, 1 tr, 3 dc, 1 hdc, 1 sc.
Repeat this sequence in each of the remaining five chain loops.
Join with sl st.
You should now have a six-petal crochet flower.
Gently spread the petals outward with your fingers.
Step 3 – Add the Raised Floral Loop Details
The raised looped petals are what give this design its decorative appearance.
To create a second dimensional layer, work behind the first flower.
Insert your hook into the spaces between the petals.
Attach yarn and create six ch-8 loops around the back of the flower, anchoring each loop between neighboring petals.
Once all six loops are complete, work the following into each loop:
1 sc, 2 hdc, 4 dc, 2 tr, 4 dc, 2 hdc, 1 sc.
Repeat for all six loops.
This creates a larger second layer of petals behind the first flower.
For additional texture, work a round of slip stitches along the outer edges of the petals.
The result is a layered floral motif with beautiful raised details.
Step 4 – Create the Openwork Square Around the Flower
To join the flowers into a bedspread, each motif needs a square-shaped outer framework.
Attach yarn behind the outer petal layer.
Work chain spaces around the flower, creating four clearly defined corners.
At each corner, work:
3 dc, ch 3, 3 dc.
Between the corners, use chain spaces and double crochet groups to create an airy openwork effect.
Continue working around the motif until it forms a reasonably flat square.
Adjust the chain lengths as needed to accommodate the dimensions of your petals.
FO and weave in the ends.
Important: Because the floral layers vary in size with yarn and tension, this outer framework must be fitted to your finished flower. It is a construction guide rather than a fully counted square pattern.
Step 5 – Block the Crochet Floral Motifs
Blocking is particularly important for a large floral lace bedspread.
Lightly dampen each finished motif.
Place it on a blocking mat.
Use rust-proof pins to shape the four corners.
Gently spread the flower petals into a symmetrical arrangement.
Allow the motif to dry completely.
Repeat for every motif.
Try to keep all motifs the same finished dimensions to make joining easier.
Step 6 – Determine the Number of Motifs
Measure one completed and blocked square.
Then decide how wide and long you would like your bedspread to be.
Use this formula:
Number of motifs across = Desired width ÷ Motif width
Number of motifs down = Desired length ÷ Motif length
Round each result up to the next whole number.
For example, if each square measures 15 cm and you want a bedspread approximately 210 cm wide and 240 cm long:
- 14 motifs across
- 16 motifs down
- 224 motifs total
This is only an example. Your actual motif count will depend on the size of your finished squares.
Step 7 – Join the Floral Squares
Once you have completed your floral motifs, arrange them on a large flat surface.
Check that the flowers face the same direction.
Place two squares together with their wrong sides facing.
Using matching plum yarn, join the edges with slip stitches or single crochet.
Work through corresponding edge stitches to keep the seams even.
Continue joining the motifs into horizontal rows.
Then join the completed rows together.
For a softer lace appearance, you can also use chain-space joins instead of solid seams.
Keep your joining tension relaxed so the bedspread lies flat.
Step 8 – Add the Decorative Floral Border
The photographed bedspread features beautiful openwork flowers cascading along its edges.
To create a similar decorative effect, make additional floral motifs and position them along the outer edges.
For a simpler finish, crochet a scalloped border around the completed blanket.
Scalloped Border
Round 1: Work sc evenly around the entire bedspread, placing extra stitches at the corners if necessary to keep the edge flat.
Round 2: Repeat (skip 2 stitches, work 5 dc in next stitch, skip 2 stitches, sc in next stitch) around, adjusting the spacing at corners.
FO and weave in all ends.
The scalloped edging creates a soft, romantic finish.
Step 9 – Crochet the Matching Pillow Covers
The matching floral pillow covers are a beautiful addition to this project.
Use the same floral motif pattern to create square pillow panels.
Make enough motifs to cover the front of each pillow.
Join them together using the same joining method as the bedspread.
For the back of the pillow, you can choose either a solid crochet panel or matching fabric.
Place the front and back panels together with the correct sides facing outward.
Join three sides using single crochet.
Insert the pillow form.
Close the remaining side using a removable closure or carefully sewn seam.
Repeat for the second pillow.
You now have a coordinated crochet bedding set.
Step 10 – Finish and Shape the Bedspread
Once all motifs and borders are complete, inspect the entire bedspread.
Weave in any remaining yarn ends.
Check the joining seams.
Lay the bedspread flat on a clean surface.
Lightly dampen or steam-block according to your yarn’s care instructions.
Gently shape the floral motifs and outer edges.
Allow the bedspread to dry completely before placing it on your bed.
Your beautiful royal plum floral crochet bedspread is now ready to display.
Beautiful Color Combinations to Try
Royal Plum Purple
A deep, luxurious purple that looks stunning against cream bedding and warm wooden furniture.
Vintage Ivory
Soft ivory yarn creates a timeless heirloom-inspired crochet bedspread.
Dusty Rose
A romantic blush-pink version is perfect for a soft feminine bedroom.
Sage Green
Muted green creates a calming botanical look.
Champagne Beige
A warm neutral option that complements farmhouse and minimalist interiors.
Midnight Blue
A dramatic alternative for an elegant, richly colored bedroom.
Tips for a Professional Handmade Finish
- Use yarn from the same dye lot whenever possible.
- Keep your crochet tension consistent.
- Block each motif before joining.
- Measure the first motif carefully.
- Use stitch markers to identify corners.
- Choose a durable cotton blend for frequently used bedding.
- Keep joining seams flexible.
- Weave in yarn ends securely.
- Test your flower pattern before making hundreds of motifs.
- Store the finished bedspread folded rather than hanging it for long periods.
Frequently Asked Questions
Is this crochet bedspread suitable for beginners?
This design is best suited for intermediate crocheters who are comfortable working in rounds, creating dimensional petals, and joining multiple motifs.
How long does it take to make?
A large bedspread can take several weeks or months, depending on your crochet experience and the number of motifs required.
What type of yarn is best?
Cotton or cotton-blend yarn is recommended because it provides good stitch definition and durability.
Can I make this for a king-size bed?
Yes. Simply increase the number of floral motifs until the bedspread reaches your desired dimensions.
Can I use different colors for the flowers?
Absolutely! You can create a beautiful multicolored floral blanket using coordinating yarn shades.
Can I wash the finished bedspread?
Follow the care instructions for your chosen yarn. Many cotton crochet bedspreads can be gently washed and dried flat.
Can I make a smaller version?
Yes. Use fewer motifs to create a throw blanket, baby blanket, table covering, or decorative wall hanging.
Do I need to block every motif?
Blocking is strongly recommended because it helps keep the squares uniform and makes joining easier.
Can I sell finished bedspreads made from this pattern?
You may generally sell items you make from this original pattern, subject to any applicable local requirements.
Can I create matching accessories?
Yes! The same floral motifs can be used to create matching pillow covers, decorative cushions, table runners, and wall hangings.
Final Thoughts
This Royal Plum Floral Lace Crochet Bedspread is a beautiful celebration of handmade craftsmanship, delicate floral details, and timeless crochet design.
Its rich purple color, dimensional flower motifs, and elegant openwork construction create a sophisticated bedroom statement.
Whether you’re making it as a special project for your own home, a wedding gift, or a treasured family heirloom, this floral crochet bedspread is a wonderful way to showcase your creativity.
Take your time, enjoy each individual flower, and watch your handmade masterpiece come together one motif at a time.
Happy crocheting! May every stitch bring warmth, beauty, and a little handmade magic into your home. 🧶💜