Rustic Ribbed Crochet Pumpkin Pattern
Beginner Friendly
Perfect for those just starting their crochet journey, with clear instructions and simple techniques
Single-Day Project
A satisfying project you can complete in a single afternoon or evening.
Handmade Gift
A beautiful keepsake — free forever. Read online or print at home.
About This Rustic Ribbed Crochet Pumpkin Pattern
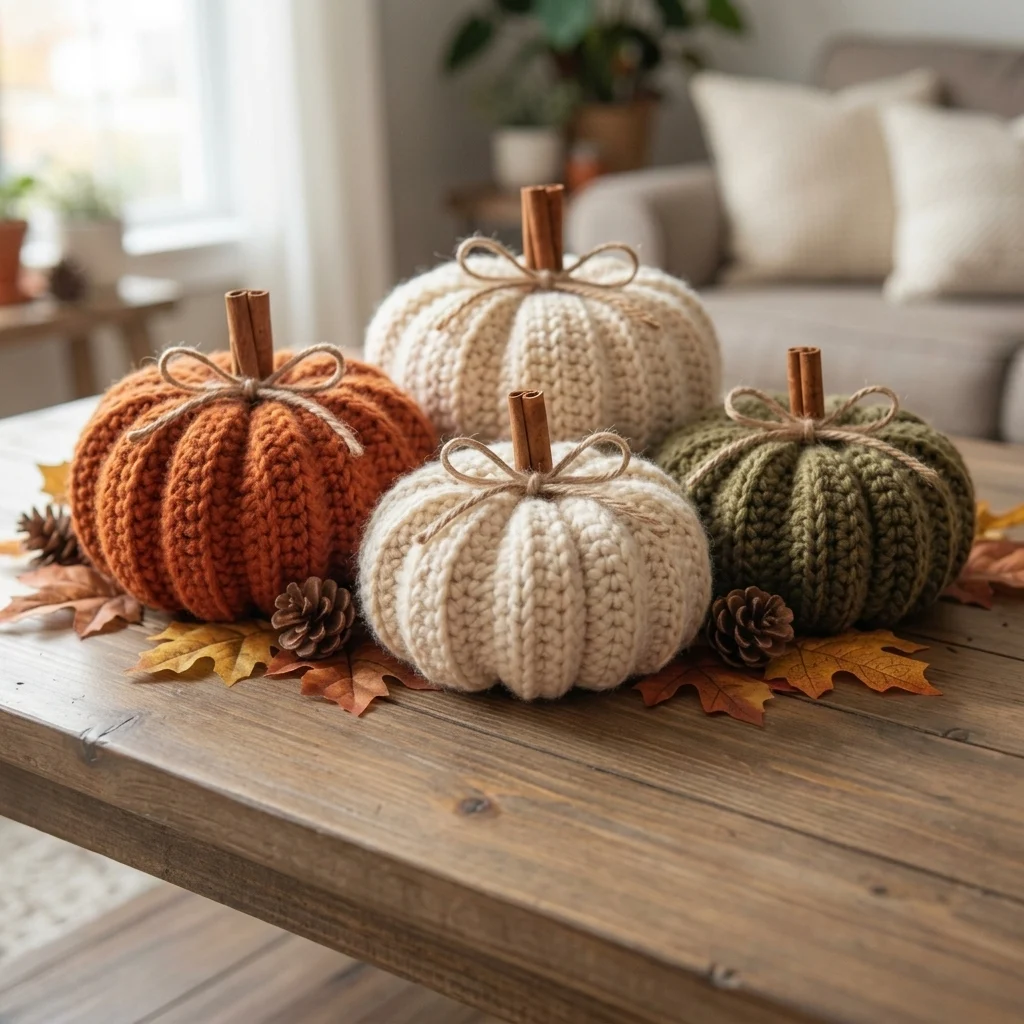
This ribbed crochet pumpkin pattern creates the soft, deeply segmented pumpkins shown in the reference, with thick vertical ribs, rounded shaping, cinnamon-stick stems, and natural twine bows. The design uses short-row shaping and back-loop crochet to produce pronounced ridges without needing to sew separate panels together.
The collection includes three coordinated sizes so you can reproduce the layered tabletop arrangement. Burnt orange gives the classic autumn look, warm cream creates a softer farmhouse version, and muted olive green adds an earthy contrast. Each pumpkin is worked flat as a shaped ribbed panel, joined into a tube, gathered at both ends, stuffed firmly, and sculpted into its final form.
Allow roughly 3-5 hours for each pumpkin, depending on size and your crochet speed. Although the construction looks simple at first glance, the pattern is rated advanced because clean short-row shaping, consistent rib tension, invisible seaming, controlled stuffing, and final sculpting are essential for achieving the deep, regular pumpkin sections visible in the photo.
Materials
- Bulky / chunky yarn in burnt orange approximately 180-220 m for one large pumpkin
- Bulky / chunky yarn in warm cream approximately 150-200 m per pumpkin
- Bulky / chunky yarn in muted olive green approximately 180-220 m for one large pumpkin
- 5.5 mm crochet hook or size needed for a dense fabric
- Polyester fiberfill approximately 150-300 g per pumpkin
- Cinnamon sticks 8-12 cm long, one per pumpkin
- Natural jute twine approximately 50 cm per pumpkin
- Strong cotton yarn for gathering and sculpting
- Large yarn needle 1
- Stitch markers 4
- Scissors 1 pair
- Fiberfill tool or wooden chopstick optional
Abbreviations
chchainsl stslip stitchscsingle crochethdchalf double crochetBLOback loop onlyststitchstsstitchesRSright sideWSwrong sideLarge Pumpkin Ribbed Panel
- With burnt orange or olive green, ch 31.
- Row 1: Hdc in second ch from hook and in each ch across. (30 sts)
- Ch 1, turn.
- Row 2: Working in BLO, hdc in each st across. (30 sts)
- Ch 1, turn.
- Row 3: BLO hdc in next 25 sts. Leave final 5 sts unworked. (25 sts)
- Ch 1, turn.
- Row 4: BLO hdc in each of the 25 sts. (25 sts)
- Ch 1, turn.
- Row 5: BLO hdc in all 25 worked sts, then BLO hdc in the 5 previously unworked sts. (30 sts)
- Ch 1, turn.
- Row 6: BLO hdc across. (30 sts)
- Rows 7-42: Repeat Rows 3-6 nine more times. (30 sts at the completion of every fourth row)
- Rows 43-46: Repeat Rows 3-6 once more.
- You should now have 46 rows with a pronounced ribbed texture and subtle shaping toward the upper edge.
- Fasten off leaving a 90 cm tail for seaming.
Medium Pumpkin Ribbed Panel
- With cream, orange, or olive yarn, ch 26.
- Row 1: Hdc in second ch from hook and across. (25 sts)
- Ch 1, turn.
- Row 2: BLO hdc across. (25 sts)
- Ch 1, turn.
- Row 3: BLO hdc in next 21 sts. Leave 4 sts unworked. (21 sts)
- Ch 1, turn.
- Row 4: BLO hdc across the 21 worked sts. (21 sts)
- Ch 1, turn.
- Row 5: BLO hdc in 21 sts, then BLO hdc in the 4 previously unworked sts. (25 sts)
- Ch 1, turn.
- Row 6: BLO hdc across. (25 sts)
- Rows 7-38: Repeat Rows 3-6 eight more times.
- Rows 39-42: Repeat Rows 3-6 once more.
- Fasten off leaving a 75 cm sewing tail.
Small Pumpkin Ribbed Panel
- With warm cream, ch 21.
- Row 1: Hdc in second ch from hook and across. (20 sts)
- Ch 1, turn.
- Row 2: BLO hdc across. (20 sts)
- Ch 1, turn.
- Row 3: BLO hdc in next 17 sts. Leave 3 sts unworked. (17 sts)
- Ch 1, turn.
- Row 4: BLO hdc across the 17 worked sts. (17 sts)
- Ch 1, turn.
- Row 5: BLO hdc in 17 sts, then BLO hdc in the 3 previously unworked sts. (20 sts)
- Ch 1, turn.
- Row 6: BLO hdc across. (20 sts)
- Rows 7-34: Repeat Rows 3-6 seven more times.
- Rows 35-38: Repeat Rows 3-6 once more.
- Fasten off leaving a 70 cm sewing tail.
Joining the Ribbed Panel
- Fold the completed panel so the first and last rows meet, with the RS facing inward.
- Thread the long yarn tail onto the yarn needle.
- Match each stitch of the first row with the corresponding stitch of the final row.
- Whipstitch through both edges from bottom to top.
- Keep the seam tension equal to the surrounding ribbing.
- Do not pull the seam tight enough to flatten the first and last ribs.
- Knot securely on the WS.
- Turn the resulting tube RS out.
Closing the Pumpkin Base
- Thread approximately 80 cm of strong matching yarn onto the yarn needle.
- Run the needle in and out through the row ends around the entire lower opening.
- Place each running stitch approximately 1 cm apart.
- After completing the circle, pull both yarn ends gradually.
- Continue pulling until the opening closes completely.
- Pass the needle across the opening several times to reinforce it.
- Tie a secure double knot.
- Push the remaining yarn tail inside the pumpkin.
Stuffing and Shaping
- Begin adding small handfuls of fiberfill through the open top.
- Push stuffing firmly into the lower outer edges first.
- Continue filling around the sides while leaving the central top slightly softer.
- Rotate the pumpkin frequently to distribute the filling evenly.
- For the large pumpkin, aim for approximately 300 g of filling.
- For the medium pumpkin, use approximately 220 g.
- For the small pumpkin, use approximately 150 g.
- Stop when the ribs are full and rounded but still flexible enough to sculpt.
Closing the Pumpkin Top
- Thread approximately 100 cm of strong matching yarn onto the yarn needle.
- Run the needle through every row end around the upper opening.
- Pull gradually until the opening measures approximately 2-3 cm across.
- Do not close the opening completely because the cinnamon-stick stem will be inserted here.
- Pass the needle through opposite sides of the opening twice.
- Tie a temporary secure knot while preparing the sculpting strand.
Deep Pumpkin Sculpting
- Cut approximately 250 cm of strong matching cotton yarn.
- Thread the yarn through the center of the pumpkin from top to bottom.
- Bring the yarn around the outside, positioning it directly inside one natural crochet rib valley.
- Insert the needle through the bottom center and return through the top center.
- Pull firmly until the first deep segment forms.
- Move approximately one-sixth of the circumference around the pumpkin.
- Wrap the yarn down the next selected rib valley.
- Pass through the center again and pull to the same tension.
- Repeat until six main pumpkin sections have been sculpted.
- For a more strongly ribbed appearance like the reference, add a second sculpting strand halfway between each of the six main sections.
- Check the pumpkin from above and redistribute the tension until all sections appear balanced.
- Knot securely inside the stem opening.
Cinnamon-Stick Stem
- Select one straight cinnamon stick approximately 8-12 cm long.
- For the small pumpkin, use approximately 8 cm.
- For medium pumpkins, use approximately 9-10 cm.
- For large pumpkins, use approximately 10-12 cm.
- Insert approximately 3-4 cm of the cinnamon stick into the central opening.
- Add a small amount of fiberfill around the stem if the opening feels loose.
- Pull the gathering yarn tightly around the cinnamon stick.
- Pass the yarn around the base of the stem twice.
- Tie securely and hide the yarn tail inside the pumpkin.
Rustic Twine Bow
- Cut approximately 45-50 cm of natural jute twine.
- Wrap the center of the twine once around the cinnamon-stick stem.
- Tie a firm single knot at the front.
- Form two loose loops approximately 5-6 cm wide.
- Tie the loops into a simple bow.
- Adjust the loops so they rest horizontally across the pumpkin top.
- Trim both tails to approximately 6-8 cm.
- For the relaxed appearance in the reference, leave the twine slightly uneven rather than perfectly symmetrical.
Large Burnt Orange Pumpkin
- Use the Large Pumpkin Ribbed Panel instructions with burnt orange yarn.
- Join, close, and stuff as instructed.
- Sculpt 10-12 visible ribs for the strongly segmented appearance.
- Insert a 10-12 cm cinnamon-stick stem.
- Add a natural jute bow.
- Finished size should be approximately 22-24 cm wide and 16-18 cm tall excluding the stem.
Large Olive Green Pumpkin
- Use the Large Pumpkin Ribbed Panel instructions with muted olive green yarn.
- Keep the stuffing slightly firmer than the orange pumpkin for the rounded profile visible in the reference.
- Sculpt approximately 10-12 pronounced ribs.
- Insert a cinnamon-stick stem approximately 10 cm long.
- Finish with a natural jute bow.
- Finished size should be approximately 21-23 cm wide and 15-17 cm tall excluding the stem.
Medium Cream Pumpkin
- Use the Medium Pumpkin Ribbed Panel instructions with warm cream yarn.
- Stuff evenly while keeping the upper center slightly depressed.
- Sculpt approximately 10 visible ribs.
- Insert a cinnamon-stick stem approximately 9-10 cm long.
- Add a natural jute bow.
- Finished size should be approximately 18-20 cm wide and 14-15 cm tall excluding the stem.
Small Cream Pumpkin
- Use the Small Pumpkin Ribbed Panel instructions with warm cream yarn.
- Stuff firmly around the sides but lightly at the top and bottom centers.
- Sculpt 8-10 visible ribs.
- Insert an approximately 8 cm cinnamon-stick stem.
- Finish with a natural jute bow.
- Finished size should be approximately 14-16 cm wide and 10-12 cm tall excluding the stem.
Finishing
Massage each finished pumpkin between your hands to redistribute the fiberfill and round out any flat areas. Press gently downward on the stem while supporting the base to create the slightly squat pumpkin silhouette shown in the reference. The sculpting strands should settle naturally into the valleys created by the BLO ribbing.
Arrange the pumpkins as a coordinated set by mixing sizes and colors rather than lining them up evenly. Place the smallest cream pumpkin toward the front, with the larger orange, cream, and olive pumpkins behind it. Rotate each pumpkin until its neatest ribs and twine bow face forward.
Tips for Success
- Use a hook slightly smaller than the yarn label recommends. A dense fabric keeps the fiberfill from showing through when the sculpting strands are tightened.
- Count the panel rows carefully. Too few rows create a narrow pumpkin, while too many produce an overly flat shape once gathered.
- Stuff the outer edges before filling the center. This keeps the ribbed sides plump while preserving the natural indentation around the stem.
- Pull sculpting strands gradually and alternate between opposite sections. Tightening one side completely before the others can distort the pumpkin.
- Choose cinnamon sticks with enough thickness to visually balance each pumpkin. Larger pumpkins look better with wider or doubled sticks.
Common Mistakes to Avoid
- Do not accidentally work through both loops on the main panel rows. BLO stitches create the raised vertical ribs that define this design.
- Avoid overstuffing the center. If the pumpkin becomes spherical and resists flattening, remove some fiberfill before closing the top.
- Do not pull the gathering yarn sharply in one motion. Gather gradually around the entire opening to prevent the yarn from breaking.
- Avoid placing sculpting strands randomly across raised ribs. Position them in the valleys between ribs so the crochet texture remains prominent.
- Do not insert the cinnamon stick before the sculpting is complete. The needle needs clear access through the pumpkin’s central axis.
Ways to Customize This Pattern
- Replace the orange, cream, and olive palette with burgundy, mustard, and chocolate brown for a deeper woodland autumn collection.
- Use velvet or chenille yarn for extra-soft pumpkins, but reduce the hook size enough to maintain a dense fabric.
- Add one or two crocheted sage-green leaves beside the cinnamon stem for a more botanical finish.
- Replace the jute bow with a narrow velvet ribbon for a more polished Thanksgiving centerpiece.
- Make miniature pumpkins by starting with 15-16 stitches and shortening the panel proportionally, then use small twig pieces instead of full cinnamon sticks.
Frequently asked questions
Work the panel consistently in BLO and then add sculpting strands after stuffing. Position each strand inside a natural rib valley and pull it through the top and bottom centers. The crochet texture creates the small ribs, while the sculpting strands create the deeper pumpkin segments.
The panel width controls much of the finished height. If your pumpkin looks too tall, use fewer starting chains or compress the finished pumpkin vertically before tightening the sculpting strands. The large versions should be noticeably wider than they are tall.
Yes, but the finished pumpkins will be smaller if you follow the same stitch counts. You can increase both the starting chain and the number of panel rows to restore the larger proportions. Use a hook that produces a firm fabric with no visible stuffing gaps.
Short natural twigs, wooden dowels, cork pieces, or tightly crocheted stems all work. A natural twig is the closest substitute if you want to preserve the rustic farmhouse appearance.
Combine at least two sizes and three coordinating colors. Keep one small pumpkin in front and stagger the larger pieces behind it. Repeating the same cinnamon stems and twine bows across every pumpkin makes different colors and sizes feel like one coordinated collection.
The finished Rustic Ribbed Crochet Pumpkin Pattern