Rustic Ribbed Crochet Pumpkin Pattern
Beginner Friendly
Perfect for those just starting their crochet journey, with clear instructions and simple techniques
Single-Day Project
A satisfying project you can complete in a single afternoon or evening.
Handmade Gift
A beautiful keepsake — free forever. Read online or print at home.
About This Rustic Ribbed Crochet Pumpkin Pattern
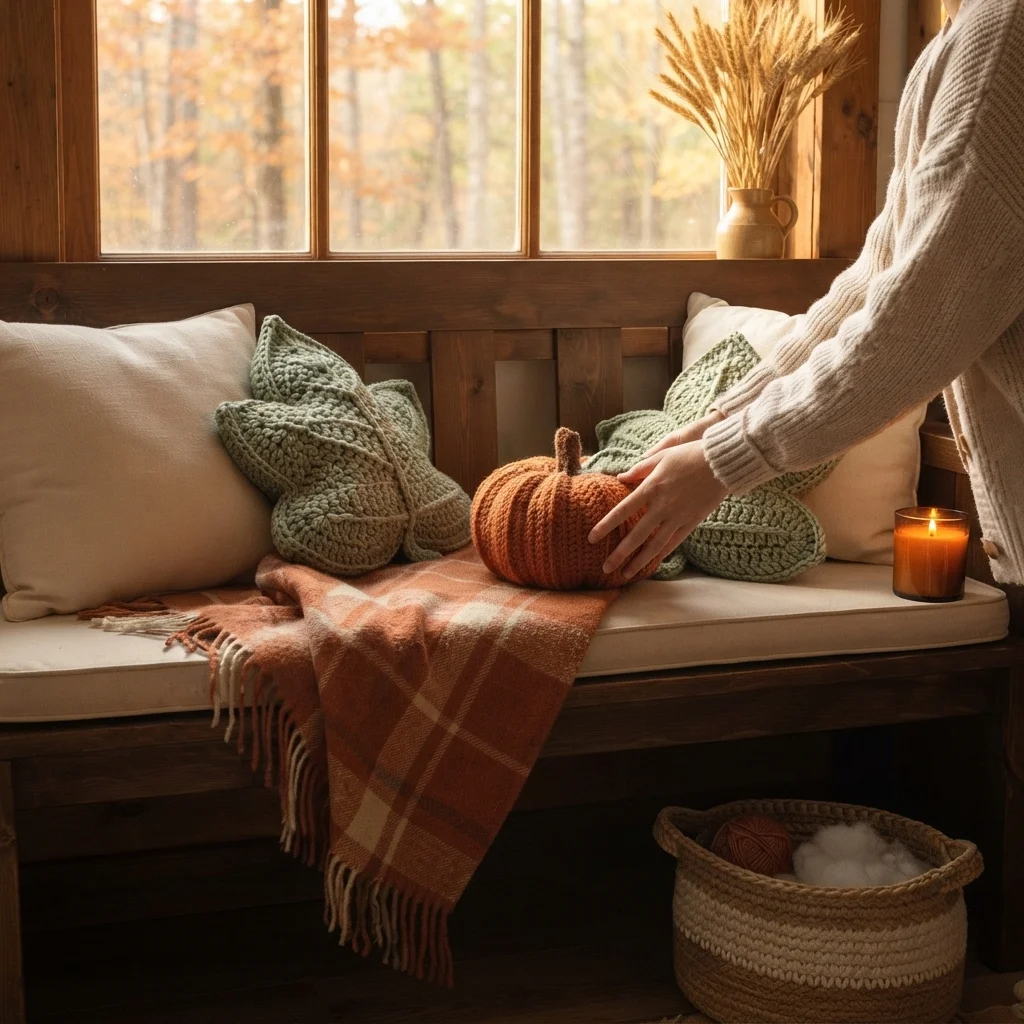
This ribbed crochet pumpkin pattern creates a plump burnt-orange pumpkin with deep vertical grooves, a slightly flattened autumn shape, a curved chocolate-brown stem, and a textured sage leaf. The pronounced ribs are built into the crochet fabric and then emphasized during assembly, giving the finished pumpkin the soft sculpted appearance shown in the reference photo.
The pumpkin body is worked as a shaped ribbed panel rather than a plain sphere. Short-row shaping creates extra fullness through the middle while the narrower ends naturally pull inward around the top and bottom. After seaming and stuffing, additional sculpting strands deepen the valleys between the ribs. The stem and leaf are made separately, shaped, and attached over the gathered top.
This advanced pumpkin takes approximately 5-7 hours to complete. It is a good project for crocheters comfortable with back-loop ribbing, short rows, invisible seaming, firm stuffing, three-dimensional sculpting, working small pieces in the round, surface details, and shaping a decorative leaf.
Materials
- Aran / medium worsted yarn in burnt pumpkin orange approximately 150-180 m
- Aran / medium worsted yarn in dark chocolate brown approximately 20 m
- Aran / medium worsted yarn in muted sage green approximately 20-25 m
- 4.0 mm crochet hook pumpkin body
- 3.5 mm crochet hook stem and leaf
- Polyester fiberfill approximately 120-160 g
- Yarn needle long needle recommended for sculpting
- Stitch markers 4-6
- Scissors 1 pair
- Strong matching thread optional for additional stem reinforcement
- Small amount of plastic pellets optional for a weighted base; enclose securely in fabric first
Abbreviations
MRmagic ringchchainsl stslip stitchscsingle crochethdchalf double crochetdcdouble crochetinc2 single crochet in the same stitchdecsingle crochet 2 stitches togetherBLOback loop onlyFLOfront loop onlyststitchstsstitchesRSright sideWSwrong sideRibbed Pumpkin Body
- With burnt orange and the 4.0 mm hook, ch 31.
- Row 1: Beginning in second ch from hook, hdc in each ch across. Ch 1, turn. (30 sts)
- Row 2: Working in BLO, hdc in each st across. Ch 1, turn. (30 sts)
- Row 3: BLO hdc in next 26 sts. Leave final 4 sts unworked. Ch 1, turn. (26 sts)
- Row 4: BLO hdc in each of the 26 sts. Ch 1, turn. (26 sts)
- Row 5: BLO hdc in next 28 sts, working into 2 previously unworked sts at the end. Leave final 2 sts unworked. Ch 1, turn. (28 sts)
- Row 6: BLO hdc in each of the 28 sts. Ch 1, turn. (28 sts)
- Row 7: BLO hdc across all 30 sts. Ch 1, turn. (30 sts)
- Row 8: BLO hdc across all 30 sts. Ch 1, turn. (30 sts)
- Rows 9-14: Repeat Rows 3-8. This completes the second shaped rib section.
- Rows 15-20: Repeat Rows 3-8. This completes the third shaped rib section.
- Rows 21-26: Repeat Rows 3-8. This completes the fourth shaped rib section.
- Rows 27-32: Repeat Rows 3-8. This completes the fifth shaped rib section.
- Rows 33-38: Repeat Rows 3-8. This completes the sixth shaped rib section.
- Rows 39-44: Repeat Rows 3-8. This completes the seventh shaped rib section.
- Rows 45-50: Repeat Rows 3-8. This completes the eighth shaped rib section.
- Rows 51-56: Repeat Rows 3-8. This completes the ninth shaped rib section.
- Rows 57-62: Repeat Rows 3-8. This completes the tenth shaped rib section.
- Rows 63-68: Repeat Rows 3-8. This completes the eleventh shaped rib section.
- Rows 69-74: Repeat Rows 3-8. This completes the twelfth shaped rib section.
- Check the panel by bringing the first and last rows together. It should form a full cylinder without stretching. If necessary, add or remove one complete 6-row repeat rather than individual rows so the shaping remains consistent.
- Fasten off leaving approximately 120 cm of orange yarn for seaming and sculpting.
Seaming the Pumpkin Body
- Fold the finished panel so the first and final rows meet with the RS facing inward.
- Thread the long orange tail onto the yarn needle.
- Whip stitch through corresponding loops of the first and final rows from bottom to top.
- Keep the seam firm but do not pull it tighter than the surrounding ribbing.
- Turn the cylinder RS outward.
- Massage the seam with your fingers so it settles between two raised ribs and becomes less visible.
Gathering the Pumpkin Bottom
- Thread approximately 70 cm of orange yarn onto the yarn needle.
- Run the needle in and out around the complete lower edge, catching approximately one stitch per rib.
- Pull the yarn gradually until the opening closes.
- Pass the needle across the opening several times to reinforce the gathered center.
- Knot securely on the inside.
- If using an optional weighted insert, place it at the bottom now before stuffing.
Stuffing and Shaping the Pumpkin
- Add small handfuls of fiberfill around the lower sides first rather than filling only the center.
- Continue stuffing evenly around the circumference, pushing fiberfill into every rib.
- Keep the center slightly less dense than the outer sides so the top and bottom can be indented later.
- Shape the pumpkin with both hands as you work, aiming for a broad rounded profile rather than a tall sphere.
- Continue until the body feels firm but each vertical rib can still be compressed slightly with your fingers.
- Leave approximately 2 cm of unfilled space directly beneath the upper opening for gathering.
Gathering the Pumpkin Top
- Thread a long orange yarn strand around the upper opening in the same manner used for the bottom.
- Pull the opening closed gradually while redistributing the stuffing with your fingers.
- Before fully tightening, press the upper center downward to begin forming the natural pumpkin indentation.
- Pull the gathering yarn firmly and knot securely.
- Do not cut the yarn yet; use the remaining length for vertical sculpting.
Deep Pumpkin Sculpting
- Insert the long yarn needle through the top center and bring it out through the bottom center.
- Carry the yarn externally up one natural valley between two raised crochet ribs.
- Insert the needle again through the top center and bring it through the bottom center.
- Pull until the valley becomes noticeably deeper, but stop before the yarn disappears into the fabric.
- Move to the next evenly spaced valley and repeat.
- Create 8 primary sculpted sections around the pumpkin.
- After the eighth section, pass the needle from bottom to top through the center several times while pulling gently to flatten the pumpkin vertically.
- Knot securely inside the top indentation.
- Use your fingers to redistribute stuffing into each rounded section until all lobes look balanced.
Brown Stem
- Round 1: With chocolate brown and 3.5 mm hook, work 6 sc in MR. (6 sts)
- Round 2: Inc in each st around. (12 sts)
- Round 3: Working in BLO, sc in each st around. (12 sts)
- Round 4: Sc in each st around. (12 sts)
- Round 5: (Sc in next 4 sts, dec) twice. (10 sts)
- Round 6: Sc in each st around. (10 sts)
- Round 7: Sc in next 6 sts, sl st in next 4 sts. (10 sts)
- Round 8: Sc in next 5 sts, sl st in next 5 sts. (10 sts)
- Round 9: Sc in next 4 sts, sl st in next 6 sts. (10 sts)
- The uneven stitch heights in Rounds 7-9 begin the slight natural curve visible in the reference stem.
- Round 10: Sc in each st around. (10 sts)
- Round 11: (Sc in next 3 sts, dec) twice. (8 sts)
- Round 12: Sc in each st around. (8 sts)
- Stuff the lower two-thirds of the stem lightly. Leave the upper section softer so it can curve.
- Round 13: Dec around. (4 sts)
- Fasten off and close the remaining opening. Leave a long separate tail at the base for sewing.
Stem Surface Texture
- Thread a length of dark brown yarn onto the needle.
- Beginning at the stem base, make one long vertical surface stitch toward the tip.
- Return to the base and create another long stitch approximately 3-4 mm beside the first.
- Continue around the stem to create irregular bark-like vertical ridges.
- Keep the stitches slightly tighter on the inside of the desired curve to encourage the stem to bend naturally.
- Secure all ends inside the stem.
Sage Pumpkin Leaf
- With sage and the 3.5 mm hook, ch 13.
- Beginning in second ch from hook work sl st, sc, hdc, dc, tr in next 4 ch, dc in next 2 ch, hdc, sc, sl st.
- Work 3 sc in the final foundation chain to turn around the tip.
- Continue along the opposite side of the foundation chain: sl st, sc, hdc, dc in next 2 ch, tr in next 4 ch, dc, hdc, sc, sl st.
- Ch 1 and begin the shaping edge.
- Work sc in next 2 sts, (hdc, ch 2, sl st in second ch from hook, hdc) in next st to create the first subtle serration.
- Sc in next 3 sts, repeat the pointed hdc group in the next st.
- Continue around the leaf, placing 4-5 small points approximately evenly along the edge.
- At the leaf tip work (sc, ch 3, sl st in first ch, sc).
- Mirror the small pointed edging down the opposite side.
- Join with sl st at the base and do not fasten off yet.
Leaf Vein and Short Stem
- From the base of the leaf, surface sl st along the original foundation chain toward the leaf tip.
- Keep the surface stitches relaxed so the leaf does not curl inward.
- At the tip, fasten off and weave the end into the WS.
- Rejoin sage at the leaf base.
- Ch 7.
- Beginning in second ch from hook, sl st in each ch back toward the leaf.
- Sl st into the leaf base and fasten off leaving a 30 cm sewing tail.
Optional Small Accent Leaf
- With sage, ch 9.
- Beginning in second ch from hook work sl st, sc, hdc, dc in next 3 ch, hdc, sc.
- Work 3 sc in the final ch and continue down the opposite side.
- Work sc, hdc, dc in next 3 ch, hdc, sc, sl st.
- Surface sl st along the center foundation chain to form a vein.
- Ch 5 from the base and sl st back along the chain to create a short stem.
- Fasten off leaving a sewing tail.
Attaching the Stem
- Place the brown stem directly over the gathered top center.
- Angle the curved tip slightly to one side rather than keeping the stem perfectly vertical.
- Using the long brown tail, sew around the complete 12-stitch base of the stem.
- Make a second reinforcing pass through the stem base and dense orange stitches beneath it.
- Pull several stitches slightly tighter on the side opposite the curve to stabilize the angle.
- Knot securely and hide the yarn tail inside the pumpkin.
Attaching the Sage Leaf
- Position the leaf beside the stem so its base sits partially beneath the stem edge.
- Angle the leaf outward across the pumpkin rather than pointing it straight upward.
- Sew the short leaf stem securely beside the brown stem.
- Add 2-3 hidden stitches along the first 2 cm of the leaf center vein.
- Leave the outer half and pointed edges completely free so the leaf remains dimensional.
- If using the optional small leaf, place it on the opposite side of the stem and attach only its base and lower vein.
Final Pumpkin Shaping
- Set the pumpkin on a flat surface and inspect the silhouette from every side.
- Press gently downward on the top while supporting the sides to emphasize the squat, rounded profile.
- Massage any overstuffed section toward a neighboring lobe until all segments appear balanced.
- Pull individual sculpting strands slightly tighter if any groove is noticeably shallower than the others.
- Flatten the bottom gently with your palm so the pumpkin sits without rolling.
- Curve the stem with your fingers and arrange the sage leaf over one upper rib.
Finishing
Weave all remaining yarn tails deeply into the pumpkin body and trim only after they are secure. Shape the orange ribs with your fingers, working around the pumpkin until the sculpted valleys are evenly distributed. The finished piece should be wider than it is tall, with a noticeable indentation at the top and a softer indentation underneath.
Adjust the brown stem into a gentle irregular curve and allow the sage leaf to rest naturally against one side of the pumpkin. Avoid aggressively blocking the stuffed body. If the leaf needs shaping, dampen only the leaf, pin it separately into a slightly curved position, allow it to dry completely, and then arrange it around the stem.
Tips for Success
- Keep every BLO hdc ridge clearly defined. These raised columns are what give the pumpkin its strong knitted-looking ribs before the additional sculpting strands are added.
- Stuff around the outside first and the center last. This keeps the lobes full while allowing the top and bottom centers to pull inward.
- Use a long sturdy yarn needle for sculpting. Passing repeatedly through the entire stuffed pumpkin is much easier with a needle that reaches from top to bottom in one movement.
- Do not pull the sculpting yarn to maximum tension on the first pass. Form all 8 sections first, then return to shallow grooves and tighten them gradually.
- Keep the leaf attachment loose near its outer half. A leaf sewn completely flat loses the soft dimensional look visible in the reference pumpkin.
Common Mistakes to Avoid
- Do not overstuff the pumpkin. If the vertical grooves disappear, remove a small amount of fiberfill before closing the top and redistribute the remaining stuffing toward the outer lobes.
- Avoid making only four or five deep sculpting grooves. More evenly spaced sections create the rounded ribbed pumpkin shape rather than a segmented ball.
- Do not pull the gathering yarn from only one side of the opening. Work gradually around the circumference so the top and bottom centers remain centered.
- Avoid stuffing the brown stem firmly to its tip. Keeping the upper portion lightly filled allows it to curve instead of standing like a rigid cylinder.
- Do not sew the entire sage leaf surface to the pumpkin. Secure the base and lower center vein only, then leave the pointed outer section free.
Ways to Customize This Pattern
- Make a neutral farmhouse pumpkin in oatmeal, ivory, or warm taupe and keep the chocolate stem and sage leaf for contrast.
- Create a small pumpkin collection by using DK yarn with a 3.0 mm hook for miniature versions and bulky yarn with a 5.5-6.0 mm hook for larger pieces.
- Replace burnt orange with muted rust, terracotta, mustard, olive, or deep burgundy to create a coordinated autumn display.
- Add a second smaller sage leaf on the opposite side of the stem for a fuller botanical top.
- For extra rustic texture, hold a thin strand of tweed yarn together with the orange body yarn while keeping the stem and leaf solid-colored.
Frequently asked questions
First make sure the body is not overstuffed. Then use a long strand of matching orange yarn to travel from the top center to the bottom center and back externally through each natural valley. Tighten each strand gradually until the surrounding lobes become rounded and pronounced.
The body may be overstuffed or the top-to-bottom sculpting tension may be too loose. Remove excess filling if necessary, then pass yarn several times directly between the top and bottom centers and tighten gently. This compresses the height while widening the pumpkin.
Yes, but velvet hides some of the BLO stitch definition. Use a smaller hook than the yarn label normally recommends and rely more heavily on the final sculpting strands to create visible grooves. The finished pumpkin will be softer and less sharply ribbed than the cotton or wool-blend version.
Gather the bottom evenly, keep slightly less stuffing in the bottom center, and press the finished pumpkin onto a flat surface while shaping it. For a decorative pumpkin that needs extra stability, you can place a securely enclosed packet of plastic pellets at the center of the base before adding the remaining fiberfill.
Yes. The simplest method is to change yarn and hook size while keeping the same construction. For a more precise size adjustment, change the starting chain to alter height and add or remove complete 6-row body repeats to alter circumference. Always add or remove full repeats so the short-row rib shaping remains consistent.
The finished Rustic Ribbed Crochet Pumpkin Pattern