Advanced
For experienced crocheters who enjoy complex shaping, fine detail, and ambitious construction
Weekend Project
A satisfying weekend make — start Friday, finish Sunday, enjoy forever.
Handmade Gift
A beautiful keepsake — free forever. Read online or print at home.
About This Sage Blossom Crochet Shoulder Bag
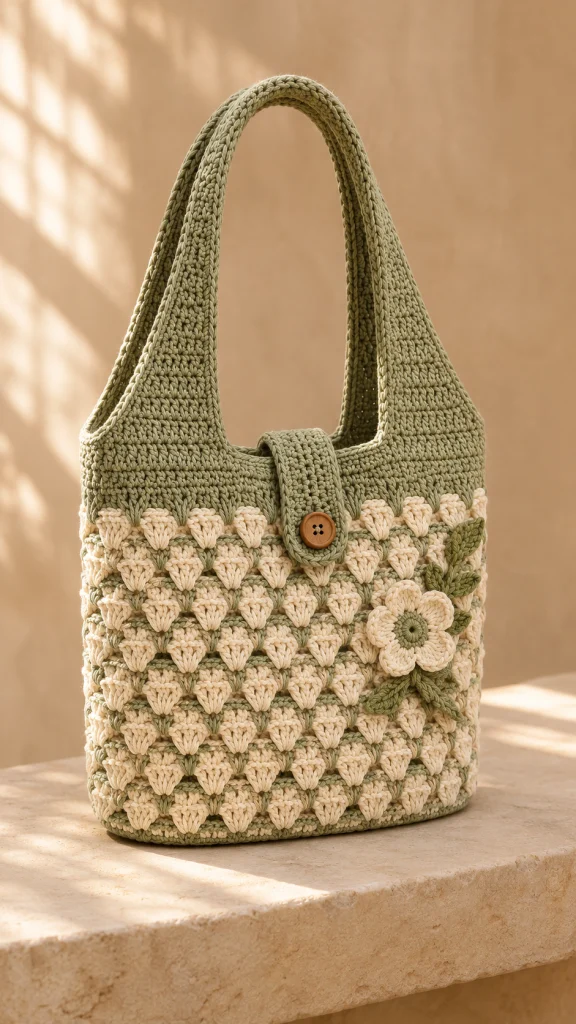
The Sage blossom crochet bag pattern pairs cream shell blossoms with a sage-green frame, broad shaped handles, and a wooden-button flap. A separate gusset gives this shoulder bag useful depth, while a small flower and leafy sprig bring the garden detail onto the front.
This advanced project combines counted shell repeats, mirrored handle shaping, fitted seams, and a sewn lining. Allow approximately 20–28 hours for the crochet and finishing. It suits crocheters who enjoy careful construction and want a practical bag with a softly textured surface.
The cream shells sit against green foundation rows, creating a repeating floral texture. Firm cotton, reinforced handles, and a lining help the finished bag keep its shape during everyday use.
Materials
- DK cotton yarn in sage: approximately 650 m.
- DK cotton yarn in warm cream: approximately 400 m.
- 3.5 mm crochet hook for the bag.
- 3.0 mm crochet hook for edging, flap, flower, and leaves.
- One wooden button, approximately 23 mm across.
- Approximately 60 × 100 cm tightly woven cotton lining fabric.
- Two lengths of 20 mm cotton twill tape, approximately 45 cm each, for handle reinforcement.
- Matching sewing thread and sewing needle.
- Tapestry needle, scissors, stitch markers, tape measure, and blocking pins.
Abbreviations
chchainscsingle crochethdchalf double crochetdcdouble crochetsl stslip stitchsc2togsingle crochet two stitches togetherMRmagic ringststitchRSright sideWSwrong sideFront and Back Blossom Panels — Make Two
- With sage and the main hook, ch 62. Row 1: sc in the second ch from the hook and each remaining ch; turn. 61 sc.
- Row 2, RS: ch 1, sc in each st; turn. 61 sc. Mark this face as the RS.
- Row 3, WS: join cream, ch 1, sc in the first st; repeat the following sequence 10 times: skip 2 st, work 5 dc in the next st, skip 2 st, sc in the next st. Turn. 10 shells and 11 sc; 61 stitches total.
- Row 4, RS: change to sage, ch 1, sc in every st across, including all five dc of each shell; turn. 61 sc.
- Rows 5–34: repeat Rows 3–4 fifteen more times. There are 16 cream shell rows altogether, each separated by a sage sc row. Keep every shell row on the WS so the same face of every shell appears on the front.
- Rows 35–36: with sage, ch 1, sc across; turn. 61 sc per row. Fasten off after Row 36. Block both panels to matching rectangles approximately 30 cm wide and 30 cm high, without flattening the shells.
Shaped Handle Halves — Four Branches
- With the RS of one panel facing, number its top stitches 1–61 from left to right. Mark stitches 19 and 43. The two handle bases occupy stitches 1–19 and 43–61; stitches 20–42 remain unworked as the center opening.
- Left branch, Row 1: join sage at stitch 1, ch 1, sc in stitches 1–17, sc2tog over stitches 18–19; turn. 18 sc. The decrease is at the opening edge.
- Left branch, Rows 2–10: ch 1 and decrease once at the opening edge on every row, working sc in all other stitches. On even rows, begin with sc2tog; on odd rows, end with sc2tog. Counts after Rows 2–10 are 17, 16, 15, 14, 13, 12, 11, 10, and 9 sc.
- Left branch, Rows 11–58: ch 1, sc in all 9 st; turn. Fasten off with a sewing tail after Row 58.
- Right branch, Row 1: with RS facing, join sage at stitch 43, ch 1, sc2tog over stitches 43–44, sc in stitches 45–61; turn. 18 sc.
- Right branch, Rows 2–10: ch 1 and decrease once at the opening edge on every row. On even rows, end with sc2tog; on odd rows, begin with sc2tog. Counts after Rows 2–10 are 17, 16, 15, 14, 13, 12, 11, 10, and 9 sc.
- Right branch, Rows 11–58: ch 1, sc in all 9 st; turn. Fasten off with a sewing tail.
- Repeat all handle steps on the second panel. Each panel now has two tapered branches.
- For each panel, bring its two branch ends together without twisting. Sew the 9 stitches of one end to the 9 stitches of the other end with a flat whipstitch seam. This makes one continuous handle on each panel. Check that both handle openings match before securing the tails.
Side and Base Gusset
- With sage and the main hook, ch 18. Row 1: sc in the second ch from the hook and across; turn. 17 sc, approximately 8 cm wide.
- Rows 2–216: ch 1, sc in each st; turn. 17 sc per row. At the stated gauge, the strip measures approximately 90 cm long.
- Before fastening off, fit the strip along one blocked panel’s side, bottom, and opposite side. Its length must equal those three edges without stretching. Add or remove complete 17-sc rows as needed; record the final row count. Fasten off.
- Mark the gusset at the two bottom corners using the actual panel dimensions. For a 30 cm square panel and a 216-row gusset, place markers after Rows 72 and 144.
- With WS together and RS outward, pin one long gusset edge around the front panel, matching the top ends and corner markers. Sew through both layers with small whipstitches, distributing the gusset rows evenly along the panel edges.
- Pin and sew the opposite long gusset edge to the back panel in the same way. Keep corresponding shell rows level across the two sides. The short gusset ends form the upper side edges of the bag.
Opening Edges and Handle Reinforcement
- With sage and the smaller hook, join at the center of the front panel’s unworked top edge. Ch 1 and work sc around the entire front handle opening: one sc in each unworked top stitch and approximately one sc in each branch row end. At each sharp lower inner corner, work sc2tog across the two adjacent edge positions to ease the turn. Join with sl st and fasten off.
- Repeat around the back handle opening. Match the edging counts on corresponding front and back sections; the exact count depends on the fitted row-end spacing.
- Work one continuous outer edging around the bag’s upper outer perimeter, following the outside of the front handle, one short gusset end, the outside of the back handle, and the other short gusset end. Work one sc per stitch across gusset ends and approximately one sc per row end along handles. Join with sl st and fasten off. Reduce row-end spacing if an edge flares.
- Fit one length of twill tape to the WS of each handle, centering it across the crown seam and extending equally down both branches. Trim it to finish above the wider tapered sections. Turn the tape ends under and hand-sew both long edges to the crochet without visible stitches on the RS.
Wooden-Button Closure Flap
- With sage and the smaller hook, ch 12. Row 1: sc in the second ch from the hook and across; turn. 11 sc.
- Rows 2–24: ch 1, sc in every st; turn. 11 sc per row. This is the straight flap section.
- Row 25: ch 1, sc in the first 4 st, ch 3, skip 3 st, sc in the final 4 st; turn. 8 sc and one ch-3 buttonhole.
- Row 26: ch 1, sc in the first 4 st, work 3 sc into the ch-3 space, sc in the final 4 st; turn. 11 sc.
- Row 27: ch 1, sc2tog, sc in the next 7 st, sc2tog; turn. 9 sc.
- Row 28: ch 1, sc2tog, sc in the next 5 st, sc2tog; turn. 7 sc. Fasten off.
- Join sage at a foundation corner and sc evenly around both long sides and the shaped tip, working 2 sc at each tip corner. Leave the foundation edge unworked. Fasten off.
- Center the foundation edge on the inside back panel, approximately 2 cm below its top edge. Sew the first 2 cm of flap firmly to the back. Fold it over the opening and mark the button position through the buttonhole with the bag lightly filled. Sew on the button with a thread shank and a small fabric backing patch inside the front panel.
Flower Appliqué
- With sage and the smaller hook, Round 1: work 6 sc into a MR. Tighten the ring. 6 sc.
- Round 2: work 2 sc in each st. 12 sc.
- Round 3: repeat sc in the next st, 2 sc in the next st six times. 18 sc. Join with sl st; fasten off.
- Petal round: join cream in any center stitch. Repeat six times: sl st in the next available center stitch, ch 2, work 3 dc in the following center stitch, ch 2, sl st in the following center stitch. Each petal uses 3 center stitches. Six petals use all 18 center stitches. Fasten off with a long sewing tail.
- Steam or damp-block the flower gently to approximately 7–8 cm across. Arrange the petals individually without stretching the center.
Leaves and Embroidered Stem
- Make four leaves with sage and the smaller hook. For each leaf, ch 9. Work into the second ch from the hook and the next six chains as follows: sl st, sc, hdc, dc, dc, hdc, sc. Work 3 sc in the final chain to turn the tip.
- Working along the unused loops on the opposite side of the foundation, work sc, hdc, dc, dc, hdc, sc, sl st. Join to the first sl st and fasten off with a sewing tail. Each leaf has 17 stitches around its foundation.
- Position the flower on the lower right area of the front panel, approximately 9 cm above the base. Arrange two leaves above and two below it. Keep all pieces clear of the side seam and button flap.
- Using sage yarn, embroider a short stem beneath the arranged pieces with chain stitch. Sew the leaves along their central foundations and secure their tips. Sew around the flower center and tack each petal base, leaving the outer petal edges slightly raised.
Fitted Fabric Lining
- Measure the inside of the assembled bag. For a 30 × 30 cm interior with 8 cm depth, cut two lining rectangles 32 × 32 cm and one gusset strip 10 × 92 cm. These dimensions include 1 cm seam allowances; adjust them to the measured bag before cutting.
- On each long gusset edge, mark the 1 cm seam-line positions corresponding to the bottom corners. With fabric right sides together, sew one long gusset edge around the sides and bottom of one panel using a 1 cm seam allowance. Clip the gusset seam allowance carefully at the lower corners.
- Sew the other gusset edge to the second lining panel in the same way. Press the seams and turn the top raw edge 1 cm toward the fabric’s wrong side.
- Insert the lining with its wrong side against the crochet’s WS. Pin its folded top approximately 5 mm below the bag opening, following the straight panel and gusset edges beneath the handles. Hand-sew the fold to the crochet, enclosing the flap attachment and button backing patch.
Finishing
- Weave in every remaining yarn tail through several stitches on the inside, changing direction before trimming. Check shell-row color changes and gusset corners especially carefully.
- Place a folded towel inside the bag and shape the corners gently. Lightly dampen the crochet and let it dry fully, keeping the lining smooth and the handles equal.
- Fill the bag with a few light everyday items and check the closure. Reposition the button if needed so the flap closes comfortably without pulling the opening inward.
The finished bag should stand with a softly squared base and a relaxed floral surface. Smooth the leaves with your fingers and lift the petal edges gently so the appliqué keeps its depth.
Support the base when carrying heavier contents. The lining and handle tape share the load, while the cotton crochet supplies the bag’s shape and texture.
Tips for Success
- Count 10 shells on every cream row and 61 stitches on every foundation row.
- Cut and secure cream at each shell row rather than carrying it through the green foundation stitches.
- Mark each handle’s opening edge so every decrease stays on the correct side.
- Fit the gusset to blocked panels before sewing; equal lengths prevent puckered corners.
- Attach the appliqué and button before installing the lining so their sewing ends remain enclosed.
Common Mistakes to Avoid
- Missing the sc between shells changes the repeat. Each shell row begins and ends with sc and contains 11 sc anchors.
- Working only one stitch into each shell on the following row narrows the panel. Work into all five dc.
- Decreasing at both handle edges makes the branches too narrow. Decrease once per row at the opening edge only.
- Stretching the gusset while sewing distorts the base. Pin all three edge sections before taking the first seam stitch.
- Sewing the lining under tension restricts the bag. Fit it with the crochet resting at its natural width.
Ways to Customize This Pattern
- Substitute dusty blue or muted terracotta for sage while keeping the cream shell rows.
- Change panel width in multiples of 6 stitches: 55 stitches gives 9 shells; 67 stitches gives 11. Recalculate handle bases, leaving an odd number of center-opening stitches.
- Add or remove complete two-row shell bands to change body height, then refit the gusset and lining.
- Add a fabric pocket to one lining panel before assembling the lining.
- For a longer handle drop, add the same number of straight rows to all four branches and increase the reinforcement tape length accordingly.
Frequently asked questions
The shell repeat is straightforward, but the bag combines mirrored handle shaping, three-edge gusset seams, separate edging paths, reinforced handles, a fitted closure, and a sewn lining. Accurate gauge and assembly matter throughout.
A lining is strongly recommended. It helps prevent small objects from catching in the shell fabric and supports the bag’s shape. Handle tape remains useful even if you choose an unlined finish.
Test the button through the finished opening before attaching the flap. To enlarge it, work 3 sc, ch 5, skip 5 stitches, then 3 sc on Row 25; restore 11 stitches on Row 26 by working 5 sc into the space. For a smaller opening, use 5 sc, ch 1, skip 1, then 5 sc, restoring one sc in the space.
Follow the yarn and fabric care instructions. Wash gently, reshape while damp, and dry flat with the handles supported. Avoid hanging a wet cotton bag by its handles because the added weight can stretch them.
The finished Sage Blossom Crochet Shoulder Bag

