Sage Braid Crochet Bedspread Pattern
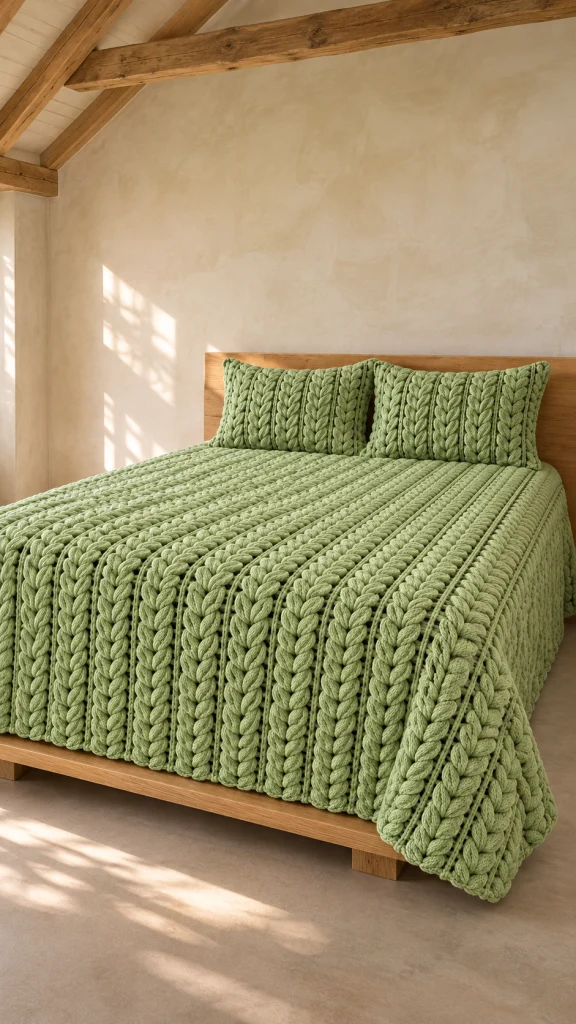
Advanced
For experienced crocheters who enjoy complex shaping, fine detail, and ambitious construction
Single-Day Project
A satisfying project you can complete in a single afternoon or evening.
Handmade Gift
A beautiful keepsake — free forever. Read online or print at home.
About This Sage Braid Crochet Bedspread Pattern
This sage braid crochet bedspread pattern brings raised cables and narrow ribs together in a generous, softly structured bed covering. Its muted green color and long vertical braids interpret the leafy texture of the photographed bedding through traditional crochet cable construction.
The bedspread is made from twenty matching strips, joined edge to edge and finished with a compact border. Working in strips keeps the cables manageable and lets you check the dimensions before assembling the full piece. This pattern covers the bedspread; the coordinating pillows shown in the styling are separate projects.
Allow approximately 100–140 hours for crocheting, joining, and finishing. The design suits experienced crocheters who are comfortable reading post stitches from both sides, crossing tall stitches, and maintaining consistent tension across repeated panels.
Materials
- Approximately 7,500 m / 8,200 yd of heavy worsted or Aran yarn in sage green, including a working allowance; purchase the same dye lot throughout.
- For yarn measuring 150 m per 100 g, approximately 5,000 g total; actual consumption must be established from your sample.
- 6 mm crochet hook, or size needed for the blocked strip gauge.
- 5.5 mm crochet hook for the border, adjusting if necessary to keep the edges flat.
- Locking stitch markers for strip ends and cable boundaries.
- Blunt tapestry needle for joining and weaving in ends.
- Scissors.
- Tape measure, blocking mats, and rustproof pins.
Abbreviations
chchainscsingle crochetdcdouble crochetFPdcfront post double crochetBPdcback post double crochetFPtrfront post treble crochetsl stslip stitchststitchRSright sideWSwrong sideGauge, Cable Technique, and Sizing
- Target blocked strip dimensions: 14 stitches = 12 cm wide; 176 rows = 220 cm long. Measure width across the whole strip, including both edge bands.
- For FPdc, yarn over, insert the hook from front to back to front around the indicated stitch post, and complete a double crochet. For BPdc, insert from back to front to back instead.
- For FPtr, yarn over twice, insert around the indicated post from front to back to front, then yarn over and draw through two loops three times.
- For the six-stitch cable crossing, skip the next three central posts, work one FPtr around each of the following three posts, then work one FPtr around each skipped post in its original order, reaching across the front of the three stitches just made. Six original posts produce six new stitches. Do not also crochet into their top loops.
- Turning ch 2 never counts as a stitch. Work the first stitch into the first actual stitch and the last stitch into the last actual stitch. Turn after every row except the final row.
- For the stated size, make 20 strips. The joined center measures approximately 240 × 220 cm; the border adds approximately 2 cm at each edge.
- To change width, use a whole number of strips: center width = strip count × 12 cm. To change length while preserving the beginning and ending arrangement, work 4k + 4 total rows, where k is the number of four-row repeats. At the stated gauge, center length in centimeters = total rows × 1.25.
Braided Strips — Make 20
- Foundation: With the main hook, ch 16. Leave a 20 cm tail.
- Row 1, RS: Dc in the third ch from the hook and in each remaining ch. Turn. Count: 14 dc. The two skipped chains do not count as a stitch.
- Row 2, WS: Ch 2, dc in the first 2 sts, BPdc around the next st, dc in the next st, BPdc around each of the next 6 sts, dc in the next st, BPdc around the next st, dc in the final 2 sts. Turn. Count: 14 sts.
- Row 3, RS, crossing row: Ch 2, dc in the first 2 sts, FPdc around the next st, dc in the next st, work the six-stitch cable crossing over the next 6 posts, dc in the next st, FPdc around the next st, dc in the final 2 sts. Turn. Count: 14 sts.
- Row 4, WS: Ch 2, dc in the first 2 sts, BPdc around the next st, dc in the next st, BPdc around each of the next 6 cable posts in their current order across the row, dc in the next st, BPdc around the next st, dc in the final 2 sts. Turn. Count: 14 sts.
- Row 5, RS, plain cable row: Ch 2, dc in the first 2 sts, FPdc around the next st, dc in the next st, FPdc around each of the next 6 cable posts, dc in the next st, FPdc around the next st, dc in the final 2 sts. Turn. Count: 14 sts.
- Row 6, WS: Work as Row 4. Count: 14 sts.
- Rows 7–174: Repeat Rows 3–6 another 42 times. Together with Rows 3–6 already completed, this gives 43 four-row repeats. Every row contains 14 sts; crossing rows are Rows 3, 7, 11, and every fourth row through Row 171.
- Row 175, RS: Work as Row 5. Count: 14 sts.
- Row 176, WS: Work as Row 4, without turning afterward. Count: 14 sts. Fasten off, leaving a 20 cm tail.
- Repeat the entire strip sequence until you have 20 strips, each with 176 rows and 14 stitches across.
Blocking, Layout, and Joining
- Wash and block the strips according to the yarn label. Shape each to approximately 12 × 220 cm, keeping the braids raised. Allow every strip to dry fully.
- Lay all 20 strips RS up, side by side, with every foundation edge at the same end. The cables run along the 220 cm length. Check that all crossing rows align.
- Place two neighboring strips edge to edge. Using matching yarn and a tapestry needle, mattress stitch through the outer edge bars, alternating between the two strips and matching each row to the corresponding row. Join all 176 row pairs without overlapping the strips.
- Draw the joining yarn snug after every few centimeters, keeping the seam flexible and the strips flat. Do not pull the edges into a ridge.
- Join the remaining strips in the same way, making 19 full-length seams. The two-stitch edge bands on either side of each seam create recessed channels between the raised cable columns.
- Check the assembled center: approximately 240 cm wide and 220 cm long. At each short edge there are 20 × 14 = 280 available stitch positions.
Three-Round Border
- Preparation: With RS facing and the smaller hook, join yarn at the first stitch of a short edge. Work clockwise around the perimeter. Beginning ch 1 does not count as a stitch; corner chains are excluded from stitch totals.
- Round 1: Ch 1, sc across all 280 stitch positions of the first short edge, ch 2 for the corner; work 264 sc along the long edge by placing 1 sc in the first row end and 2 sc in the second row end of each consecutive two-row pair, repeated 88 times; ch 2. Work 280 sc across the foundation edge, placing one sc in the underside of each original foundation stitch; ch 2. Work 264 sc along the remaining long edge using the same pickup sequence; ch 2, sl st to the first sc. Count: 1,088 sc and four ch-2 corner spaces.
- Round 2: Ch 1, sc in every sc around. In each corner space work 2 sc, ch 2, 2 sc. Join with sl st to the first sc. Count: 1,104 sc and four ch-2 corner spaces; each short side has 284 sc and each long side has 268 sc, counting from one corner space to the next.
- Round 3: Ch 1, sc in every sc around. In each corner space work 2 sc, ch 2, 2 sc. Join with sl st to the first sc. Count: 1,120 sc and four ch-2 corner spaces; each short side has 288 sc and each long side has 272 sc. Fasten off.
- Check that the border lies flat. Its intended depth is approximately 2 cm. If the first round ripples or draws inward, undo it and adjust the border hook size before repeating the stated pickup counts.
Finishing
- Inspect all 19 seams from both sides. Secure any loose joining ends through the seam allowances without pulling the strips together.
- Weave each yarn tail through several stitches on the WS, reverse direction, and trim after the final wash.
- Wash the assembled bedspread according to the yarn instructions. Support its full weight while lifting and lay it flat to dry, shaping the corners square.
- Measure after drying. The intended finished size is approximately 244 × 224 cm, with small differences expected from yarn and blocking.
Smooth the channels between the braids with your hands and leave the raised stitches rounded. Place the bedspread with its cables running from the head of the bed toward the foot for the long, flowing lines shown in the styling.
Tips for Success
- Mark the six central cable stitches on the first few rows so the isolated ribs never become part of a crossing.
- Keep FPtr stitches tall enough to span the crossing comfortably; tight crossings shorten and narrow the strip.
- Record completed four-row repeats for each strip. All strips need the same 43 repeats before the final two rows.
- Weigh your blocked sample and calculate the full strip requirement before committing to the yarn purchase; reserve additional yarn for seams and border.
- Join strips on a large flat surface so their weight cannot stretch the seam as you sew.
Common Mistakes to Avoid
- Adding stitches above post stitches: work around the post only, then leave its top loops unworked. Every strip row must remain at 14 stitches.
- Working the skipped cable posts in reverse order: return to the first skipped post and work the three posts in their original order.
- Using FPdc on WS rows: use BPdc there to keep the raised cable on the intended front surface.
- Joining strips in opposite directions: keep all foundation edges together and match row numbers before sewing.
- Putting two border stitches in every row end: use the specified three stitches per two rows to avoid an excessively flared long edge.
Ways to Customize This Pattern
- Make a narrower coverlet with 16 strips: approximately 196 cm wide including the border, at the stated gauge.
- Make a longer bedspread by adding four-row repeats to every strip; each additional repeat adds approximately 5 cm in length.
- Use alternating sage and cream strips while keeping every cable crossing in the same row position.
- Choose a wool blend for a springier braid or a washable acrylic blend for easier care; make and wash a gauge sample for either substitution.
- For a changed strip count or length, recalculate Round 1: each short edge has 14 stitches per strip, and each long edge has three stitches per two rows. Each later border round adds four stitches to each side.
Frequently asked questions
The photograph suggests large leafy braids, but it does not establish a reliable stitch sequence. This original pattern uses six-stitch crochet cables and isolated post ribs to create a related raised texture. Its cables will have a more traditional twisted appearance.
The instructions and dimensions are calculated for separate strips. Joining them provides stable channels and makes it easier to match the cable tension. A one-piece version would require a new foundation calculation and a fresh gauge sample.
Make and weigh a blocked 18-row strip sample. Estimate yarn for the twenty full strips by multiplying the sample weight by 176 divided by 18, then by 20. Add approximately 15 percent for joining, the border, and variation in tension. Convert weight to length using your yarn label.
Measure the mattress width and add twice your desired side drop. Compare that result with the approximately 244 cm finished width. For example, a 160 cm mattress has approximately 42 cm of drop on each side when centered.
The finished Sage Braid Crochet Bedspread Pattern

