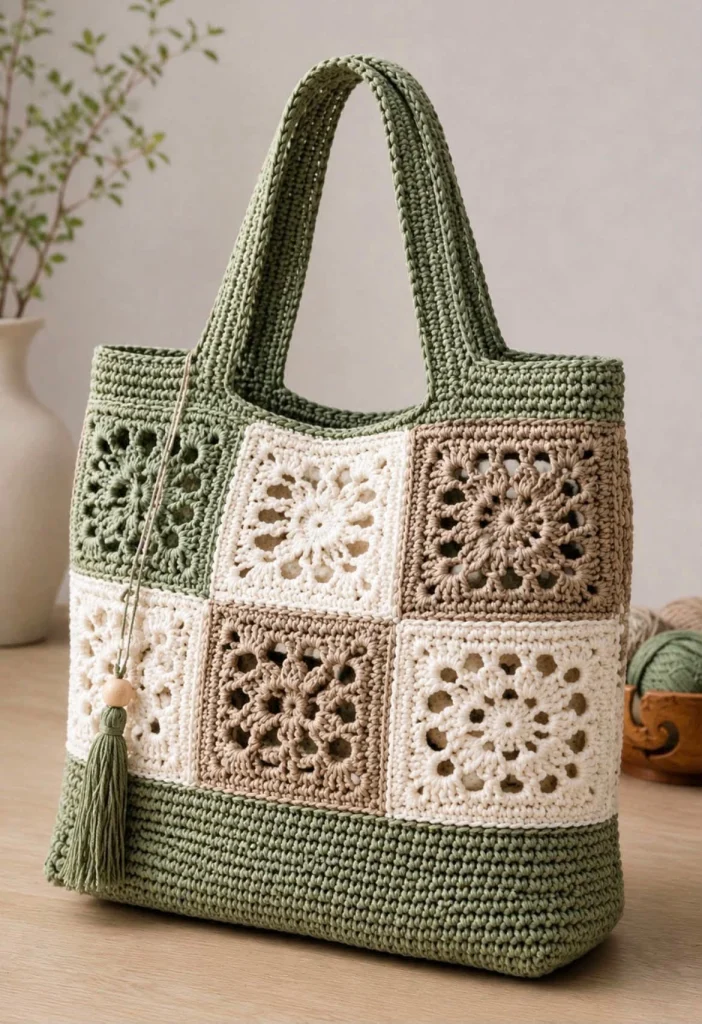
Sage Green Crochet Granny Square Tote Bag Pattern – Beautiful Floral Patchwork Bag
Looking for a beautiful handmade crochet bag that combines vintage charm with modern everyday style? This gorgeous sage green crochet granny square tote bag is the perfect inspiration for your next creative project!
Featuring six delicate floral granny squares in soft sage green, warm cream, and natural beige, this spacious handmade tote combines intricate crochet details with a practical, structured design.
The coordinating sage green base, long crocheted shoulder handles, and decorative tassel give this bag an elegant finish that looks wonderful with casual outfits, summer dresses, and cozy autumn clothing.
In this tutorial, you’ll learn how to create the floral granny squares, join the panels, crochet a sturdy base, attach comfortable handles, and add a beautiful handmade tassel.
Pattern note: This is an original, photo-inspired construction pattern designed to create a similar bag. The exact floral stitch chart and construction details cannot be determined from the photograph alone.
Project Overview
- Project: Sage Green Floral Granny Square Tote Bag
- Skill Level: Intermediate
- Style: Vintage, cottagecore, boho, everyday handmade fashion
- Construction: Floral granny square panels, solid crocheted base, upper border, two handles, decorative tassel
- Suggested Finished Size: Approximately 34 cm wide × 36 cm tall × 10 cm deep, excluding handles
- Hook Size: 4 mm
- Yarn: Worsted-weight cotton yarn
- Estimated Yarn: 500–700 g depending on yarn thickness and final dimensions
- Optional: Fabric lining for extra durability
Materials You’ll Need
- Sage green cotton yarn for the base, handles, upper border, and floral squares
- Warm ivory cotton yarn for contrasting granny squares
- Natural beige cotton yarn for additional floral squares
- 4 mm crochet hook
- Yarn needle
- Scissors
- Stitch markers
- Measuring tape
- One wooden bead for the decorative tassel
- Optional cotton fabric for lining
- Optional interfacing for additional structure
Suggested Color Palette
- Sage Green: Main bag color, bottom, handles, and border
- Warm Ivory: Three floral granny squares
- Natural Beige: Two contrasting floral squares
- Soft Olive: Optional decorative accents
The pictured front panel features six squares arranged in two rows of three:
Top Row: Sage Green – Ivory – Beige
Bottom Row: Ivory – Beige – Ivory
For the back panel, repeat the same arrangement or create your own complementary combination.
Crochet Abbreviations – US Terms
- MR: Magic ring
- ch: Chain
- sc: Single crochet
- hdc: Half double crochet
- dc: Double crochet
- tr: Treble crochet
- sl st: Slip stitch
- st: Stitch
- sp: Space
- FO: Fasten off
Part 1 – Crochet the Floral Granny Squares
The floral granny squares are the centerpiece of this beautiful bag. Each square features an openwork flower-inspired center surrounded by a structured square border.
For a bag with matching floral panels on both sides, make twelve squares in total.
Round 1 – Create the Flower Center
Using your chosen yarn color, make a magic ring.
Ch 3 (counts as the first dc), then work 11 dc into the ring.
Pull the ring closed.
Join with a sl st to the top of the beginning ch-3.
Total: 12 dc.
Round 2 – Create the Openwork Foundation
Ch 4 (counts as 1 dc and ch 1).
Work 1 dc into the next stitch, ch 1.
Repeat around.
Join with a sl st to the third chain of the beginning ch-4.
Total: 12 dc and 12 ch-1 spaces.
Round 3 – Crochet the Floral Petals
Sl st into the first ch-1 space.
Ch 1.
Work (1 sc, 3 dc, 1 sc) into the same space.
Skip the next ch-1 space.
Repeat the petal sequence in every other ch-1 space around.
Join with a sl st.
You should have six raised floral petals.
Round 4 – Create the Square Foundation
Working behind the petals, attach yarn to the foundation spaces.
Ch 3.
Work dc stitches and chain spaces around the flower to establish four corners.
At each corner, work (2 dc, ch 2, 2 dc).
Keep the corner groups evenly spaced so the flower sits centered inside the square.
Round 5 – Expand the Granny Square
Ch 3.
Work 1 dc into each stitch along the sides.
At each corner ch-2 space, work:
(2 dc, ch 2, 2 dc).
Repeat around all four sides.
Join with a sl st.
Round 6 – Add the Decorative Openwork
Ch 3.
Work a combination of dc stitches and ch-1 spaces along each side.
Maintain the corner pattern of (2 dc, ch 2, 2 dc).
This creates the airy, lace-inspired appearance seen in the bag.
Round 7 – Final Square Border
Ch 1.
Work 1 sc into each stitch and chain space around.
At each corner, work (2 sc, ch 2, 2 sc).
Join with a sl st and fasten off.
Block the squares gently so they are all the same size.
Suggested Square Size: Approximately 11–12 cm per side.
Important: The floral center above is a usable decorative motif, but the square-transition rounds are a design framework rather than an exact stitch-by-stitch chart. Adjust the stitch counts to your flower’s actual foundation and maintain four evenly spaced corners.
Part 2 – Arrange the Granny Square Panels
Once all twelve squares are complete, arrange them into two matching rectangular panels.
Front Panel Arrangement
- Top Left: Sage Green
- Top Center: Ivory
- Top Right: Beige
- Bottom Left: Ivory
- Bottom Center: Beige
- Bottom Right: Ivory
Back Panel Arrangement
Repeat the same six-square layout for a coordinated finish.
Alternatively, reverse the arrangement to create a complementary patchwork effect.
Part 3 – Join the Granny Squares
Use ivory or sage green yarn to join the squares.
Step 1
Place two squares together with their right sides facing.
Step 2
Insert the hook through the corresponding edge stitches of both squares.
Step 3
Work a slip stitch through both layers.
Step 4
Continue along the entire edge.
Step 5
Repeat until all six squares form one rectangular panel.
Make a second panel using the same technique.
For a flatter finish, you can use a mattress stitch instead of slip stitches.
Part 4 – Crochet the Solid Sage Green Base
The solid sage green base gives the tote its structured appearance and makes it more practical for everyday use.
Step 1 – Foundation Chain
Using sage green yarn and a 4 mm hook, ch 61.
Step 2 – First Row
Starting in the second chain from the hook, work 1 sc in each chain.
Total: 60 sc.
Step 3 – Continue the Base
Ch 1, turn.
Work 1 sc in each stitch across.
Repeat until the rectangle measures approximately 10 cm deep.
Adjust the foundation chain if necessary so the finished base matches the width of your joined granny square panels.
Step 4 – Strengthen the Base
Work one additional row of sc around the entire rectangle.
Place 3 sc into each corner to prevent pulling.
Fasten off and weave in the ends.
Part 5 – Create the Side Panels
To give the tote more depth, crochet two narrow side panels.
Step 1
Using sage green yarn, ch enough stitches to measure approximately 10 cm.
Step 2
Work sc rows until each side panel matches the height of the granny square panels.
Step 3
Make two identical side panels.
Step 4
Join the side panels to the front and back using slip stitches or a mattress seam.
Attach the lower edges to the base rectangle.
Make sure all corners align before securing the final seams.
Part 6 – Crochet the Upper Sage Green Border
The upper border creates the clean, structured finish visible around the top of the bag.
Round 1
Attach sage green yarn to the top opening.
Work sc evenly around the entire opening.
Join with a sl st.
Rounds 2–5
Ch 1.
Work 1 sc in each stitch around.
Join with a sl st.
Round 6
Work one final round of slip stitches for a neat, reinforced edge.
Fasten off.
The finished border should measure approximately 3–4 cm tall.
Part 7 – Crochet the Long Shoulder Handles
The long sage green handles are designed to sit comfortably over the shoulder.
Make two identical handles.
Step 1 – Foundation
Using sage green yarn, ch 91.
Row 1
Starting in the second chain from the hook, work 1 sc in each chain.
Total: 90 sc.
Rows 2–7
Ch 1, turn.
Work 1 sc in each stitch across.
Step 2 – Reinforce the Handles
Work one round of slip stitches around the entire handle.
This helps reduce stretching and creates a clean edge.
Step 3 – Attach the Handles
Position the first handle on the front of the bag.
Place each end approximately 7–9 cm from the side edges.
Sew the ends securely to the inside of the upper border.
Repeat with the second handle on the back.
For extra durability, stitch a small square with a diagonal cross at each handle attachment point.
Tip: Cotton yarn is ideal for handles because it generally stretches less than soft acrylic yarn.
Part 8 – Make the Decorative Sage Green Tassel
The beautiful hanging tassel adds a charming boho detail to the finished tote.
Step 1 – Cut the Yarn
Cut approximately 30 strands of sage green yarn, each measuring 25–30 cm long.
Step 2 – Fold the Strands
Gather the strands together and fold them in half.
Step 3 – Create the Tassel Head
Wrap a separate piece of yarn tightly around the bundle approximately 2 cm below the fold.
Tie securely and hide the knot inside.
Step 4 – Trim the Ends
Trim the bottom of the tassel so the strands hang evenly.
Step 5 – Add the Wooden Bead
Thread the tassel’s hanging cord through a natural wooden bead.
Step 6 – Attach to the Bag
Tie the tassel to one of the handle bases or upper corners.
Allow it to hang naturally along the side of the bag.
Part 9 – Add an Optional Fabric Lining
A fabric lining can help protect the crochet stitches and prevent small items from slipping through the openwork granny squares.
Step 1
Measure the inside of the finished bag.
Step 2
Cut two fabric rectangles for the front and back, plus pieces for the sides and bottom.
Step 3
Sew the fabric pieces together, leaving the top open.
Step 4
Fold the upper raw edge inward and press it flat.
Step 5
Insert the lining into the crochet bag.
Step 6
Hand-stitch the lining to the inside of the upper border.
Keep the stitches small and evenly spaced.
You can also add an interior pocket for keys, a phone, or other small essentials.
Part 10 – Final Finishing Touches
- Weave in all loose yarn ends securely.
- Check the seams between the granny squares.
- Reinforce the handle attachment points.
- Gently block the bag if necessary.
- Attach the decorative tassel.
- Insert the optional lining.
- Check the bag’s shape and adjust the corners.
Your beautiful sage green crochet granny square tote bag is now ready to enjoy!
Tips for a Professional Handmade Finish
- Use the same yarn weight for every granny square.
- Measure each square before joining to maintain consistent sizing.
- Block the squares before assembly for straighter seams.
- Use cotton yarn for a firm and durable bag.
- Keep the handle attachments symmetrical.
- Reinforce the base if you plan to carry heavier items.
- Add a fabric lining to improve durability.
- Choose neutral colors for a timeless everyday accessory.
Creative Color Combinations to Try
1. Sage Green, Ivory & Beige
A soft, natural combination perfect for a minimalist or cottagecore wardrobe.
2. Dusty Rose, Cream & Taupe
A romantic color palette with a delicate vintage feel.
3. Terracotta, Olive & Natural Cotton
A warm, earthy combination inspired by autumn landscapes.
4. Navy Blue, White & Sand
A timeless coastal-inspired bag perfect for summer.
5. Chocolate Brown, Caramel & Ivory
A rich neutral combination for cozy fall outfits.
Ways to Style Your Crochet Granny Square Tote Bag
Everyday Casual
Pair it with jeans, a white blouse, and comfortable sandals for an effortlessly stylish handmade look.
Summer Outfits
Wear it with a linen dress and woven sandals for a relaxed summer aesthetic.
Autumn Fashion
Style it with a cream cardigan, brown trousers, and ankle boots.
Weekend Shopping
Use it as a lightweight accessory for shopping trips, coffee dates, and casual outings.
Handmade Gift
Fill it with a small candle, a notebook, or other thoughtful gifts for a personalized handmade present.
Frequently Asked Questions
Is this crochet tote bag suitable for beginners?
Confident beginners who already understand basic crochet stitches may be able to complete it, although the floral squares and assembly require some patience.
What is the best yarn for a crochet tote bag?
Cotton yarn is an excellent choice because it is durable, washable, and helps the bag maintain its structure.
How many granny squares do I need?
This design uses twelve granny squares: six for the front and six for the back.
Can I make the bag larger?
Yes. You can add more granny squares or increase the number of rounds in each square.
Do I need to add a lining?
A lining is optional, but recommended if you plan to carry small items or use the bag frequently.
How can I prevent the handles from stretching?
Use cotton yarn, work tight stitches, reinforce the attachment points, or sew a narrow cotton tape along the inside of each handle.
Can I wash the finished bag?
Follow the care instructions for your chosen yarn. Gentle handwashing in cool water is usually a safe option for cotton crochet bags.
How long does this project take?
Depending on your experience and the complexity of your chosen floral squares, the bag may take approximately 12–20 hours or longer.
Can I sell bags made using this design?
You may sell your own handmade bags, subject to any applicable rules concerning third-party designs, trademarks, and decorative elements.
Final Thoughts
This sage green crochet granny square tote bag pattern is a wonderful project for anyone who loves elegant handmade accessories.
The combination of soft sage green, warm ivory, natural beige, delicate floral motifs, comfortable shoulder handles, and a charming decorative tassel creates a timeless bag that feels both vintage and modern.
Whether you’re making it for yourself, creating a thoughtful handmade gift, or exploring new crochet bag ideas, this project offers plenty of opportunities to experiment with colors, textures, and personal details.
Gather your favorite cotton yarn, choose your crochet hook, and enjoy making a beautiful accessory that’s uniquely yours.
Happy crocheting! 🧶🌿🤍

