Sage Green Floral Granny Square Crochet Tote Bag – Free Advanced Pattern
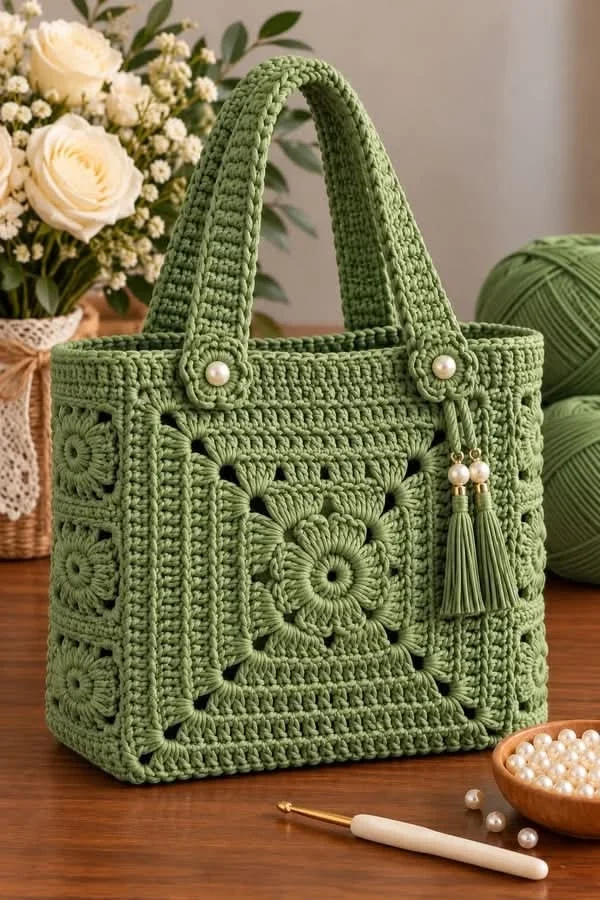
Create a timeless handmade accessory with this elegant sage green floral granny square crochet tote bag. Featuring a beautiful raised flower motif, structured rectangular body, textured crochet borders, sturdy double handles, pearl button accents, and delicate decorative tassels, this sophisticated handbag combines classic crochet craftsmanship with modern everyday style.
Inspired by the reference photograph, this advanced crochet bag pattern features a prominent three-dimensional floral granny square on the front, smaller flower motifs along the side panels, and a beautifully textured sage green finish.
Perfect for spring outings, summer shopping, thoughtful handmade gifts, or everyday accessories, this floral crochet tote bag is a wonderful project for experienced crocheters who enjoy detailed stitchwork and elegant finishing techniques.
Pattern Details
- Skill Level: Advanced
- Finished Width: Approximately 32 cm
- Finished Height: Approximately 27 cm, excluding handles
- Finished Depth: Approximately 11 cm
- Handle Drop: Approximately 22 cm
- Yarn Weight: Worsted-weight cotton yarn
- Hook Size: 3.5 mm and 4.0 mm
- Main Color: Sage green
- Construction: Floral granny square panels, reinforced base, textured upper band, and separate handles
- Terminology: US crochet terms
Materials Needed
- Approximately 550–650 g sage green cotton yarn
- 3.5 mm crochet hook
- 4.0 mm crochet hook
- Two pearl-style buttons, approximately 12–15 mm
- Four decorative pearl beads for the tassels
- Small gold-colored spacer beads
- Matching sewing thread
- Tapestry needle
- Stitch markers
- Scissors
- Measuring tape
- Optional cotton fabric lining
- Optional magnetic snap closure
- Optional plastic canvas for the base
- Blocking pins and blocking mat
Crochet Abbreviations
- MR: Magic ring
- ch: Chain
- sc: Single crochet
- hdc: Half double crochet
- dc: Double crochet
- tr: Treble crochet
- sl st: Slip stitch
- inc: Increase
- dec: Decrease
- st: Stitch
- sp: Space
- FLO: Front loop only
- BLO: Back loop only
- FO: Fasten off
- FPdc: Front post double crochet
- BPdc: Back post double crochet
1. Crochet the Raised Floral Center
The focal point of this tote bag is a large raised floral motif worked in the same sage green yarn as the rest of the bag.
Using a 3.5 mm crochet hook, begin with a magic ring.
Round 1: Work 12 sc into the magic ring. Pull tight and join with a sl st. (12)
Round 2: Ch 3, dc in the same stitch, 2 dc in each remaining stitch around. Join. (24)
Round 3: *Ch 4, skip 2 stitches, sc in next stitch.* Repeat eight times to create eight chain arches.
Round 4: Into each chain arch work (sc, hdc, 5 dc, hdc, sc). Repeat around to create eight rounded flower petals.
Round 5: Working behind the petals, join yarn around the posts of Round 3. *Ch 5, sc behind the next petal.* Repeat eight times.
Round 6: Into each new arch work (sc, hdc, 7 dc, hdc, sc).
Round 7: Work another round of chain arches behind the second petal layer using ch 6 between attachment points.
Round 8: Into each arch work (sc, hdc, 9 dc, hdc, sc).
Fasten off and weave in the ends.
The completed flower should have three overlapping layers of raised petals and a clearly defined circular center.
2. Transform the Flower into a Granny Square
Using the same sage green yarn, join yarn behind the outer petal layer.
Round 1: Create eight evenly spaced chain arches behind the petals.
Round 2: Work alternating groups of dc and tr stitches to begin forming four corners.
At each corner, work (3 tr, ch 2, 3 tr).
Along each side, work groups of dc stitches separated by ch 1 spaces.
Round 3: Continue working granny-style clusters around the square, maintaining four clearly defined corners.
Round 4: Work dc clusters into the spaces from the previous round.
Round 5: Work one round of hdc around the entire square, placing 3 hdc into each corner space.
Round 6: Work one round of sc to strengthen the outer edge.
Continue adding rounds as needed until the square measures approximately 24 × 24 cm after blocking.
Keep the raised floral center prominent and avoid flattening the petals while blocking.
3. Crochet the Textured Frame
The reference bag features a beautiful combination of dense crochet stitches and raised vertical textures surrounding the floral square.
Using the 3.5 mm hook:
Round 1: Sc evenly around the square.
Round 2: Work dc around, placing additional stitches at the corners to maintain the square shape.
Round 3: Alternate FPdc and BPdc stitches along each side to create a textured ribbed effect.
Round 4: Repeat the post-stitch pattern, working FPdc into FPdc and BPdc into BPdc.
Round 5: Finish with one round of sc.
The textured frame should appear raised, structured, and symmetrical.
4. Make the Front and Back Panels
For the front panel, use the completed large floral granny square.
Extend the square with additional textured crochet rows until the finished panel measures approximately 32 cm wide × 27 cm high.
Maintain a consistent stitch count along both sides.
For the back panel, create a matching floral square and work the same surrounding border.
Alternatively, use a solid textured crochet back panel for a simpler, more durable everyday handbag.
Block both panels to identical dimensions before assembly.
5. Crochet the Side Flower Motifs
The side panels feature smaller raised floral granny squares arranged vertically.
Make six small flower squares, three for each side panel.
Small Flower Center
Round 1: MR, 8 sc. (8)
Round 2: *Ch 3, skip 1 stitch, sc in next stitch.* Repeat four times.
Round 3: Work (sc, hdc, 3 dc, hdc, sc) into each chain arch.
Round 4: Create chain arches behind the petals.
Round 5: Work 5 dc into each arch to form a second petal layer.
Square Border
Work dc clusters around the flower, forming four corners with (2 dc, ch 2, 2 dc).
Continue until each small square measures approximately 10–11 cm.
Make all six squares the same size.
Block before joining.
6. Join the Side Panels
Arrange three small flower squares vertically for each side.
Join them using a flat slip-stitch seam or a mattress stitch.
Work additional rows of sc along the edges until each completed side panel measures approximately 11 cm wide × 27 cm high.
Make sure both side panels are identical.
For a polished appearance, keep the floral motifs aligned vertically.
7. Crochet the Reinforced Bag Base
Using the 4.0 mm crochet hook:
Row 1: Ch 49.
Row 2: Sc in the second chain from the hook and across. (48)
Rows 3–18: Ch 1, turn, sc across. (48)
Continue working rows until the base measures approximately 32 × 11 cm.
Work one round of sc around the entire rectangle.
For a stronger base, crochet a second identical rectangle.
Place a piece of plastic canvas between the two rectangles and sew them together.
This reinforced base helps the handbag maintain its structured rectangular shape.
8. Assemble the Bag Body
Lay the front panel, back panel, side panels, and base flat.
Using matching yarn and a tapestry needle:
- Attach the front panel to one long edge of the base.
- Attach the back panel to the opposite long edge.
- Sew one side panel between the front and back panels.
- Repeat with the second side panel.
- Reinforce the four lower corners.
- Turn the bag right side out.
Use a firm mattress stitch or slip-stitch seam to create clean, sturdy joins.
Check that the bag stands evenly on a flat surface.
9. Crochet the Upper Textured Band
Using sage green yarn and a 3.5 mm hook, join yarn to the upper edge of the assembled bag.
Round 1: Sc evenly around the opening.
Round 2: Dc in every stitch around.
Round 3: Alternate FPdc and BPdc around the entire opening.
Round 4: Continue the post-stitch ribbing.
Round 5: Sc in every stitch around.
Round 6: Work another round of sc for reinforcement.
Fasten off.
The upper band should be approximately 4–5 cm tall and firm enough to support the handles.
10. Crochet the Two Sturdy Handles
The bag features two wide, slightly curved crochet handles.
Make two identical handles.
Using the 3.5 mm hook:
Row 1: Ch 85.
Row 2: Sc in the second chain from the hook and across. (84)
Rows 3–8: Ch 1, turn, sc across.
Row 9: Work one row of slip stitches to reinforce the edge.
Fasten off, leaving long sewing tails.
Fold each handle lengthwise and sew the long edges together to create a thick, rounded strap.
For additional strength, insert cotton cord inside the folded handle before closing.
Attach the handles symmetrically to the front and back upper bands.
Use several rows of reinforced stitching at each attachment point.
11. Crochet the Decorative Handle Tabs
Make four small oval crochet tabs to cover the handle attachment points.
Using sage green yarn:
Round 1: Ch 8.
Round 2: Sc in second chain from hook, sc 5, 3 sc in last chain. Continue along the opposite side with sc 5 and 2 sc in the final chain.
Round 3: Work sc around, increasing at both rounded ends.
Round 4: Work one final round of sc.
Fasten off.
Position one tab over each handle attachment point.
Sew securely and attach a pearl-style button in the center of each visible front tab.
The buttons should be decorative rather than the primary structural support for the handles.
12. Make the Elegant Sage Green Tassels
The reference handbag includes two long decorative tassels finished with pearl and gold bead accents.
Make two matching tassels.
- Wrap sage green yarn around a 12 cm cardboard template approximately 45 times.
- Slide a separate yarn strand beneath the wraps and tie securely.
- Remove the yarn bundle from the cardboard.
- Cut the bottom loops.
- Wrap yarn around the upper section to create a neat tassel head.
- Trim the bottom strands evenly.
- Thread a pearl bead and gold spacer bead onto the hanging cord.
- Repeat for the second tassel.
Attach both tassels near the upper right handle attachment point.
Allow them to hang naturally along the front of the bag.
13. Optional Fabric Lining
Adding a fabric lining improves durability and prevents small items from slipping through the decorative crochet openings.
Choose lightweight cotton fabric in a coordinating sage green or neutral beige shade.
- Measure the inside of the finished handbag.
- Cut two fabric rectangles for the front and back.
- Cut two narrow rectangles for the side panels.
- Cut one rectangle for the base.
- Add approximately 1 cm seam allowance to each piece.
- Sew the fabric pieces together to create a bag-shaped lining.
- Fold the upper raw edge inward.
- Insert the lining into the crochet bag.
- Hand-sew the lining to the inside upper band.
For added convenience, install a small magnetic snap closure before attaching the lining.
14. Final Finishing
- Check that all granny square seams are secure.
- Weave in every loose yarn end.
- Gently shape the raised floral motifs.
- Inspect the reinforced bag base.
- Check the alignment of the two handles.
- Secure the decorative pearl buttons.
- Attach the two tassels.
- Add the optional fabric lining.
- Steam-block lightly if needed, avoiding direct pressure on the raised flowers.
- Allow the bag to dry completely before use.
Your sage green floral granny square crochet tote bag is now ready to enjoy!
15. Color Variations
Classic Sage Green
Use one beautiful sage green shade throughout the bag for a timeless, elegant, monochromatic appearance.
Ivory and Beige
Combine warm ivory floral squares with beige borders for a soft, neutral handbag.
Dusty Rose
Create a romantic feminine version using muted pink cotton yarn and pearl accents.
Chocolate Brown
Use rich chocolate brown yarn with gold hardware for a sophisticated autumn accessory.
Soft Lavender
Choose pastel lavender with ivory accents for a delicate spring handbag.
16. Advanced Crochet Tips
- Use tightly spun cotton yarn for crisp stitch definition.
- Maintain consistent tension across all granny squares.
- Block every motif before joining the panels.
- Count stitches carefully when creating the square corners.
- Keep the raised flower petals evenly spaced.
- Use reinforced seams for the base and handles.
- Add cotton cord inside the handles to reduce stretching.
- Choose a sturdy lining for everyday use.
- Keep the decorative tassels lightweight.
- Test the handle attachments with a light load before regular use.
17. Care Instructions
To keep your handmade crochet handbag looking beautiful:
- Hand wash gently in cool water.
- Use mild detergent suitable for cotton yarn.
- Avoid twisting or wringing the bag.
- Remove excess water with a clean towel.
- Reshape while damp.
- Dry flat away from direct sunlight.
- Avoid hanging the bag while wet.
- Store with tissue paper inside to maintain its shape.
- Keep decorative pearls and tassels away from rough surfaces.
Frequently Asked Questions
Is this floral crochet tote bag suitable for beginners?
This design is best suited to advanced crocheters because it includes dimensional flower motifs, granny square shaping, textured stitches, structured assembly, reinforced handles, and decorative finishing.
What yarn is best for this handbag?
Worsted-weight cotton yarn is recommended because it offers durability, structure, and excellent stitch definition.
Can I make the bag larger?
Yes. Add more rounds to the granny square panels and adjust the side panels, base, and handles proportionally.
Can I use acrylic yarn?
Yes, but cotton yarn generally provides better structure and is less likely to stretch during everyday use.
Does the bag need a lining?
A lining is optional but recommended, especially if you plan to carry small accessories or use the bag regularly.
How can I make the handles stronger?
Use tight stitches, reinforce the attachment points, and insert cotton cord or non-stretch tape inside the handles.
Can I make the bag without tassels?
Absolutely. The tassels are decorative and can be omitted for a simpler, minimalist appearance.
How long does this project take?
An experienced crocheter may need approximately 15–25 hours, depending on the chosen yarn, stitch tension, and finishing details.
Can I sell finished bags made from this pattern?
Yes. You may sell handmade bags created using this original pattern. Credit to Cozy Crochet Patterns is appreciated.
Final Thoughts
This Sage Green Floral Granny Square Crochet Tote Bag is a beautiful combination of traditional crochet artistry and practical modern design.
The dimensional flower centerpiece, matching floral side panels, textured stitches, elegant handles, pearl accents, and delicate tassels make this handbag a truly special handmade accessory.
Whether you create it for yourself, give it as a thoughtful gift, or add it to your handmade collection, this sophisticated crochet tote bag is sure to attract attention.
Save this free floral granny square crochet bag pattern to Pinterest and share it with your crochet-loving friends!
Designer note: This is an original, untested pattern interpretation inspired by the supplied photograph, rather than an exact stitch-for-stitch reconstruction. The flower-to-square transition, panel dimensions, stitch counts, and handle construction may require adjustments based on your gauge and yarn.

