Sage Green Mandala Crochet Hobo Bag Pattern
Beginner Friendly
Perfect for those just starting their crochet journey, with clear instructions and simple techniques
Single-Day Project
A satisfying project you can complete in a single afternoon or evening.
Handmade Gift
A beautiful keepsake — free forever. Read online or print at home.
About This Sage Green Mandala Crochet Hobo Bag Pattern
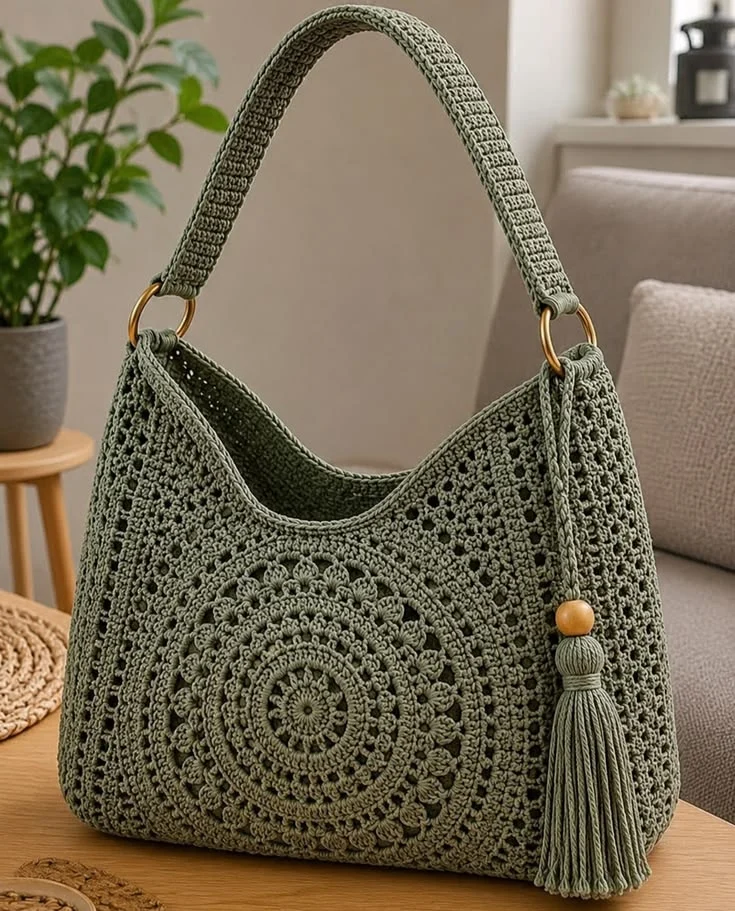
This crochet mandala hobo bag pattern creates a beautiful everyday shoulder bag with a soft slouchy shape, intricate lace texture and a statement circular mandala worked directly into the front panel.
The entire bag is made in a muted sage green for an elegant, natural look. A wide crocheted shoulder strap attaches to gold-tone rings, while a matching handmade tassel and wooden bead finish the design.
Materials
- DK / Light #3 cotton yarn or cotton cord in sage green 650-800 g
- 3.5 mm crochet hook 1
- 3 mm crochet hook optional for strap
- Gold-tone metal rings, 35-40 mm 2
- Large natural wooden bead 1
- Yarn needle 1
- Scissors 1 pair
- Stitch markers 4
- Cotton fabric for lining optional
- Magnetic snap optional
Abbreviations
MRmagic ringchchainsl stslip stitchscsingle crochethdchalf double crochetdcdouble crochettrtreble crochetFPdcfront post double crochetpicotch 3, sl st into first chspspaceststitchFOfasten offFinished Measurements
- Bag width: approximately 38-40 cm / 15-16 in
- Bag height: approximately 31-33 cm / 12-13 in
- Base depth: approximately 9-10 cm / 3.5-4 in
- Mandala diameter: approximately 23-25 cm / 9-10 in
- Strap length: approximately 60-65 cm / 24-26 in
- Strap width: approximately 4 cm / 1.5 in
- Tassel: approximately 18 cm / 7 in
Front Mandala – Center
Using sage green yarn, make a MR.
R1: ch 3, work 15 dc into MR. Pull ring closed and join with sl st to top of beginning ch-3. (16 dc)
R2: ch 1, *sc in next st, ch 2*. Repeat around. Join. (16 ch-2 spaces)
R3: sl st into first ch-2 sp. Ch 3, 2 dc in same sp, ch 1. Work 3 dc, ch 1 in every ch-2 sp around. Join.
Mandala Petal Round
R4: sl st into first ch-1 sp.
Work:
*sc, hdc, 3 dc, hdc, sc*
into each ch-1 space.
This creates the first ring of small rounded petals.
Raised Texture Round
R5: Working behind the petals, join around the post of the center dc from R3.
Ch 3, FPdc around the same post.
Work 2 FPdc around each center post around the motif.
Join with sl st.
Mandala Arch Round
R6: ch 1, sc in first st, *ch 4, sk 1 st, sc in next st*.
Repeat around and join.
R7: sl st into first ch-4 sp. Work 5 dc into each ch-4 space.
Join.
Mandala Bobble-Style Texture
R8: ch 1, sc around.
Work one sc between each group of 5 dc and evenly across the tops of the shells.
R9: *sc in next 2 sts, ch 3, sl st into first ch to create a picot, sc in next 2 sts*.
Repeat around.
Outer Mandala Fans
R10: Working behind the picots, *ch 5, sk approximately 3 sts, sc in next st*.
Repeat evenly around.
R11: Into each ch-5 space work:
sc, hdc, 3 dc, hdc, sc.
Repeat around.
R12: sc evenly around the entire motif, increasing as necessary so the circle remains flat.
Final Mandala Round
R13: *sc in next 3 sts, picot, sc in next 3 sts*.
Repeat around.
FO only if you plan to sew the mandala onto the panel separately.
For a seamless appearance, continue directly into the surrounding lace panel.
Building the Front Panel Around the Mandala
Mark the top, bottom and both sides of the mandala.
Begin creating a loose mesh around the circle using alternating chains and double crochets.
Setup: join yarn at the side marker, ch 4.
Work:
*dc in next appropriate stitch, ch 2, sk 1-2 sts*
around the outer mandala.
Gradually lengthen the chain spaces near the four corners so the circular motif begins forming a rectangular panel.
Front Lace Panel
Once the mandala has been squared, continue working the side sections in mesh stitch.
Mesh row: ch 4, turn, *dc in next dc, ch 2*. Repeat across.
Texture row: ch 1, turn, sc into first sp, *ch 3, sc into next ch-2 sp*. Repeat across.
Alternate these two rows until the front panel measures approximately 38 cm wide × 30 cm high.
Shaping the Curved Top
The upper edge of the bag should dip gently in the center.
Begin decreasing the center section while keeping both side sections taller.
Work approximately the first third of the row normally.
Across the center third, replace some mesh spaces with shorter stitches such as sc and hdc.
Return to dc mesh across the final third.
Repeat for 3-4 rows until the opening forms a gentle curved shape.
Back Panel
The back may be made with the same lace texture without the mandala.
Ch enough stitches to measure approximately 38 cm.
R1: dc in 4th ch from hook, *ch 1, sk 1, dc in next st*. Repeat across.
R2: ch 4, turn, *dc in next dc, ch 1*. Repeat across.
Continue until the back matches the dimensions of the front.
Shape the top edge to match the front panel.
Firm Lower Section
For better structure, work the bottom 5-6 cm of both panels in solid stitches.
Row 1: sc across.
Row 2: ch 1, turn, sc in each st.
Repeat until the dense section measures approximately 5 cm.
Bag Base
Ch enough stitches to measure approximately 28 cm.
R1: sc in second ch from hook and across.
Work 3 sc in final ch.
Continue along opposite side of foundation chain.
Work 2 sc into the final end.
Continue crocheting in an oval, increasing evenly at both ends.
Stop when the base measures approximately 28 × 9 cm.
Assembling the Bag
- Place front and back panels with wrong sides together.
- Position the oval base between the lower edges.
- Pin or mark everything evenly.
- Join the front to the base using sc.
- Continue around and attach the back panel.
- Work sc up both side seams.
- Leave the curved upper opening unjoined.
Top Edge
Join sage yarn at one side seam.
R1: sc evenly around the entire opening.
R2: reverse sc around for a firm decorative edge.
FO and weave in securely.
Side Ring Tabs
Make 2.
Ch 8.
R1: sc in second ch from hook and across. (7 sc)
R2-12: ch 1, turn, sc across.
FO leaving a long tail.
Pass each tab through one gold-tone ring, fold it in half and sew both ends securely to the upper side of the bag.
Shoulder Strap
Ch 8.
R1: sc in second ch from hook and across. (7 sc)
R2: ch 1, turn, sc in BLO across.
Repeat R2 until the strap measures approximately 60-65 cm.
For a wider strap, begin with 10-12 chains instead.
Reinforcing the Strap
Work one round of sl st around the entire strap.
This reduces stretching and creates a neat finished edge.
Thread one end through the first metal ring and fold approximately 5 cm back onto itself.
Sew firmly.
Repeat at the opposite end.
Tassel Cord
Ch approximately 45-50.
Sl st back through every chain to create a firm cord.
FO, leaving enough yarn for attaching.
Loop the cord around one side ring.
Large Sage Tassel
Cut approximately 45-55 strands of sage yarn, each 38-40 cm long.
Fold the strands in half around the tassel cord.
Using a separate strand, wrap firmly around the bundle approximately 2 cm below the fold.
Wrap 8-10 times and knot securely.
Trim the bottom so the finished tassel measures approximately 17-18 cm.
Wooden Bead Detail
Thread one large wooden bead onto the tassel cord before attaching the tassel.
Position the bead directly above the tassel head.
Tie a secure knot underneath the bead to prevent movement.
Attach the cord to the gold ring at the upper side of the bag.
Optional Lining
- Lay the finished bag flat on doubled cotton fabric.
- Trace around the bag, excluding the strap.
- Add approximately 1.5 cm seam allowance.
- Cut two lining pieces.
- Sew the side and bottom edges together.
- Fold the upper raw edge inward.
- Insert the lining into the crochet bag.
- Hand sew around the upper edge using small invisible stitches.
Optional Magnetic Closure
Install one half of a magnetic snap at the center of the front lining and the other half at the center of the back lining.
Add a small square of interfacing behind each snap for reinforcement.
Install the closure before sewing the lining permanently into the bag.
Final Finishing
- Weave in every yarn end securely.
- Check the side-ring tabs and strap attachments.
- Lightly steam-block the front mandala.
- Shape the curved opening with your fingers.
- Lay the bag flat until completely dry.
- Comb the tassel strands with your fingers.
- Trim the tassel evenly.
Frequently Asked Questions
Yes. Work both panels using the lace mesh pattern for a simpler version. You can also crochet the mandala separately and sew it onto an existing solid panel.
Yes. Add additional rounds around the mandala and increase the width and height of both panels before assembly.
Cotton, mercerized cotton or braided cotton cord works especially well because these fibers provide structure and show the detailed mandala stitches clearly.
A lining is optional, but it is recommended if the bag will be used regularly. It helps protect the lace stitches and prevents keys or other small objects from slipping through the openings.
Yes. Continue the strap rows until it reaches your preferred length. For a crossbody version, approximately 100-120 cm may work better depending on the desired fit.
Absolutely. Cream gives the bag a soft boho look, burgundy creates a richer autumn style, chocolate brown gives it a vintage feel, and dusty rose creates a softer feminine version.
The finished Sage Green Mandala Crochet Hobo Bag Pattern