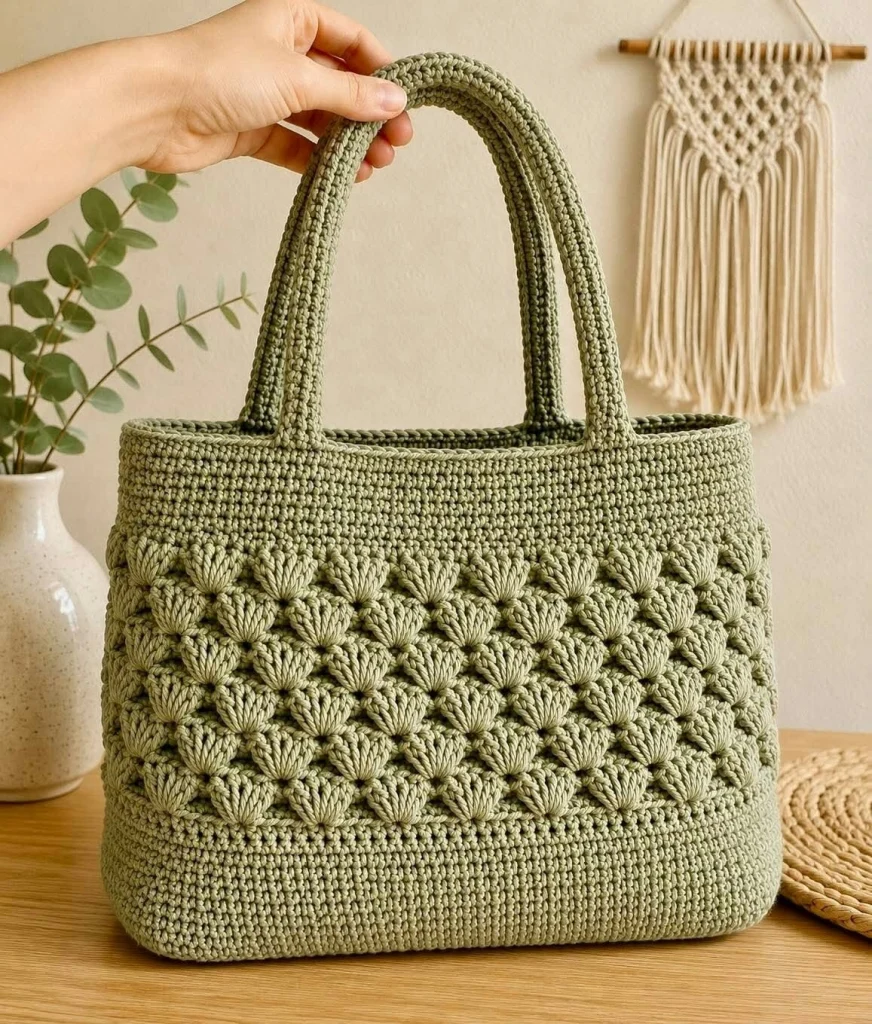
Sage Green Puff Stitch Crochet Tote Bag – Free Pattern
Create a beautiful everyday accessory with this sage green puff stitch crochet tote bag pattern. Featuring rows of raised floral-inspired puff stitches, a structured rectangular base, a smooth upper band, and two sturdy shoulder handles, this handmade bag combines practical design with elegant crochet texture.
The soft sage green color gives this tote a timeless, natural look that pairs beautifully with casual outfits, summer dresses, and neutral wardrobes.
This free crochet bag pattern walks you through making the base, working the textured body, shaping the upper band, crocheting reinforced handles, and finishing the bag.
Pattern at a Glance
Materials and Supplies
- Approximately 600–800 g of sage green cotton cord or sturdy worsted-weight cotton yarn.
- 4 mm crochet hook, or a hook suitable for your yarn.
- Yarn needle with a large eye.
- Scissors.
- Stitch markers.
- Measuring tape.
- Optional fabric lining.
- Optional magnetic snap closure.
- Optional plastic canvas for reinforcing the base.
Abbreviations
Special Stitch: Puff Stitch
How to Crochet a Puff Stitch
- Yarn over and insert your hook into the indicated stitch.
- Yarn over and pull up a long loop.
- Repeat the yarn-over and pull-up process four more times in the same stitch.
- You should have 11 loops on your hook.
- Yarn over and pull through all 11 loops.
- Chain 1 to secure the puff stitch.
The securing chain is part of the puff stitch and does not count as an additional stitch.
Keep the pulled-up loops even to create full, rounded puffs.
Part 1: Crochet the Rectangular Base
The bag begins with a sturdy rectangular base worked in single crochet rows.
Base instructions
Using sage green yarn:
Row 1: Ch 31. Sc in the second chain from the hook and in each remaining chain. (30 sc)
Rows 2–20: Ch 1, turn. Sc in each stitch across. (30 sc)
Continue until the base measures approximately 30 cm long and 10 cm wide, adjusting the number of rows if necessary.
Do not fasten off.
Part 2: Work Around the Base
Next, crochet around the rectangular base to create the foundation for the bag walls.
Foundation round
- Work 30 sc along the first long edge.
- Work 20 sc evenly along the first short edge.
- Work 30 sc along the opposite long edge.
- Work 20 sc evenly along the remaining short edge.
- Join with a sl st to the first sc.
Total: 100 stitches.
Place a stitch marker at the beginning of the round.
Part 3: Create the Structured Lower Body
The lower portion of the tote features tightly worked stitches that provide strength and stability.
Lower body instructions
Round 1: Ch 1. Work 1 sc in the back loop of each stitch around. Join. (100)
Rounds 2–10: Ch 1. Sc in each stitch around. Join. (100)
Maintain even tension and keep the side walls upright.
The lower band should measure approximately 6–8 cm tall.
Part 4: Prepare the Puff Stitch Section
The center of the bag features a repeating raised floral texture inspired by the reference photograph.
Texture foundation
Round 11: Ch 1. Sc in each stitch around. Join. (100)
Round 12: Ch 1. Repeat (sc in next 4 stitches, puff stitch in next stitch) around. Join. (100 stitch positions)
There should be 20 puff stitches around the bag.
Part 5: Crochet the Raised Floral Puff Pattern
The textured middle section creates a soft, dimensional appearance resembling rows of small crocheted flowers or leaves.
Textured repeat
Round 13: Ch 1. Sc in each stitch around, working into the top of each puff stitch and skipping its securing chain. Join. (100)
Round 14: Ch 1. Repeat (sc in next 2 stitches, puff stitch in next stitch, sc in next 2 stitches) around. Join. (100 stitch positions)
Round 15: Ch 1. Sc in each stitch around, skipping puff securing chains. Join. (100)
Round 16: Repeat Round 12.
Round 17: Repeat Round 13.
Round 18: Repeat Round 14.
Round 19: Repeat Round 15.
Continue alternating the two puff placement rounds, separated by plain sc rounds, until the textured section measures approximately 14–16 cm tall.
Finish after a plain sc round.
Part 6: Crochet the Smooth Upper Band
The upper section of the tote returns to tightly worked stitches for a clean, structured finish.
Upper band instructions
Round 1: Ch 1. Sc in each stitch around. Join. (100)
Rounds 2–7: Ch 1. Sc in each stitch around. Join. (100)
Continue until the smooth upper band measures approximately 5–6 cm.
FO and weave in the yarn end.
Part 7: Make the Crochet Handles
The bag features two long, rounded crochet handles designed to sit comfortably over the shoulder.
For a sturdy result, work each handle as a narrow crochet strip and fold it lengthwise before stitching it closed.
Handle instructions – make 2
Using sage green yarn:
- Ch 9.
- Row 1: Sc in the second chain from the hook and across. (8 sc)
- Rows 2 onward: Ch 1, turn, sc in all 8 stitches.
- Continue until the strip measures approximately 55–60 cm.
- FO, leaving a long sewing tail.
- Fold the strip lengthwise so the long edges meet.
- Sew the long edges together using matching yarn.
- Make a second identical handle.
The finished handles should be firm, comfortable, and approximately 2–3 cm wide.
Part 8: Position the Handles
Correct handle placement helps the tote hang evenly and prevents twisting.
Handle placement
- Lay the tote flat with the front panel facing upward.
- Mark two handle attachment points approximately 10–12 cm apart.
- Repeat on the back panel, matching the positions.
- Position the first handle ends on the front panel.
- Position the second handle ends on the back panel.
- Check that both handles have equal height and are not twisted.
Part 9: Sew and Reinforce the Handles
Handle attachment
- Overlap each handle end with the upper band by approximately 4–5 cm.
- Use a yarn needle and matching yarn to sew around the attachment area.
- Work several horizontal and vertical reinforcement stitches.
- Add a diagonal cross of stitches for extra strength.
- Repeat for all four attachment points.
- Secure the yarn ends firmly inside the bag.
Check each attachment carefully before using the tote to carry items.
Part 10: Finish the Top Edge
A final crochet border creates a neat, polished opening.
Top edging
Join sage green yarn at the side seam.
Round 1: Sc evenly around the top opening, working around the handle attachment areas as needed.
Round 2: Work 1 reverse single crochet (crab stitch) in each stitch around.
Join, FO, and weave in the ends.
Part 11: Optional Fabric Lining
A lining helps protect the crochet fabric and prevents smaller belongings from slipping through textured areas.
Lining instructions
- Measure the interior width, height, and depth of the finished bag.
- Cut fabric panels to fit the interior, allowing approximately 1 cm for seam allowances.
- Sew the lining pieces together.
- Fold and press the top edge inward.
- Insert the lining into the crochet bag.
- Hand-stitch the lining to the inside of the upper band.
- Keep the stitches hidden from the outside.
Part 12: Optional Magnetic Closure
For extra convenience, add a magnetic snap closure to the center of the bag opening.
Closure instructions
- Mark the center of the front and back upper edges.
- Attach the two halves of the magnetic snap to reinforced lining fabric.
- Ensure the snap pieces align correctly.
- Secure the lining and test the closure.
Part 13: Shape and Block the Bag
Finishing instructions
- Lightly dampen the finished crochet bag.
- Stuff the interior with clean towels to support its shape.
- Gently shape the base and side walls.
- Adjust the handles so they hang evenly.
- Allow the bag to air dry completely.
- Remove the towels and check the final shape.
Tips for a Professional Finish
- Choose cotton cord or tightly spun cotton yarn for better structure.
- Use a smaller hook if the fabric feels too loose.
- Keep puff stitch loops even for a consistent texture.
- Count stitches at the end of each round.
- Use stitch markers to track the beginning of rounds.
- Reinforce handle attachment points thoroughly.
- Add a lining if you plan to carry small objects.
- Use a removable base insert for additional stability.
- Block the bag gently to improve its overall shape.
Creative Color Variations
Natural sage green
Use a muted sage green shade for an elegant, earthy everyday tote.
Warm cream
Choose ivory cotton yarn for a soft, minimalist summer accessory.
Terracotta
Make the tote in warm terracotta for a rustic, autumn-inspired look.
Dusty rose
Use dusty pink cotton yarn for a feminine handmade bag.
Chocolate brown
Choose rich brown yarn for a classic accessory that pairs beautifully with neutral outfits.
Frequently Asked Questions
Is this crochet tote bag suitable for beginners?
This pattern is recommended for intermediate crocheters or confident beginners familiar with single crochet, working in rounds, puff stitches, and sewing crochet pieces together.
What yarn is best for this tote bag?
Firm cotton cord or tightly spun cotton yarn is recommended because it helps the bag maintain its shape and supports the raised texture.
Can I make the bag larger?
Yes. Increase the base dimensions and adjust the number of stitches around the bag. Keep the stitch count divisible by five for the puff stitch repeat.
Can I make shorter handles?
Yes. Reduce the handle length to approximately 35–40 cm for a handbag-style tote.
Does the bag need a lining?
A lining is optional, but it can improve durability and make the tote more practical for everyday use.
How can I prevent the handles from stretching?
Use firm cotton yarn, work with tight tension, reinforce the attachment points, and consider sewing non-stretch cotton tape inside the handles.
Care Instructions
- Spot-clean gently with mild soap and cool water.
- Hand-wash only if your yarn label permits it.
- Avoid wringing or twisting the bag.
- Reshape while damp.
- Dry flat away from direct sunlight.
- Store without heavy objects inside to prevent stretching.
Final Thoughts
This sage green puff stitch crochet tote bag is a beautiful combination of handmade texture, practical construction, and timeless style.
With its raised floral-inspired puff stitches, structured base, clean upper band, and sturdy shoulder handles, this crochet tote is a lovely accessory for everyday errands, shopping trips, and handmade gifts.
Experiment with different cotton yarn colors to create a collection of elegant crochet bags for every season.
Love this free crochet tote bag pattern? Save it to Pinterest and share it with fellow crochet lovers who enjoy beautiful handmade accessories!

