Sandstone & Caramel Bobble Crochet Tote Bag
Advanced
For experienced crocheters who enjoy complex shaping, fine detail, and ambitious construction
Single-Day Project
A satisfying project you can complete in a single afternoon or evening.
Handmade Gift
A beautiful keepsake — free forever. Read online or print at home.
About This Sandstone & Caramel Bobble Crochet Tote Bag
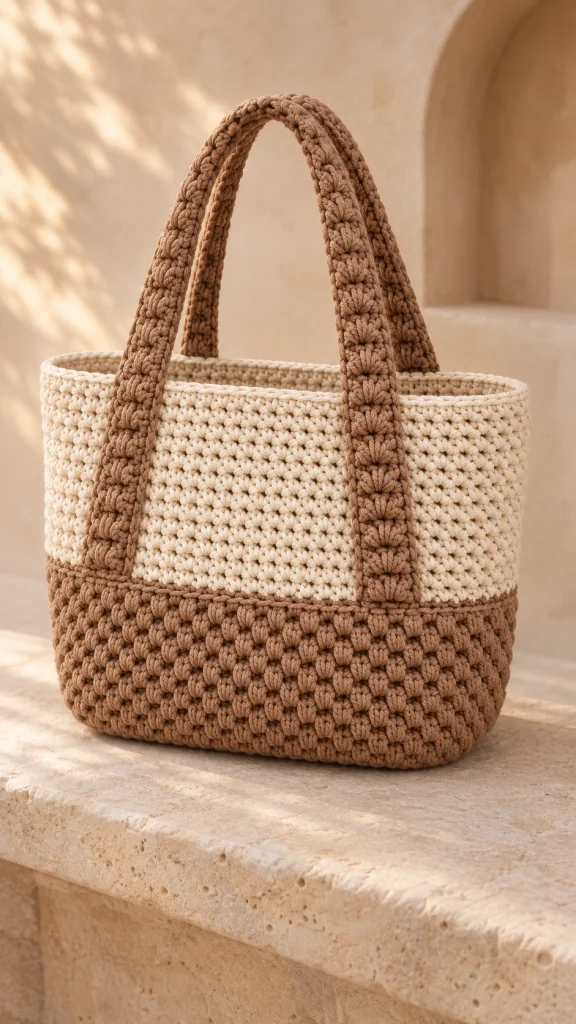
This bobble crochet tote bag pattern combines a caramel oval base, a cream upper body, and long textured handles that extend down the outside of the bag. The two-tone palette and raised stitches give the tote its distinctive look, while a firm fabric and reinforced straps help it hold its shape.
The bag is worked upward from an oval foundation, with alternating bobble rounds across the lower section and dense single crochet above. Two separate straps are sewn onto the front and back, then supported with cotton webbing. A fitted lining finishes the inside and covers the reinforcement stitches.
Allow approximately 24–32 hours for crocheting, assembly, and sewing. This advanced project suits crocheters comfortable with shaped rounds, textured stitches, accurate placement, and fabric finishing. Finished measurements are approximately 36 cm wide laid flat, 28 cm tall, and 11 cm deep, with a handle drop of about 26–28 cm.
Materials
- Bulky weight 5 cotton cord, approximately 3 mm thick: 450 m caramel and 300 m cream; purchase additional yarn if your swatch uses more than the stated gauge.
- 5 mm crochet hook, or size required for a firm fabric at gauge.
- Blunt yarn needle large enough for the cord.
- Eight locking stitch markers.
- Two lengths of 25 mm cotton webbing, each approximately 96 cm long, trimmed to the blocked strap length during assembly.
- Approximately 60 × 100 cm medium-weight cotton fabric for the lining.
- Strong polyester sewing thread matching the caramel cord and lining fabric.
- Hand-sewing needle and sewing machine, if available.
- Scissors, measuring tape, and sewing clips.
- Optional removable bag-base insert, approximately 29 × 9 cm with rounded corners, cut to fit the finished base.
Abbreviations
chchainscsingle crochetdcdouble crochetsl stslip stitchststitchincwork 2 single crochet in one stitchBOfive-double-crochet bobble, counting as one stitchRSright sideWSwrong sideGauge and Bobble Preparation
- For the single crochet swatch, ch 19. Sc in the second ch from the hook and each remaining ch. Work 20 rows of 18 sc, using ch 1 and turning between rows. Measure the central 10 cm after damp blocking and drying.
- To make BO: yarn over, insert the hook into the designated st, yarn over and draw up a loop, yarn over and draw through 2 loops; repeat this partial dc action 5 times in the same st. With 6 loops on the hook, yarn over and draw through all 6 loops. Do not add a securing chain. The completed BO counts as 1 st.
- For the texture swatch, ch 21 and join into a ring without twisting. Work 20 sc around. On the next round repeat BO, sc around; work one plain sc round; then repeat sc, BO around; work one plain sc round. Repeat these four texture rounds three more times. Each round has 20 stitches.
- Push each bobble toward the RS. If the textured swatch is wider than the single crochet swatch at the same stitch count, adjust the hook used for the textured section until their widths agree.
Caramel Oval Base
- With caramel, ch 33. Round 1: work 3 sc in the second ch from the hook, sc in each of the next 30 ch, and 3 sc in the last ch. Rotate the foundation and work sc in the unused underside of each of the next 30 ch. Join with sl st to the first sc. There are 66 sc: two 3-stitch end caps and two 30-stitch straight sections.
- Place markers around the two end caps. Round 2: ch 1; repeat twice: inc in each of the next 3 st, sc in the next 30 st. Join. There are 72 sc; each end cap now has 6 stitches.
- Round 3: ch 1; repeat twice: repeat sc in the next st, inc in the next st 3 times; sc in the next 30 st. Join. There are 78 sc; each end cap has 9 stitches.
- Round 4: ch 1; repeat twice: repeat sc in the next 2 st, inc in the next st 3 times; sc in the next 30 st. Join. There are 84 sc; each end cap has 12 stitches.
- Round 5: ch 1; repeat twice: repeat sc in the next 3 st, inc in the next st 3 times; sc in the next 30 st. Join. There are 90 sc; each end cap has 15 stitches.
- Round 6: ch 1; repeat twice: repeat sc in the next 4 st, inc in the next st 3 times; sc in the next 30 st. Join. There are 96 sc; each end cap has 18 stitches.
- Round 7: ch 1; repeat twice: repeat sc in the next 5 st, inc in the next st 3 times; sc in the next 30 st. Join. There are 102 sc; each end cap has 21 stitches.
- Round 8: ch 1; repeat twice: repeat sc in the next 6 st, inc in the next st 3 times; sc in the next 30 st. Join. There are 108 sc; each end cap has 24 stitches. The base should measure approximately 31–33 × 10–11 cm and lie flat.
Textured Lower Body
- Body round 1: ch 1, sc in the back loop only of every base stitch. Join. There are 108 sc. This turning ridge separates the bottom from the upright walls.
- Body round 2: ch 1; repeat BO in the next st, sc in the next st 54 times. Join. There are 108 stitches: 54 bobbles and 54 sc.
- Body round 3: ch 1, sc in every st, including the top of each bobble. Join. There are 108 sc.
- Body round 4: ch 1; repeat sc in the next st, BO in the next st 54 times. Join. There are 108 stitches: 54 sc and 54 bobbles. These bobbles sit between the bobbles of round 2.
- Body round 5: ch 1, sc in every st. Join. There are 108 sc.
- Body rounds 6–9: work the four-round sequence from body rounds 2–5 once. Each round has 108 stitches.
- Body rounds 10–13: work the four-round sequence from body rounds 2–5 once. Each round has 108 stitches.
- Body round 14: repeat body round 2. There are 108 stitches.
- Body round 15: repeat body round 3. There are 108 sc.
- Body round 16: repeat body round 4. There are 108 stitches. Change to cream during the final pull-through of the joining sl st, leaving a caramel tail to secure inside.
Cream Upper Body and Rim
- Body round 17: with cream, ch 1 and sc in every st. Join. There are 108 sc. Check that all bobble tops from the previous round have been worked once.
- Body rounds 18–42: ch 1, sc in every st, and join at the end of each round. Work exactly 25 rounds, each containing 108 sc.
- Body round 43: ch 1, sc in every st and join. There are 108 sc.
- Body round 44: ch 1, sc in every st and join. There are 108 sc. Fasten off and weave in the cream tail. The cream section contains 28 rounds in total.
- Measure from the base turning ridge to the rim. The target wall height is approximately 27.5–28 cm, with a caramel section approximately 10 cm high and a cream section approximately 17.5 cm high. Gently shape the tote over folded towels and allow it to dry before positioning the straps.
Bobble Handles — Make Two
- With caramel, ch 8. Row 1: sc in the second ch from the hook and each remaining ch. There are 7 sc. Mark this as the RS.
- Row 2, WS facing: ch 1, turn, sc in the first 3 st, BO in the next st, and sc in the last 3 st. There are 7 stitches. Push the bobble away from you so that it projects on the RS.
- Row 3, RS facing: ch 1, turn, sc in every st. There are 7 sc.
- Rows 4–149: repeat rows 2–3 exactly 73 times. Each row has 7 stitches. All bobbles must project on the same face.
- Row 150: ch 1, turn, sc in every st. There are 7 sc. Do not make a bobble in this final row. The strip should measure approximately 94 cm long before edging.
- Handle edging: ch 1 and turn to work along a long edge. Work 1 sc in each row end, giving 150 sc along that edge. Work 1 additional sc at the corner, sc across the 7 foundation stitches, and work 1 additional sc at the next corner.
- Continue with 150 sc along the second long edge, 1 additional sc at the corner, 7 sc across the final row, and 1 additional sc at the last corner. Join to the first edging sc and fasten off. The edging contains 318 sc. Keep it relaxed enough that the strip stays flat.
- Repeat all handle steps for the second handle. Block both to the same length and approximately 5–6 cm wide including edging.
Handle Reinforcement and Placement
- Center a webbing strip on the WS of each blocked handle. Fold each webbing end under by approximately 1 cm, then trim as needed so the folded webbing ends sit 5 mm inside the crocheted ends. Sew along both webbing edges with small backstitches, catching the backs of crochet stitches without piercing through the raised bobbles.
- Shape the bag into its natural oval. Mark the midpoint of each narrow side at the rim. Between these side midpoints, each front or back half contains 54 stitches. Center a 40-stitch front panel and a 40-stitch back panel, leaving 14 stitches centered on each narrow side.
- Temporarily number the rim stitches from a front-panel corner: front stitches 1–40, first side stitches 41–54, back stitches 55–94, and second side stitches 95–108. This numbering is for placement and does not need to match the round beginning.
- Place the first handle on the front with its RS outward. Center its left end over front stitches 7–13 and its right end over front stitches 28–34. Align both short ends with the top of the caramel lower body, then run the ends vertically up the cream section.
- Place the second handle on the back with its ends centered over stitches 61–67 and 82–88. Align both ends at the same color-change level. Clip all four ends in position and check that neither handle twists.
- Each attached handle leg should cover approximately 17.5 cm from the color change to the rim. With approximately 35 cm of each strap attached, about 59 cm remains free above the rim, producing an approximate 26–28 cm drop.
- Sew both long edges and the bottom edge of each attached leg firmly to the body with caramel yarn. Sew through the cream fabric without cinching it. At the rim, use strong sewing thread to stitch a rectangle approximately 2.5 cm wide and 3 cm tall through the handle webbing and bag fabric, then stitch both diagonals inside that rectangle. Repeat at all four rim attachments.
Fitted Lining
- Measure the inside circumference at the rim, the inside wall height from the base ridge to 1 cm below the rim, and the finished oval base. Use these actual measurements for the lining so it supports the crochet without pulling it inward.
- Cut one fabric rectangle with a width equal to the measured inside circumference plus 2 cm for the side seam. Its height equals the measured lining wall height plus 3 cm: 1 cm for the bottom seam and 2 cm for the folded upper hem.
- Trace the finished base onto paper, reduce the outline by approximately 3 mm all around for ease inside the crochet, then add a 1 cm seam allowance outside that reduced outline. Cut one fabric oval using this template.
- With fabric right sides together, sew the rectangle’s short edges using a 1 cm seam allowance to form a tube. Press the seam open. Mark the tube’s bottom edge and the oval into quarters.
- Pin or clip the oval into the tube, right sides together and quarter marks aligned. Sew around with a 1 cm seam allowance. The wall seam line and oval seam line must have equal circumferences; adjust the tube’s side seam before sewing the oval if necessary. Clip the curved seam allowance without cutting the stitching.
- Fold the top edge 1 cm toward the fabric’s wrong side, then fold another 1 cm and stitch the hem. Place the lining inside the bag with its wrong side against the crochet so that all seams are hidden between the layers.
- Position the lining hem approximately 1 cm below the crocheted rim. Hand-sew it to the inner backs of the crochet stitches with small, evenly spaced stitches. At each handle position, catch the webbing reinforcement securely without pulling the lining tight.
Finishing
- Weave each cord end through at least 6 cm of nearby stitches, reverse direction, and pass through several more stitches. Keep the ends away from the bag opening and handle edges.
- Check all four handle attachments from both sides before closing the lining completely. Add reinforcement stitches wherever an attachment lifts away from the body.
- If using a base insert, round and smooth its edges, cover it with a fitted fabric sleeve, and place it inside the lining. Keep it removable for cleaning.
- Shape the base and upper edge by hand. Fill the bag lightly with towels and let the fabric settle without stretching the handles.
The finished tote should stand with a softly rounded base and an even cream rim. The caramel straps frame the front and back, with their lower ends resting neatly at the color change.
Before regular use, add a light load and check that the handle stitching stays firm and the lining supports the contents. Care for the bag according to the cord label, reshaping it and drying it flat after cleaning.
Tips for Success
- Keep markers at the boundaries of both oval end caps; every base increase belongs inside an end cap.
- Count 108 stitches after every textured round. A bobble has one top stitch even though it contains five partial dc.
- Push the body bobbles outward after each plain round so the lower section has consistent relief.
- Measure both handles after blocking and before adding webbing. Match their lengths within 5 mm.
- Attach the webbing before sewing the handles onto the tote so the reinforcement remains hidden and accessible during stitching.
Common Mistakes to Avoid
- Adding a chain after each bobble increases the stitch count and opens the fabric. Close the bobble without an extra chain.
- Working into the round’s joining slip stitch adds an unwanted stitch. Mark the first actual sc and join directly to it.
- Pulling the handle edging tight shortens the strap and causes curling. Use one relaxed sc per row end and check the strip on a flat surface.
- Sewing only the handle’s bottom edge leaves the rim carrying too much strain. Sew both vertical edges and complete all four reinforced rim rectangles.
- Cutting a lining from the nominal bag dimensions can produce a tight fit. Measure the completed crochet and compare the fabric seam-line circumferences before assembly.
Ways to Customize This Pattern
- Use dark chocolate in place of caramel while keeping the upper body cream; retain the same yarn type and gauge in both colors.
- For a taller tote, add 4 cream rounds for approximately 2.5 cm of height. Add 8 rows to each handle to preserve the drop, and extend the lining height by the same amount as the body.
- Add an internal patch pocket to the lining before sewing its side seam. Keep the pocket clear of the four handle reinforcement areas.
- For a shorter handle drop, remove 16 rows from each strap, preserving the alternating texture and ending with a plain row. This removes approximately 10 cm of strap length and reduces the drop by about 5 cm.
- Add a magnetic closure to a reinforced fabric tab sewn into the lining near the rim. Support both halves with extra fabric so the closure does not pull directly on the crochet.
Frequently asked questions
Yes, if the resulting fabric matches both gauges and feels firm. Several strands held together may work, but a soft, loosely spun yarn can stretch more than cord. Swatch the bobbles and a reinforced handle section before committing to the substitution.
The foundation creates 60 straight-side stitches and 6 end-cap stitches. Seven increase rounds add 6 stitches each, giving 66 + 42 = 108 stitches. That even number supports 54 bobble-and-single-crochet pairs around the body.
They are part of this design’s finishing. The webbing limits handle stretch, and the fitted lining helps distribute the contents’ weight while covering the attachment stitches. The crochet remains flexible, so avoid overloading it even with reinforcement.
Maintain 108 stitches and compare the circumference after the first few cream rounds. If it grows despite an accurate count, use the hook size established by your matching swatches. Correct the gauge early instead of adding decreases that would change the intended silhouette.
The finished Sandstone & Caramel Bobble Crochet Tote Bag

