Scarlet Star Crochet Ornament with Jute Bow and Bell
Advanced
For experienced crocheters who enjoy complex shaping, fine detail, and ambitious construction
Single-Day Project
A satisfying project you can complete in a single afternoon or evening.
Handmade Gift
A beautiful keepsake — free forever. Read online or print at home.
About This Scarlet Star Crochet Ornament with Jute Bow and Bell
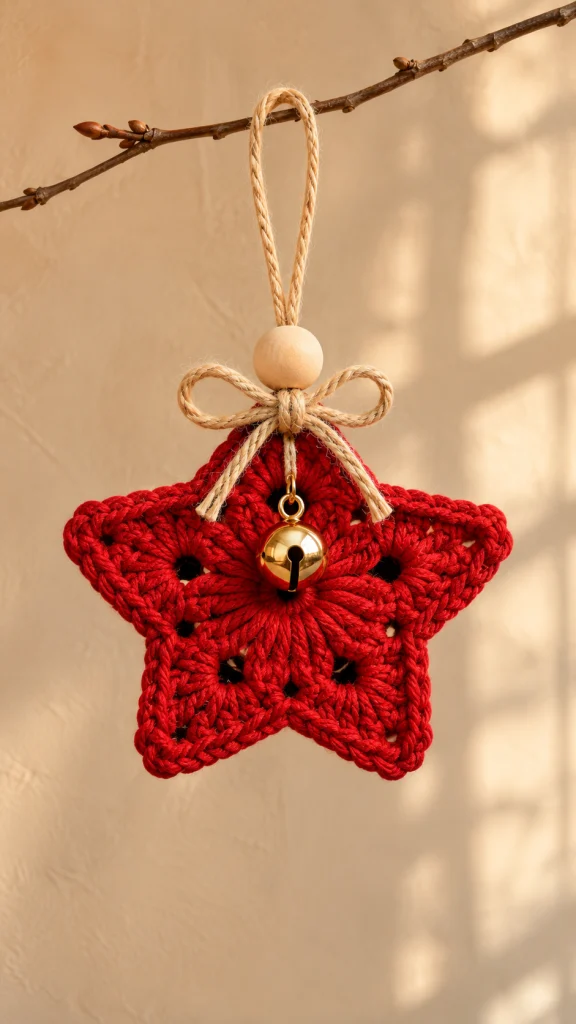
This star crochet ornament pattern combines a scarlet five-point motif with a natural jute bow, a wooden bead, and a small gold bell. Tall stitches radiate from the center, while graduated shaping and a close border give the star its defined outline.
The ornament is a single flat crochet piece, carefully blocked and finished with separate hanging hardware. Its open spaces and substantial points echo traditional Christmas decorations, and the bell rests against the upper center of the star.
Allow approximately 2–3 hours for crocheting and assembly, plus drying time. This advanced project suits crocheters comfortable reading tall stitches, maintaining exact counts, and adjusting blocking tension across a shaped motif.
Materials
- Scarlet worsted-weight cotton yarn, approximately 20 g or 35–40 m; choose a firmly plied yarn for clear stitch definition.
- 3.5 mm crochet hook.
- Natural jute cord, approximately 2 mm thick and 1.2 m long.
- One unfinished wooden bead, 18–20 mm diameter, with a hole large enough for two strands of jute.
- One gold jingle bell, 18–22 mm diameter, with a closed attachment eye.
- Approximately 30 cm of strong matching red sewing thread for the bell.
- Tapestry needle.
- Sewing needle suitable for the attachment thread.
- Five removable stitch markers.
- Scissors and a ruler.
- Blocking mat and rustproof pins.
- Optional washable fabric stiffener suitable for cotton.
Abbreviations
chchainsl stslip stitchscsingle crochethdchalf double crochetdcdouble crochettrtreble crochet; yarn over twice before inserting the hookststitchspspaceStar Foundation and Radial Center
- Foundation: Ch 5 and sl st into the first ch to form a ring. Leave a 15 cm starting tail. This small ring provides a controlled center opening without requiring a tightly closed center.
- Round 1: Ch 4, work 19 tr into the ring, and sl st into the top of the beginning ch-4. Count the beginning ch-4 as the first tr. Total: 20 tr.
- Mark the first, fifth, ninth, thirteenth, and seventeenth stitches. Each marker identifies the first stitch of a four-stitch sector. Check that the beginning ch-4 occupies the first marked position.
Shape the Five Star Points
- Round 2: Ch 1. Repeat the following sequence five times: sc in the next st, work hdc and dc in the next st, work tr, ch 2, and tr in the next st, then work dc and hdc in the next st. Begin the first repeat in the same st as the joining sl st. Join with sl st to the first sc. Each repeat uses four stitches from Round 1 and produces seven stitches plus one ch-2 tip space. Total: 35 stitches and five ch-2 spaces.
- Move the five markers into the five sc stitches. These stitches mark the valleys between points. In each sector, the stitches now read sc, hdc, dc, tr, ch-2 space, tr, dc, hdc.
- Round 3: Ch 1. Repeat the following sequence five times: sc in the next sc, hdc in the next hdc, dc in the next dc, tr in the next tr, work 2 tr, ch 2, and 2 tr in the next ch-2 sp, tr in the next tr, dc in the next dc, and hdc in the next hdc. Begin in the same st as the joining sl st. Join with sl st to the first sc. Each sector produces 11 stitches plus one ch-2 tip space. Total: 55 stitches and five ch-2 spaces.
- Move each valley marker into the new sc directly above it. Check every point: there should be six stitches before its ch-2 space, counting from the marked valley sc, and five stitches after the space before the next valley.
Define the Star Border
- Round 4: Ch 1. Repeat the following sequence five times: sc in each of the next 6 stitches, work sc, ch 1, and sc in the next ch-2 sp, then sc in each of the next 5 stitches. Begin the first repeat in the same st as the joining sl st. Join with sl st to the first sc. Total: 65 sc and five ch-1 tip spaces.
- Fasten off with a 15 cm tail. Thread the tail through the tapestry needle and secure it on the back through several stitch bases. Weave the starting tail through the bases of the center trebles without drawing the center ring closed.
- Check the border before blocking: each sector contains 13 sc and one ch-1 space. Remove the valley markers after confirming all five sectors.
Block and Set the Shape
- Dampen the star according to the yarn care instructions, then press it gently in a towel. Lay it with one point facing straight upward.
- Pin the five ch-1 tip spaces first, spreading the star to approximately 14 cm across its widest points. Adjust the five valleys so the points have comparable lengths and the center remains flat.
- Arrange the tall stitches into smooth fans. Pin along the border only where needed; do not stretch the open spaces into large holes. Leave until fully dry.
- For a firmer ornament, apply a light coat of suitable fabric stiffener following its directions, then pin the star back to the same measurements. Let it dry fully before adding the jute, bead, or bell.
Make the Hanging Loop and Bow
- Cut a 50 cm length of jute for the hanger. Fold it in half and pass the folded end through the uppermost ch-1 tip space from back to front. Pass both cut ends through that folded end and pull gently to make a lark’s head attachment.
- Thread both free ends upward through the wooden bead. Slide the bead down until it sits immediately above the top crochet point. The two strands below the bead should lie together without twisting the star.
- Hold the two free ends together and tie an overhand knot approximately 9–11 cm above the bead. The two strands between the bead and this knot form the hanging loop. Trim the excess ends above the knot to approximately 1 cm.
- Cut a separate 60 cm length of jute. Pass it behind the two hanger strands between the bead and the crochet tip. Tie a snug single knot at the front, then tie a bow with loops approximately 3 cm long.
- Adjust the bow so it sits below the bead and above the upper portion of the star. Trim both tails to approximately 4–5 cm, angling them outward so they frame the bell.
Attach the Bell
- Lay the ornament flat with its top point upright. Position the bell over the upper center of the star, with its attachment eye approximately 2–3 cm below the bow knot. Adjust slightly for the bell size so the bell body rests near the motif center.
- Using doubled strong red thread, pass through the bell eye and around the bases of two adjacent tall stitches directly above the center ring. Make four secure passes through the same attachment path. Catch the stitch bases rather than individual surface strands.
- Leave approximately 3–5 mm of play at the bell eye so it can move. Tie the thread ends securely on the back and bury them through several stitch bases. Confirm that the bell hangs centrally without pulling one point inward.
Finishing
Hang the star from its loop and let the fabric settle. Straighten the bead and bow, then check that the upper point supports the ornament evenly. If the star tilts, reposition the jute attachment within the top chain space and redistribute the bow loops.
Trim any remaining thread ends and smooth the crochet border with your fingers. The finished ornament should have five clear points, a flat center, and a bell that moves freely. Store it flat between layers of tissue to preserve the blocked shape.
Tips for Success
- Keep the beginning ch-4 close to the height of the other trebles; an oversized chain creates a visible gap in the center fan.
- Count each sector separately: seven stitches in Round 2, 11 in Round 3, and 13 in Round 4, with tip spaces counted separately.
- Work the border at an even tension. Tight single crochet can curl the points inward, especially around the tip spaces.
- Block the crochet before adding the natural cord and wooden bead so those materials stay dry.
- Choose a lightweight bell. If its weight bends the star, use a smaller bell or apply a light stiffening treatment.
Common Mistakes to Avoid
- Missing the top of the beginning ch-4: mark it immediately in Round 1 so all 20 foundation stitches remain available.
- Working a point into a stitch instead of its chain space: place the complete tip group inside the open ch-2 space in Round 3.
- Adding stitches at a join: the joining sl st and beginning ch-1 are not working stitches and must not receive extra stitches.
- Pulling the starting tail tight enough to close the center ring: secure the tail without changing the ring size or bunching the radial stitches.
- Tying the bow through only one strand of crochet: anchor it around the paired hanger strands beneath the bead to distribute its pull.
Ways to Customize This Pattern
- Use cream or forest-green yarn for companion ornaments, keeping the same stitch sequence and natural jute finish.
- Make a smaller star in sport-weight cotton with a 2.5–3 mm hook. Measure the finished motif and use a proportionally smaller bead and bell.
- Work Round 4 in cream for a contrasting outline. Join the new color in the first valley sc and follow the same border count.
- Replace the jute bow with a narrow woven ribbon, keeping the separate hanging cord securely anchored through the top tip space.
- Make a garland from several completed stars, attaching each by its own hanging loop to a stronger horizontal cord.
Frequently asked questions
No. This ornament uses one flat crochet motif. Its shape comes from the graduated stitch heights, defined border, and blocking. A light stiffening treatment can add support.
First check the sector counts and confirm that you have not worked into a joining slip stitch. If the counts are correct, gentle damp blocking can settle slight waviness. Persistent ruffling may require a smaller hook for the outer rounds; pronounced cupping may require a larger one.
Yes. Complete the star, hanger, bead, and bow, then omit the bell attachment section. The star will hang with less weight at its center and may need less stiffening.
Dust it gently with a soft brush. For washing, remove the jute, wooden bead, and bell first, follow the yarn care instructions, and block the crochet again. Reapply stiffener only as directed by its manufacturer.
The finished Scarlet Star Crochet Ornament with Jute Bow and Bell

