Snowman Christmas Spiral Wall Hanging Crochet Pattern
Advanced
For experienced crocheters who enjoy complex shaping, fine detail, and ambitious construction
Weekend Project
A satisfying weekend make — start Friday, finish Sunday, enjoy forever.
Handmade Gift
A beautiful keepsake — free forever. Read online or print at home.
About This Snowman Christmas Spiral Wall Hanging Crochet Pattern
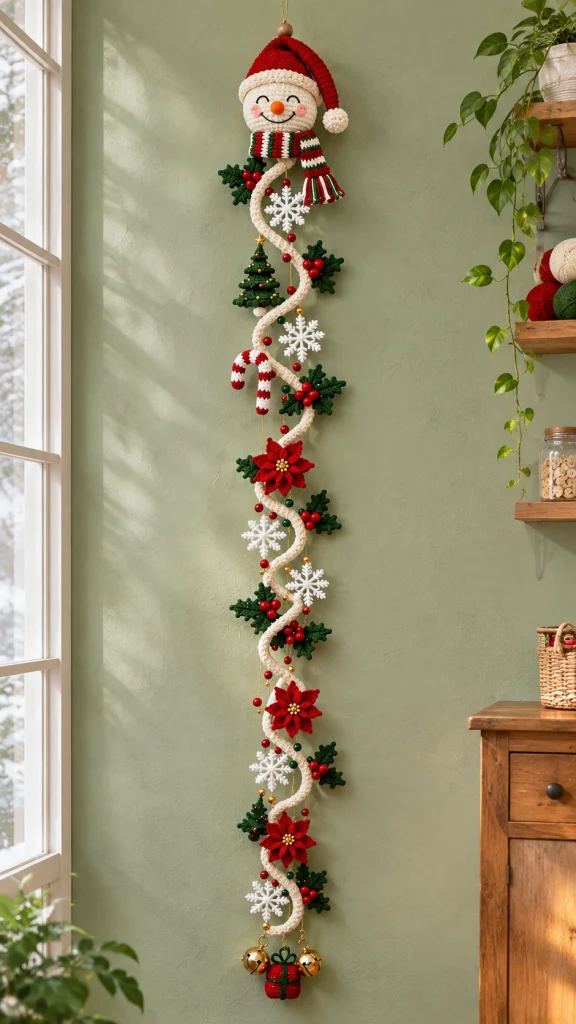
This snowman Christmas wall hanging crochet pattern turns a smiling snowman, a snowy spiral, and small festive motifs into a long decoration for a narrow wall. Red poinsettias, green holly, white snowflakes, and a striped candy cane echo the colors and shapes of a traditional Christmas display.
Allow approximately 18–24 hours for the crochet, embroidery, blocking, and assembly. The pattern suits experienced crocheters who enjoy working small shaped pieces and arranging their own decorative details. The motifs are sewn onto a stable backing cord, so the spiral retains its shape when hung.
Materials
- DK cotton or cotton-blend yarn: approximately 100 g cream, 35 g red, 30 g dark green, and 15 g white
- Small amounts of orange, black, pink, and gold DK yarn or embroidery thread
- 3.0 mm crochet hook for small motifs and the snowman
- 3.5 mm crochet hook for the spiral and backing cord
- Polyester fiberfill, a small handful
- Tapestry needle and sharp scissors
- Removable stitch markers and measuring tape
- Blocking mat and rustproof pins
- Optional: three securely attached decorative bells and assorted sew-on beads
- Strong hanging cord and a suitable wall hook
Abbreviations
chchaindcdouble crochethdchalf double crochetincwork 2 single crochet stitches in the same stitchdecsingle crochet 2 stitches togetherMRmagic ringrndroundscsingle crochetsl stslip stitchststitchSnowman Head
- With cream and the 3.0 mm hook, work 6 sc into an MR. (6 sc)
- Rnd 2: Inc in each st. (12)
- Rnd 3: Repeat [sc in next st, inc] 6 times. (18)
- Rnd 4: Repeat [sc in next 2 sts, inc] 6 times. (24)
- Rnd 5: Repeat [sc in next 3 sts, inc] 6 times. (30)
- Rnd 6: Repeat [sc in next 4 sts, inc] 6 times. (36)
- Rnds 7–12: Sc in each st. (36 per rnd)
- Rnd 13: Repeat [sc in next 4 sts, dec] 6 times. (30)
- Rnd 14: Repeat [sc in next 3 sts, dec] 6 times. (24)
- Embroider two curved black eyes between rnds 8 and 9, approximately 6 sts apart. Embroider a curved smile below them and add small pink cheeks. Stuff firmly.
- Rnd 15: Repeat [sc in next 2 sts, dec] 6 times. (18)
- Rnd 16: Repeat [sc in next st, dec] 6 times. (12)
- Rnd 17: Dec 6 times. (6) Fasten off, draw the tail through the remaining stitches, and close.
Carrot Nose
- With orange and the 3.0 mm hook, work 4 sc into an MR. (4)
- Rnd 2: Repeat [sc in next st, inc] twice. (6)
- Rnd 3: Sc in each st. (6) Fasten off with a sewing tail.
- Flatten the open edge and sew it between the eyes and smile, adding a tiny amount of stuffing if desired.
Santa Hat and Pom-Pom
- With red and the 3.0 mm hook, work 6 sc into an MR. (6)
- Rnds 2–3: Sc in each st. (6 per rnd)
- Rnd 4: Repeat [sc in next st, inc] 3 times. (9)
- Rnds 5–6: Sc in each st. (9 per rnd)
- Rnd 7: Repeat [sc in next 2 sts, inc] 3 times. (12)
- Rnds 8–9: Sc in each st. (12 per rnd)
- Rnd 10: Repeat [sc in next st, inc] 6 times. (18)
- Rnd 11: Sc in each st. (18)
- Rnd 12: Repeat [sc in next 2 sts, inc] 6 times. (24)
- Rnd 13: Sc in each st. (24)
- Rnd 14: Repeat [sc in next 3 sts, inc] 6 times. (30)
- Rnd 15: Repeat [sc in next 4 sts, inc] 6 times. (36)
- Rnds 16–17: Sc in each st. (36 per rnd) Change to cream.
- Rnds 18–19: Sc in each st. (36 per rnd) Fasten off with a long tail for sewing.
- For the pom-pom, with cream work 6 sc into an MR, then inc in each st. (12)
- Sc in each st for one rnd. (12) Stuff lightly, dec 6 times, and close. Sew to the hat tip.
- Fit the brim over the head and sew in place. Bend the hat tip to one side and tack it down.
Striped Scarf
- With dark green and the 3.0 mm hook, ch 8. Sc in the second ch from the hook and each remaining ch; ch 1 and turn. (7 sc)
- Rows 2–36: Sc in each st, ch 1 and turn. (7 per row) Change color every 2 rows, alternating dark green, white, and red; omit the turning ch after the final row.
- Fasten off and weave in ends. Add short strands of red, green, and white fringe to one short edge, knot securely, and trim evenly.
- Wrap the scarf around the base of the head and sew the overlap, leaving the fringed end hanging to one side.
Backing Cord and Snowy Spiral
- With cream and the 3.5 mm hook, ch until the chain measures approximately 115 cm. Fasten off; this is the straight backing cord.
- For the spiral, ch until the chain measures approximately 155 cm. Work 2 sc in the second ch from the hook and in every remaining ch. Fasten off, leaving a long sewing tail. The extra stitches encourage the strip to curl.
- Lay the backing cord vertically. Arrange the spiral in broad alternating curves over it, starting beneath the head and ending near the bottom of the cord. Pin the curves so the decorated length is approximately 110 cm.
- With cream yarn, sew the spiral securely to the backing at each crossing and at both ends. Preserve the visible curves without pulling them flat.
Snowflakes
- Make 5 with white and the 3.0 mm hook. Work 6 sc into an MR; join with a sl st to the first sc. (6)
- Repeat the following in each of the 6 sc: ch 8, sl st in the second ch from the hook and the next 2 chains, ch 3, sl st in the second ch from the hook and next ch, sl st in the next 2 chains of the main chain, ch 3, sl st in the second ch from the hook and next ch, sl st in the remaining 2 chains of the main chain, then sl st in the next base sc. (6 branched arms)
- Fasten off with a sewing tail. Pin each snowflake flat and lightly block.
Holly Leaves and Berries
- Make 16 leaves with dark green and the 3.0 mm hook. Ch 9; working into the chain, sl st in the second ch from the hook, sc in the next ch, hdc in the next ch, dc in each of the next 2 chains, hdc in the next ch, sc in the next ch, and 3 sc in the last ch.
- Working along the opposite side of the foundation chain, sc in the next ch, hdc in the next ch, dc in each of the next 2 chains, hdc in the next ch, sc in the next ch, and sl st in the last ch. Fasten off with a sewing tail.
- For each berry, with red work 6 sc into an MR, sc in each st for one rnd, then dec 3 times. (3) Fasten off and close. Make 24 berries.
- Arrange the leaves in 8 pairs and sew 3 berries over the base of each pair.
Poinsettias
- Make 3 flowers. For each, make 8 petals with red and the 3.0 mm hook: ch 7, sl st in the second ch from the hook, sc in the next ch, hdc in the next ch, dc in the next ch, hdc in the next ch, and sc in the last ch. Fasten off with a sewing tail.
- For each flower center, with gold work 6 sc into an MR and join with a sl st to the first sc. Fasten off with a sewing tail.
- Overlap the narrow petal bases around the center in two staggered layers of 4 petals. Sew all layers together and embroider a few gold knots or stitches in the center.
Christmas Trees
- Make 2 with dark green and the 3.0 mm hook. Ch 2; work 2 sc in the second ch from the hook, ch 1 and turn. (2)
- Row 2: Inc in each st, ch 1 and turn. (4)
- Row 3: Sc in each st, ch 1 and turn. (4)
- Row 4: Inc in first st, sc in next 2 sts, inc in last st, ch 1 and turn. (6)
- Row 5: Sc in each st, ch 1 and turn. (6)
- Row 6: Inc in first st, sc in next 4 sts, inc in last st, ch 1 and turn. (8)
- Row 7: Sc in each st, ch 1 and turn. (8)
- Row 8: Inc in first st, sc in next 6 sts, inc in last st. (10) Fasten off.
- Embroider a short cream trunk at the center of the lower edge and add tiny red and gold stitches as decorations.
Candy Cane
- With red and the 3.0 mm hook, work 6 sc into an MR. (6)
- Sc in each st for 24 rounds, changing between red and white every 2 rounds. (6 per rnd)
- Stuff lightly, flatten the opening, and sew it closed. Bend one end into a hook and tack the inner curve with matching yarn.
Gift and Bottom Tassels
- For the gift, make 2 red squares with the 3.0 mm hook. For each square, ch 9, sc in the second ch from the hook and each remaining ch, ch 1 and turn. (8)
- Rows 2–8: Sc in each st, ch 1 and turn. (8 per row) Omit the turning ch after row 8 and fasten off.
- Place the squares together and sew around three sides. Add a thin layer of stuffing, sew the final side closed, and wrap green yarn vertically and horizontally around the parcel. Secure the ends and embroider a bow at the top.
- For two soft tassels, cut six 12 cm lengths of cream yarn for each tassel. Fold each bundle in half, tie around the folded end, and trim the loose ends evenly. Sew one tassel to each side of the gift, or substitute securely sewn decorative bells.
Finishing
Lay the hanging flat with the snowman at the top. Distribute the snowflakes, holly, poinsettias, trees, and candy cane along the spiral, alternating sides and leaving the curves visible. Sew each piece to both the spiral and backing where possible so it cannot twist out of position.
Sew the gift and tassels or bells to the bottom of the backing. Attach a strong hanging-cord loop through several stitches at the top of the head and secure it firmly. Weave in all ends, hang the piece, and make any small adjustments needed for an even drape.
Tips for Success
- Use the smaller hook for the head and berries so the stuffing stays enclosed.
- Pin the complete layout before sewing to balance the red and green motifs along the length.
- Block snowflakes and petals separately so their points remain distinct.
- Support the weight of the bottom ornaments with the backing cord rather than the spiral alone.
Common Mistakes to Avoid
- If the spiral stretches too long, shorten its pinned curves before sewing it to the backing.
- If the head looks lumpy, distribute the stuffing in small pieces before closing the final round.
- If a motif twists, add a second anchoring stitch at its opposite edge.
- If the hanging leans, reposition heavy ornaments closer to the center and reinforce the top loop.
Ways to Customize This Pattern
- Replace the gift with another crocheted tree or a small yarn tassel.
- Make extra holly clusters and space them more closely for a fuller garland.
- Change the scarf stripe order while keeping the same row count.
- Shorten the backing and spiral chains together, then use fewer motifs for a smaller wall space.
Frequently asked questions
Yes. Lengthen the backing chain and make the spiral chain longer as well. Arrange the curves before sewing, then add motifs to fill the extra space.
Spot-clean gently with a damp cloth and let it dry flat. If you add metal bells or beads, check their care instructions before wetting them.
Yes. Use embroidered gold stitches for decorative accents and the crocheted tassels for the bottom edge.
The finished Snowman Christmas Spiral Wall Hanging Crochet Pattern