Snowy Christmas Village Crochet Centerpiece Pattern
Advanced
For experienced crocheters who enjoy complex shaping, fine detail, and ambitious construction
Single-Day Project
A satisfying project you can complete in a single afternoon or evening.
Handmade Gift
A beautiful keepsake — free forever. Read online or print at home.
About This Snowy Christmas Village Crochet Centerpiece Pattern
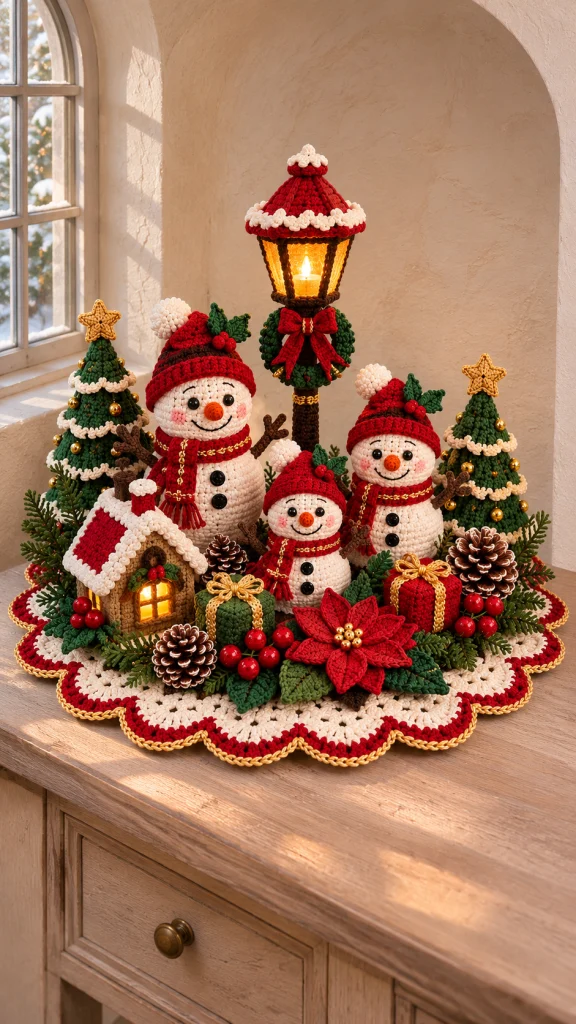
This Christmas crochet centerpiece pattern brings a snowy village together on a scalloped cream mat edged in red and gold. Three smiling snowmen sit between tiered evergreen trees, a little illuminated cottage, wrapped presents, and a tall lantern dressed with a wreath and bow.
This is a decorative arrangement built from separate crochet components, with firm internal supports for the cottage and lantern. Deep red accessories, textured snow, embroidered faces, and a layered poinsettia give the village its recognizable Christmas character. The snowmen are stuffed accents within the centerpiece; the complete project is home decor.
Allow approximately 70–95 hours for crocheting, embroidery, structural work, and assembly. The pattern suits experienced crocheters comfortable with counted shaping, working into reserved loops, sewing dimensional pieces, and adjusting a removable cover to a measured support.
Materials
- DK yarn: approximately 450 g cream, 250 g dark green, 200 g red, 100 g dark brown, 60 g tan, 30 g medium green, 20 g ochre, and small amounts of orange and black; estimates assume approximately 220 m per 100 g.
- Fine gold metallic crochet thread, approximately 100 m, for embroidered accents and surface edging.
- 3 mm crochet hook for shaped pieces and 3.5 mm hook for the mat; adjust to obtain gauge.
- Polyester stuffing, approximately 300 g.
- Six black sew-on eye beads, approximately 6–8 mm, or black yarn for embroidered eyes.
- Six black sew-on buttons, approximately 10–15 mm, for the snowmen.
- Gold sew-on beads, approximately 25–35, for tree ornaments and the flower center.
- One ready-made battery LED lantern, approximately 28–32 cm tall, with a stable foot, narrow stem, tapered light chamber, removable or accessible battery compartment, and a cool-running LED.
- One separate battery LED tealight for the cottage.
- Amber translucent craft sheet for the cottage window.
- Plastic canvas for the cottage walls, roof, gift inserts, and two tree bases.
- One rigid circular display board approximately 52 cm across, covered with cream felt.
- Brown chenille stems for decorative branches, enclosed completely within crochet sleeves.
- Three small natural pinecones and several short artificial evergreen sprigs, optional.
- Tapestry needle, sewing needle, strong sewing thread, stitch markers, scissors, ruler, pins, and removable fabric clips.
Abbreviations
chchainsl stslip stitchscsingle crochethdchalf double crochetdcdouble crochettrtreble crochetinc2 single crochet in one stitchdecsingle crochet 2 stitches together; use an invisible decrease on stuffed piecesMRmagic ringBLOback loop onlyFLOfront loop onlyststitchstsstitchesCircular snow mat
- With cream and the 3.5 mm hook, Round 1: make an MR, ch 2, work 12 dc into the ring, and join. Tighten the center. Count: 12 dc.
- Round 2: ch 2, work 2 dc in each st, and join. Count: 24 dc.
- Round 3: ch 2, repeat (dc in next st, 2 dc in next st) 12 times; join. Count: 36 dc.
- Rounds 4–24: work each round separately. On Round r, ch 2 and repeat (dc in next r minus 2 sts, 2 dc in next st) 12 times; join. The counts are 48, 60, 72, 84, 96, 108, 120, 132, 144, 156, 168, 180, 192, 204, 216, 228, 240, 252, 264, 276, and 288 dc. Move the start of the increase sequence by a few stitches on alternate rounds to soften the twelve corners, keeping exactly 12 increases.
- Round 25: ch 1, sc in every st; join. Count: 288 sc. Fasten off cream.
- Round 26: join red in any st. Repeat (sl st in next st, skip 5 sts, 9 tr in next st, skip 5 sts) 24 times. Join to the first sl st. Each repeat uses 12 base sts and produces one scallop; count: 24 scallops, 216 tr, and 24 sl sts.
- Gold edging: with metallic thread held alongside one strand of ochre, work one loose surface sl st through the top of every red stitch, including the valley sl sts. Count: 240 surface sl sts. Fasten off without drawing the edge inward.
- Block the mat flat to approximately 56 cm across the scallop tips. Its cream center should cover the display board; place the scallops beyond the board edge.
Three snowman bodies
- Use cream and the 3 mm hook. For each body, Round 1: 6 sc in an MR. Count: 6.
- For each body, Round 2: inc in every st. Count: 12.
- For each body, Round 3: repeat (sc, inc) 6 times. Count: 18.
- For each body, Round 4: repeat (2 sc, inc) 6 times. Count: 24.
- For each body, Round 5: repeat (3 sc, inc) 6 times. Count: 30.
- For each body, Round 6: repeat (4 sc, inc) 6 times. Count: 36.
- Large body, Round 7: repeat (5 sc, inc) 6 times. Count: 42.
- Large body, Round 8: repeat (6 sc, inc) 6 times. Count: 48.
- Large body, Round 9: repeat (7 sc, inc) 6 times. Count: 54.
- Large body, Round 10: repeat (8 sc, inc) 6 times. Count: 60.
- Large body, Rounds 11–22: sc in every st, 60 sc per round.
- Large body, Round 23: repeat (8 sc, dec) 6 times. Count: 54.
- Large body, Round 24: repeat (7 sc, dec) 6 times. Count: 48.
- Large body, Round 25: repeat (6 sc, dec) 6 times. Count: 42.
- Large body, Round 26: repeat (5 sc, dec) 6 times. Count: 36.
- Large body, Round 27: repeat (4 sc, dec) 6 times. Count: 30. Stuff firmly, keeping the underside broad.
- Large body, Round 28: repeat (3 sc, dec) 6 times. Count: 24. Fasten off with a sewing tail; leave this neck opening unclosed.
- Medium body, Round 7: repeat (5 sc, inc) 6 times. Count: 42.
- Medium body, Round 8: repeat (6 sc, inc) 6 times. Count: 48.
- Medium body, Rounds 9–18: sc in every st, 48 sc per round.
- Medium body, Round 19: repeat (6 sc, dec) 6 times. Count: 42.
- Medium body, Round 20: repeat (5 sc, dec) 6 times. Count: 36.
- Medium body, Round 21: repeat (4 sc, dec) 6 times. Count: 30. Stuff firmly.
- Medium body, Round 22: repeat (3 sc, dec) 6 times. Count: 24. Fasten off with a sewing tail; leave open.
- Small body, Rounds 7–14: sc in every st, 36 sc per round.
- Small body, Round 15: repeat (4 sc, dec) 6 times. Count: 30.
- Small body, Round 16: repeat (3 sc, dec) 6 times. Count: 24. Stuff firmly.
- Small body, Round 17: repeat (2 sc, dec) 6 times. Count: 18. Fasten off with a sewing tail; leave open.
Snowman heads and embroidered faces
- Make three cream heads. For each head, Rounds 1–6: follow body Rounds 1–6, ending with 36 sc.
- Large head, Round 7: repeat (5 sc, inc) 6 times. Count: 42.
- Large head, Round 8: repeat (6 sc, inc) 6 times. Count: 48.
- Large head, Rounds 9–16: sc in every st, 48 sc per round.
- Large head, Round 17: repeat (6 sc, dec) 6 times. Count: 42.
- Large head, Round 18: repeat (5 sc, dec) 6 times. Count: 36.
- Large head, Round 19: repeat (4 sc, dec) 6 times. Count: 30. Stuff, rounding the cheeks.
- Large head, Round 20: repeat (3 sc, dec) 6 times. Count: 24. Fasten off; leave open.
- Medium head, Round 7: repeat (5 sc, inc) 6 times. Count: 42.
- Medium head, Rounds 8–14: sc in every st, 42 sc per round.
- Medium head, Round 15: repeat (5 sc, dec) 6 times. Count: 36.
- Medium head, Round 16: repeat (4 sc, dec) 6 times. Count: 30. Stuff.
- Medium head, Round 17: repeat (3 sc, dec) 6 times. Count: 24. Fasten off; leave open.
- Small head, Rounds 7–12: sc in every st, 36 sc per round.
- Small head, Round 13: repeat (4 sc, dec) 6 times. Count: 30.
- Small head, Round 14: repeat (3 sc, dec) 6 times. Count: 24. Stuff.
- Small head, Round 15: repeat (2 sc, dec) 6 times. Count: 18. Fasten off; leave open.
- Mark the center front of each head. Place the large head’s eyes between Rounds 11 and 12, with 7 sts between them; medium eyes between Rounds 10 and 11, with 6 sts between; small eyes between Rounds 8 and 9, with 5 sts between. Sew beads securely or embroider dense black eyes.
- Carrot noses, make three in orange: Round 1, 4 sc in an MR; Round 2, sc around, 4 sts; Round 3, repeat (sc, inc) twice, 6 sts; Round 4, sc around, 6 sts. Fasten off, add a tiny amount of stuffing, and sew the open base between the eyes, one round below them.
- Embroider a curved smile beneath each nose with black yarn, spanning approximately 9 sts on the large head, 8 on the medium head, and 7 on the small head. Add short eyebrows two rounds above the eyes and three small red straight stitches on each cheek.
- Join each head opening to its matching body opening, stitch for stitch: 24 to 24 on the large and medium snowmen, and 18 to 18 on the small one. Add stuffing through the final gap before closing the seam.
- Sew two black buttons vertically to each body, centered below the face and approximately 2 cm apart on the large body, 1.5 cm on the medium body, and 1.2 cm on the small body.
Red hats, scarves, and branch arms
- Large hat, in red: work Rounds 1–8 as for the large head, ending with 48 sc.
- Large hat, Rounds 9–13: sc around, 48 sts per round. Round 14: repeat (7 sc, inc) 6 times, 54 sts. Rounds 15–17: sc around, 54 sts per round. Fasten off and turn the last three rounds outward for the brim.
- Medium hat, in red: work Rounds 1–7 as for the medium head, ending with 42 sc.
- Medium hat, Rounds 8–11: sc around, 42 sts per round. Round 12: repeat (6 sc, inc) 6 times, 48 sts. Rounds 13–15: sc around, 48 sts per round. Fasten off and turn the last three rounds outward.
- Small hat, in red: work Rounds 1–6 as for the small head, ending with 36 sc.
- Small hat, Rounds 7–9: sc around, 36 sts per round. Round 10: repeat (5 sc, inc) 6 times, 42 sts. Rounds 11–13: sc around, 42 sts per round. Fasten off and turn the last three rounds outward.
- Make one cream pompom for each hat, approximately 3 cm, 2.5 cm, and 2 cm across. Sew each slightly to one side of its hat crown. Pin hats above the eyebrows, then tack the brims in place.
- Large scarf: ch 81 in red. Row 1: sc in second ch from hook and each remaining ch, 80 sc. Rows 2–5: ch 1, turn, sc across, 80 sc per row. Fasten off.
- Medium scarf: ch 69. Row 1: sc in second ch and across, 68 sc. Rows 2–4: ch 1, turn, sc across, 68 sc per row. Fasten off.
- Small scarf: ch 57. Row 1: sc in second ch and across, 56 sc. Rows 2–3: ch 1, turn, sc across, 56 sc per row. Fasten off.
- Embroider a gold running stitch down the center of each scarf. Add six short doubled red fringe strands to each end, trim to 1.5 cm, wrap around the neck, and tack the overlap.
- For six main branch sleeves, ch 5 in brown. Row 1: sc in second ch and across, 4 sc. Rows 2–12: ch 1, turn, 4 sc. Fasten off. Fold lengthwise and sew the long edges around a chenille stem with its ends folded inward. Close both sleeve ends.
- For six short branch forks, ch 5 in brown. Row 1: sc in second ch and across, 4 sc. Rows 2–5: ch 1, turn, 4 sc. Fold, sew, and lightly stuff each fork; sew one to each main branch near its outer end.
- Sew one arm to each side of each body, immediately below the scarf. Curve the arms upward and keep every chenille stem enclosed.
Two tiered Christmas trees
- Make two dark green cones. Round 1: 6 sc in an MR. Round 2: sc around, 6 sts.
- Round 3: inc around, 12 sts. Round 4: sc around, 12 sts.
- Round 5: repeat (sc, inc) 6 times, 18 sts. Round 6: sc around, 18 sts.
- Round 7: repeat (2 sc, inc) 6 times, 24 sts. Round 8: sc around in BLO, 24 sts; reserve the front loops.
- Round 9: repeat (3 sc, inc) 6 times, 30 sts. Round 10: sc around, 30 sts.
- Round 11: repeat (4 sc, inc) 6 times, 36 sts. Round 12: sc around, 36 sts.
- Round 13: repeat (5 sc, inc) 6 times, 42 sts. Round 14: sc around in BLO, 42 sts; reserve the front loops.
- Round 15: repeat (6 sc, inc) 6 times, 48 sts. Round 16: sc around, 48 sts.
- Round 17: repeat (7 sc, inc) 6 times, 54 sts. Round 18: sc around, 54 sts.
- Round 19: repeat (8 sc, inc) 6 times, 60 sts. Round 20: sc around in BLO, 60 sts; reserve the front loops.
- Round 21: repeat (9 sc, inc) 6 times, 66 sts. Round 22: sc around, 66 sts.
- Round 23: repeat (10 sc, inc) 6 times, 72 sts. Round 24: sc around, 72 sts. Fasten off.
- For each cream snow band, join cream to a reserved front loop on Round 8, 14, or 20. Repeat (sl st in next loop, ch 3, sl st in next loop) around. Join and fasten off. The bands contain 12, 21, and 30 chain arches respectively.
- For each tree base, work a dark green flat sc circle: Round 1, 6 sc in an MR; Round 2, inc around, 12 sts; Rounds 3–12, repeat (sc in next r minus 2 sts, inc) 6 times on Round r. Counts: 18, 24, 30, 36, 42, 48, 54, 60, 66, 72. Fasten off with a long tail.
- Cut a plastic-canvas circle slightly smaller than each base. Insert it above the crochet base, stuff the cone firmly without stretching its tip, and sew the 72 cone sts to the 72 base sts.
- Sew 10–12 gold beads to each tree, spacing them between the snow bands.
- Make four ochre stars. Round 1: 10 sc in an MR; join. Round 2: repeat (sl st in next st, work sc, hdc, dc, ch 2, dc, hdc, sc all in next st) 5 times; join. Each star has 5 points. Fasten off.
- Pair the stars with wrong sides together. Sew around their outlines, adding a thin layer of stuffing before the final point. Sew one finished star securely to each tree tip.
Lantern sleeve, snowy roof, and wreath
- Measure the lantern stem circumference and the distance from its foot to the underside of its light chamber. Make a brown sc swatch with the smaller hook. Calculate the sleeve stitch count by multiplying circumference in centimeters by your sc stitches per centimeter; round up to the next whole stitch. Make a flat panel so the cover can be fitted without covering the lantern foot.
- Stem sleeve Row 1: ch the calculated stitch count plus 1; sc in second ch and across. Count: calculated stitch count.
- Stem sleeve Rows 2 onward: ch 1, turn, sc across each row until the panel matches the exposed stem height. Fasten off, wrap around the stem, and lace the long edges together with brown yarn. Keep the lacing removable.
- For an approximately 7 cm wide finial and 19 cm roof perimeter diameter, begin the red roof cap: Round 1, 6 sc in an MR. Round 2, inc around, 12 sts. Round 3, repeat (sc, inc) 6 times, 18 sts. Round 4, sc around, 18 sts.
- Roof Round 5: repeat (2 sc, inc) 6 times, 24 sts. Round 6: sc around, 24 sts.
- Roof Round 7: repeat (3 sc, inc) 6 times, 30 sts. Round 8: sc around, 30 sts.
- Roof Round 9: repeat (4 sc, inc) 6 times, 36 sts. Round 10: sc around, 36 sts.
- Roof Round 11: repeat (5 sc, inc) 6 times, 42 sts. Round 12: sc around, 42 sts.
- Roof Round 13: repeat (6 sc, inc) 6 times, 48 sts. Round 14: sc around, 48 sts.
- Roof Round 15: repeat (7 sc, inc) 6 times, 54 sts. Round 16: sc around, 54 sts.
- Roof Round 17: repeat (8 sc, inc) 6 times, 60 sts. Round 18: sc around, 60 sts.
- Roof Round 19: repeat (9 sc, inc) 6 times, 66 sts. Round 20: sc around, 66 sts.
- Roof Round 21: repeat (10 sc, inc) 6 times, 72 sts. Round 22: sc around, 72 sts.
- Roof Round 23: repeat (11 sc, inc) 6 times, 78 sts. Round 24: sc around, 78 sts. Fasten off. This cap is approximately 10 cm high and 11 cm across at the lower edge at the stated sc gauge; the preceding fit description refers to the support’s available roof area, not the cap’s crochet diameter. Center the cap over the support and use its existing rigid roof beneath it.
- Roof snow: join cream to any lower-edge st. Repeat (sl st in next st, ch 4, sl st in next st) 39 times. Join and fasten off. Add six overlapping cream ch-5 loops at the crown, sewing both ends of each loop to the roof.
- If the roof cap does not match your support, adjust before adding snow: continue alternating an increase round with an even round, adding 6 sts per increase round, until the circumference fits. End on an even stitch count so the two-stitch snow repeat fits exactly. Stop short of vents and leave the light chamber uncovered.
- Wreath foundation: ch 36 in dark green, join without twisting. Round 1: sc in each ch, 36 sts. Rounds 2–5: sc around, 36 sts per round. Fasten off with a long tail.
- Fold the wreath tube lengthwise, join the last round to the foundation chain, and stuff lightly as you sew. This produces a small padded ring. Shape it into a circle and lace it around the lantern stem immediately below the light chamber.
- Wreath foliage: join green through the outer surface of the ring and make 24 evenly spaced loops, each consisting of ch 5 and a sl st into the wreath approximately 0.5 cm farther along. Fasten off.
- Bow: ch 25 in red. Row 1: sc in second ch and across, 24 sc. Rows 2–6: ch 1, turn, 24 sc. Sew the short ends together, flatten the loop with the seam at the back center, and wrap the middle tightly with red yarn.
- Bow tails, make two: ch 17. Row 1: sc in second ch and across, 16 sc. Rows 2–3: ch 1, turn, 16 sc. Fasten off and sew one end of each strip behind the bow center. Sew the bow to the wreath and embroider two gold stitches around its center.
- Place the manufactured lantern foot directly on the rigid display board beneath the mat. Make a discreet opening between mat stitches for the stem only if the lantern can be safely disassembled and reassembled according to its own instructions; otherwise place its foot on top of the mat and conceal it with foliage.
Illuminated cottage walls and roof
- Use tan and the smaller hook. Back wall Row 1: ch 19, sc in second ch and across, 18 sc. Rows 2–16: ch 1, turn, 18 sc per row.
- Back gable Row 17: ch 1, turn, dec, 14 sc, dec, 16 sts. Row 18: ch 1, turn, dec, 12 sc, dec, 14 sts. Row 19: ch 1, turn, dec, 10 sc, dec, 12 sts. Row 20: ch 1, turn, dec, 8 sc, dec, 10 sts.
- Back gable Row 21: ch 1, turn, dec, 6 sc, dec, 8 sts. Row 22: ch 1, turn, dec, 4 sc, dec, 6 sts. Row 23: ch 1, turn, dec, 2 sc, dec, 4 sts. Row 24: ch 1, turn, dec twice, 2 sts. Fasten off.
- Front wall Row 1: ch 19, sc in second ch and across, 18 sc. Rows 2–4: ch 1, turn, 18 sc per row.
- Front wall Row 5: ch 1, turn, 5 sc, ch 8, skip 8 sts, 5 sc. Count: 10 sc and an 8-chain window opening.
- Front wall Rows 6–12, first pier: ch 1, turn, work only the 5 sc at this edge, 5 sc per row. Fasten off after Row 12.
- Front wall Rows 6–12, second pier: join tan to the outer edge of the other group of 5 sc on Row 5. Work 5 sc per row for seven rows, turning with ch 1. Fasten off after Row 12. Both piers must finish at the same height.
- Front wall Row 13: join tan at the right outer edge with the right side facing; 5 sc across the first pier, ch 8, 5 sc across the second pier. Count: 10 sc and 8 ch.
- Front wall Row 14: ch 1, turn, 5 sc, 8 sc into the chain space, 5 sc. Count: 18 sc. Rows 15–16: ch 1, turn, 18 sc per row.
- Front gable Rows 17–24: work the eight back-gable rows exactly, ending with 2 sts. Fasten off.
- Side walls, make two: ch 17. Row 1: sc in second ch and across, 16 sc. Rows 2–16: ch 1, turn, 16 sc per row. Fasten off.
- Cut plastic-canvas inserts approximately 3 mm smaller than the back and side walls. Cut the front insert with a matching window opening. Overcast each insert to the wrong side of its crochet panel, keeping the canvas inside the seam allowance.
- Stitch an amber translucent sheet behind the window. Sew brown yarn around the opening, then add one vertical and one horizontal brown yarn bar across the window.
- Sew the front and back to the side walls with right sides outward. Leave the bottom open so the cottage can lift off its LED tealight.
- Roof panels, make two in red: ch 23. Row 1: sc in second ch and across, 22 sc. Rows 2–15: ch 1, turn, 22 sc per row. Fasten off.
- Cut two plastic-canvas roof inserts approximately 3 mm smaller than the panels, stitch them to the wrong sides, and sew one 22-stitch edge of each panel together to form the ridge. The roof should overhang the walls.
- Snow edging: join cream at an outer roof corner. Work sc around the complete roof perimeter, placing one sc in each stitch end, one sc in each row end, and 3 sc at each corner. Mark the four corner centers. Join.
- Snow loops: ch 1; work (sc in next edging st, ch 3) around, including all three stitches at each corner. Join and fasten off. Sew the roof to the gable edges and side-wall tops.
- Chimney: ch 10 in brown and join. Rounds 1–6: sc around, 10 sts per round. Change to cream for Round 7: repeat (sc, ch 3) in each st, 10 loops. Fasten off. Flatten the bottom slightly and sew the chimney to one roof slope.
- Place the cottage over its separate LED tealight, keeping the switch accessible from below. Test that the building lifts off easily without pulling its roof.
Gift boxes and gold ties
- Make six squares for each gift, one set red and one set dark green. For each square, ch 11. Row 1: sc in second ch and across, 10 sc. Rows 2–10: ch 1, turn, 10 sc per row. Fasten off.
- Join four squares into a strip by sewing their side edges, then join the first and last edges to form a box wall. Sew a fifth square to the bottom.
- Insert a small plastic-canvas cube slightly smaller than the crochet shell, or lightly stuff the shell while keeping the corners square. Sew the sixth square on as the top.
- For each gift, make two ochre chain cords long enough to pass around the box in perpendicular directions, approximately 50 chains each at this gauge. Fasten off, wrap around the gift, and stitch the crossing points to the box.
- Make an additional 60-chain ochre cord for each bow. Tie into a bow at the top and tack the knot and four loop attachment points. Embroider metallic thread along the visible ochre cords.
Holly leaves, berries, and poinsettia
- Holly leaves, make twelve in dark green: ch 10. Work into the second ch from the hook and onward: sl st, sc, hdc, dc in each of the next 3 ch, hdc, sc, then 3 sc in the final ch. Working along the unused side of the chain, sc, hdc, dc in each of the next 3 ch, hdc, sc, sl st. Join to the first sl st. Count: 19 sts.
- Leaf points: with the same yarn, work 19 sc around the leaf, adding (ch 2, sl st in second ch from hook) after the 3rd, 6th, 10th, 14th, and 17th sc. Join and fasten off. The points are additions and do not replace the 19 edging sc.
- Berries, make fifteen in red: Round 1, 6 sc in an MR; Round 2, sc around, 6 sts; Round 3, dec 3 times, 3 sts. Add a tiny tuft of stuffing before the final decrease. Fasten off and draw the opening closed.
- Sew two leaves and three berries to each snowman hat. Reserve the remaining six leaves and six berries for the cottage and foreground.
- Poinsettia petals, make eight in red: ch 13. Starting in second ch from hook, work sl st, sc, hdc, dc in next 2 ch, tr in next 2 ch, dc in next 2 ch, hdc, sc, then 3 sc in the last ch. Along the unused side, work sc, hdc, dc in next 2 ch, tr in next 2 ch, dc in next 2 ch, hdc, sc, sl st. Join. Count: 25 sts. Fasten off with a sewing tail.
- Poinsettia backing: in dark green, Round 1, 6 sc in an MR; Round 2, inc around, 12 sts; Round 3, repeat (sc, inc) 6 times, 18 sts. Fasten off.
- Sew four petals evenly around the backing, attaching only the narrow chain-start ends. Sew the other four above them, offset between the lower petals. Add five to seven gold beads at the center.
- Large foreground leaves, make three in medium green: use the same 25-stitch petal instructions. Sew them beneath the flower, extending beyond its red petals.
Village layout and attachment
- Lay the blocked mat over the felt-covered board. Identify the back of the display. Place the lantern at the back center with its foot fully supported.
- Position the large snowman left of center and the medium snowman right of center, leaving the lantern visible between their hats. Place the small snowman slightly forward between them.
- Position one tree behind each outer snowman. Set the cottage at the front left and the two gifts at the front center and right. Keep the cottage window visible.
- Arrange the poinsettia at the front edge. Add the remaining holly leaves and berries around the cottage and gifts. If using pinecones and artificial greenery, keep their stems beneath the surrounding pieces and away from the scalloped border.
- Secure each snowman and tree with four separate yarn ties passed through its lower crochet fabric and through the mat. Tie beneath the mat before replacing it on the board. Use the same method for gifts and the flower.
- Attach the cottage with two loose loops around its lower side seams so it can lift off the tealight. Leave the lantern cover laced and removable. Do not stitch through the manufactured lantern or its wiring.
- Sew optional greenery to the mat with strong thread around its stems. Attach pinecones through their lower scales with thread, keeping them removable for storage.
Finishing
- Weave in every yarn end, using extra passes on the snowman neck seams, tree bases, roof ridge, and flower center. Check that no stiff insert or chenille stem can work through the crochet.
- Set the complete display on a level surface. Adjust the ties until the snowmen stand upright, the trees sit flat, and the lantern remains steady on its own foot.
- Switch on both LEDs and check access to their controls. Remove any foliage that presses against a switch, vent, or battery door.
Give the scarves a gentle curve and angle the hats slightly toward the center of the village. Spread the poinsettia petals by hand so the gold center and layered red points remain visible.
For storage, remove the lights and optional natural decorations, then support the trees and cottage with tissue. Keep the mat flat or roll it loosely around a wide tube after detaching the dimensional pieces.
Tips for Success
- Check the mat after every four increase rounds. If it ripples or cups, correct your tension or hook size before adding the next group of rounds.
- Stuff the lower half of each snowman firmly and keep its underside broad; a rounded underside makes the finished figure lean.
- Mark all reserved tree loops as you work. This makes the cream snow bands easier to place without catching the cone fabric.
- Cut cottage inserts only after completing and blocking the actual panels. Crochet dimensions vary even when stitch counts match.
- Pin the full arrangement before tying anything down, checking that the cottage window and all three faces remain visible from the front.
Common Mistakes to Avoid
- Counting a turning chain as a wall stitch changes the cottage width. Keep every rectangular wall row at its stated count.
- Working the tree snow bands through both loops pulls the cone out of shape. Use only the reserved front loops.
- Pulling the gold mat edging tight curls the scallops. Use a larger hook for that round if necessary.
- Overstuffing the head-to-body join creates a stretched neck seam. Add small amounts of stuffing and sew matching openings stitch for stitch.
- Fitting the lantern cover by its height alone can obstruct access or distort the roof. Measure the circumference and check the cover on the actual support before finishing it.
Ways to Customize This Pattern
- Use burgundy instead of bright red and replace gold accents with copper while retaining the cream snow and dark green foliage.
- Make embroidered eyes and yarn buttons for an entirely textile finish; keep the stated facial placement.
- Replace the optional natural pinecones with additional crochet gifts using the same six-panel construction.
- Make a wider mat by adding complete 12-increase dc rounds before the sc edging. For the 12-stitch scallop repeat to fit, end with a total divisible by 12.
- Create an unlit cottage by placing a cream fabric panel behind the amber window and omitting its separate LED tealight.
Frequently asked questions
It is a Christmas home decor centerpiece. The stuffed snowmen are separate decorative components mounted alongside a structured cottage, supported trees, and a covered LED lantern.
The tall lantern in this pattern relies on a manufactured LED lantern for its structure and lighting. The crochet forms its removable stem sleeve, roof cap, wreath, and bow. An unsupported yarn lantern will not provide the same stability.
Using a different yarn weight and matching hooks changes the crochet pieces together, but the lantern and cottage inserts must still be measured separately. For a predictable display footprint, keep the stated yarn weight and adjust only the mat with complete increase rounds.
Remove the electronics, display board, natural decorations, and removable covers first. Spot-clean the structured pieces because their inserts and sewn decorations make immersion unsuitable. Wash the detached mat according to the yarn label and dry it flat.
The finished Snowy Christmas Village Crochet Centerpiece Pattern

