Snowy Cottage Christmas Crochet Lantern Pattern
Advanced
For experienced crocheters who enjoy complex shaping, fine detail, and ambitious construction
Single-Day Project
A satisfying project you can complete in a single afternoon or evening.
Handmade Gift
A beautiful keepsake — free forever. Read online or print at home.
About This Snowy Cottage Christmas Crochet Lantern Pattern
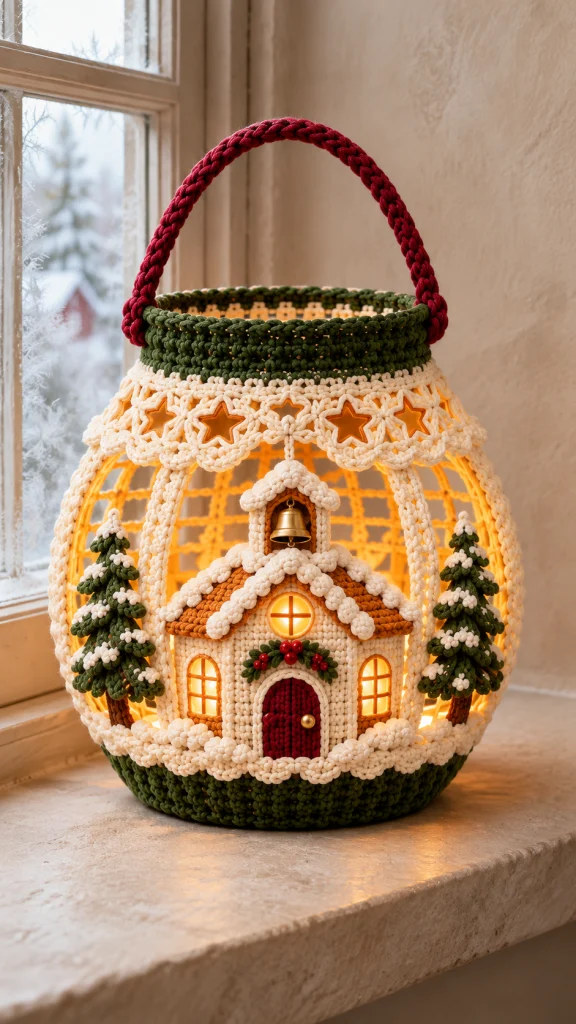
This Christmas crochet lantern pattern creates a framed winter scene with a snowy cottage, two layered fir trees, cream star trim, and a deep red handle. An olive-green base and rim surround an open cream mesh shell, allowing warm battery-powered lights to glow through the cottage windows and around the trees.
The lantern is a piece of decorative home decor built around a rigid lantern frame. Its advanced construction combines a fitted circular base, shaped mesh covering, a separate upper band, small architectural panels, layered foliage, and padded snow edging. Allow approximately 30–40 hours of crochet and assembly, plus time for blocking.
This project suits crocheters comfortable with counting openwork, working small shaped pieces, and fitting crochet to a support. The finished lantern measures approximately 26 cm across its widest point and 30 cm tall, or about 44 cm tall with its handle standing upright. The handle is decorative; move the lantern by supporting its base.
Materials
- Bulky cotton yarn, approximately 250 g olive green, 300 g cream, and 100 g deep red; approximately 90–110 m per 100 g.
- DK cotton yarn, approximately 75 g cream, 40 g forest green, 30 g ochre, 20 g brown, and 20 g deep red; approximately 110–125 m per 50 g.
- 5 mm crochet hook for the lantern covering and handle.
- 3 mm crochet hook for the cottage, trees, stars, and small details.
- Rigid, open-top craft lantern frame with a 20 cm bottom ring, 20 cm top ring, approximately 26 cm widest diameter, 27 cm ring-to-ring height, and six evenly spaced curved ribs. Select a frame with smooth, capped joins.
- Twelve smooth five-point craft star frames, approximately 30 mm across, suitable for crocheting around.
- Approximately 20 × 20 cm amber organza for the cottage windows.
- Warm-white battery-powered LED fairy lights with a compact, accessible battery pack.
- One 12–15 mm craft bell.
- One small gold button for the door handle.
- Dark red DK cotton scraps for embroidered berries.
- Approximately 65 cm of flexible 4 mm cotton cord for reinforcing the decorative handle.
- Cream and green strong sewing thread, a sewing needle, and tapestry needles.
- Stitch markers, rustproof blocking pins, scissors, and a measuring tape.
- Small amount of washable polyester stuffing for the snow edging.
Abbreviations
chchainsl stslip stitchscsingle crochethdchalf double crochetdcdouble crochetsc2togsingle crochet two stitches togetherststitchMRmagic ringRSright sideWSwrong sideBObobble: work five unfinished double crochets in one stitch, then yarn over and draw through all six loopsOlive Base and Lower Wall
- Round 1: With bulky olive yarn and the 5 mm hook, make 6 sc in an MR. Work in a spiral and mark the first stitch. Count: 6 sc.
- Round 2: Work 2 sc in every st. Count: 12 sc.
- Round 3: Repeat (sc in next st, 2 sc in next st) six times. Count: 18 sc.
- Round 4: Repeat (sc in next 2 sts, 2 sc in next st) six times. Count: 24 sc.
- Round 5: Repeat (sc in next 3 sts, 2 sc in next st) six times. Count: 30 sc.
- Round 6: Repeat (sc in next 4 sts, 2 sc in next st) six times. Count: 36 sc.
- Round 7: Repeat (sc in next 5 sts, 2 sc in next st) six times. Count: 42 sc.
- Round 8: Repeat (sc in next 6 sts, 2 sc in next st) six times. Count: 48 sc.
- Round 9: Repeat (sc in next 7 sts, 2 sc in next st) six times. Count: 54 sc.
- Round 10: Repeat (sc in next 8 sts, 2 sc in next st) six times. Count: 60 sc.
- Round 11: Repeat (sc in next 9 sts, 2 sc in next st) six times. Count: 66 sc.
- Round 12: Repeat (sc in next 10 sts, 2 sc in next st) six times. Count: 72 sc.
- Round 13: Sc in the back loop of each st to turn the edge upward. Count: 72 sc.
- Rounds 14–16: Sc in both loops of every st in each round. Count: 72 sc per round. Sl st in the next st and fasten off.
- Block the disk to 20 cm across without flattening the lower wall. Seat the frame’s bottom ring inside the lower wall. Using strong green thread, sew around the ring and through every third stitch of Round 13, making 24 securing stitches.
Cream Mesh Shell
- Setup: Mark one base stitch at the center back. Join bulky cream yarn in that stitch of Round 16. Work joined rounds with the RS facing throughout.
- Mesh Round 1: Ch 1, sc in the joining stitch, ch 3, skip 2 sts. Repeat (sc in next st, ch 3, skip 2 sts) another 23 times. Sl st to the first sc. Count: 24 sc and 24 ch-3 spaces.
- Mesh Round 2: Sl st into the first ch-3 space. Ch 1, sc in the same space, ch 3. Repeat (sc in next ch-3 space, ch 3) another 23 times. Sl st to the first sc. Count: 24 sc and 24 ch-3 spaces.
- Mesh Rounds 3–18: Repeat Mesh Round 2 for each round. Count: 24 sc and 24 ch-3 spaces per round. Fasten off after Round 18.
- Fit the shell over the frame. Distribute four mesh spaces between each neighboring pair of ribs. The same number of arches stretches wider at the belly and contracts toward the neck.
- Temporarily lace the final mesh round around the frame approximately 3 cm below the top ring. Adjust the vertical spacing until the mesh height is approximately 24 cm. Sew the final mesh round to the ribs with cream thread, keeping all 24 arches evenly distributed.
Upper Olive Band
- Round 1: With bulky olive yarn, ch 72 loosely. Join with a sl st without twisting. Ch 1 and sc in each chain. Sl st to the first sc. Count: 72 sc.
- Rounds 2–4: Ch 1, sc in every st, and sl st to the first sc in each round. Count: 72 sc per round. Fasten off after Round 4.
- Fit the band around the frame’s top ring with its upper edge level with the ring. Sew the upper edge securely around the ring with green thread.
- Join the lower edge to Mesh Round 18: sew each mesh sc to every third stitch of the band, working around all 24 mesh anchors. The remaining band stitches span each mesh arch.
- Top edging: Join bulky cream yarn at the back, ch 1, and sc in each of the 72 upper-edge stitches. Sl st to the first sc and fasten off. Count: 72 sc.
Six Raised Frame Ribs
- Row 1, make six: With bulky cream yarn, ch 33. Sc in the second chain from the hook and each remaining chain. Count: 32 sc.
- Row 2: Ch 1, turn, and sl st loosely in each st. Count: 32 sl sts. Fasten off with a long sewing tail.
- Block each strip to the curved distance between the lower wall and upper band along one frame rib. The strip should follow the rib without pulling either ring out of alignment.
- Place one strip over each rib and sew both long edges through the surrounding mesh, enclosing the metal support. Position the two front ribs outside the cottage area.
Twelve Star Medallions and Scalloped Trim
- Cover each star frame: With DK cream yarn and the 3 mm hook, work 30 sc around the frame, distributing 6 sc along each point-to-point section. Slide the stitches until the frame is covered. Sl st to the first sc. Count: 30 sc.
- Star edging: Ch 1. Repeat (sc in next 2 sts, work sc, ch 2, sc in next st, sc in next 2 sts, sl st in next st) five times. Sl st to the first sc and fasten off. Each repeat consumes 6 stitches; total: 30 sc, 5 sl sts, and 5 ch-2 points. Position the ch-2 points over the five frame tips.
- Blocking: Pin the twelve stars to their five-point outlines. Leave their central openings clear.
- Trim foundation: Join bulky cream yarn in the lower edge of the olive band at the back. Ch 1 and sc in all 72 band stitches. Sl st to the first sc. Count: 72 sc.
- Scallop round: Ch 1. Repeat (sc in next st, skip 2 sts, 7 dc in next st, skip 2 sts) twelve times. Sl st to the first sc and fasten off. Count: 12 sc and 84 dc, forming 12 scallops.
- Place one star above each scallop, with its lower tip overlapping the scallop’s center. Sew each star at its upper and side points to the band and mesh. Keep all openings uncovered.
Cottage Wall and Gable
- Wall Row 1: With DK cream yarn and the 3 mm hook, ch 26. Sc in the second chain from the hook and each chain across. Count: 25 sc. Mark the RS.
- Wall Row 2: Ch 1 and turn. Sc in next 3 sts, ch 5, skip 5 sts, sc in next st, ch 7, skip 7 sts, sc in next st, ch 5, skip 5 sts, sc in last 3 sts. Count: 8 sc, two ch-5 window spaces, and one ch-7 doorway space; 25 positions across.
- Wall Rows 3–12: Ch 1 and turn. Sc in first 3 sc, ch 5 over the next window space, sc in next sc, ch 7 over the doorway space, sc in next sc, ch 5 over the second window space, sc in last 3 sc. Count per row: 8 sc, two ch-5 spaces, and one ch-7 space. These stacked chains form horizontal window bars.
- Wall Row 13: Ch 1 and turn. Sc in first 3 sc, 5 sc in the ch-5 space, sc in next sc, 7 sc in the ch-7 space, sc in next sc, 5 sc in the next ch-5 space, sc in last 3 sc. Count: 25 sc.
- Gable Row 1: Ch 1, turn, sc2tog, sc in next 21 sts, sc2tog. Count: 23 sc.
- Gable Row 2: Ch 1, turn, sc2tog, sc in next 19 sts, sc2tog. Count: 21 sc.
- Gable Row 3: Ch 1, turn, sc2tog, sc in next 17 sts, sc2tog. Count: 19 sc.
- Gable Row 4: Ch 1, turn, sc2tog, sc in next 15 sts, sc2tog. Count: 17 sc.
- Gable Row 5: Ch 1, turn, sc2tog, sc in next 13 sts, sc2tog. Count: 15 sc.
- Gable Row 6: Ch 1, turn, sc2tog, sc in next 11 sts, sc2tog. Count: 13 sc.
- Gable Row 7: Ch 1, turn, sc2tog, sc in next 9 sts, sc2tog. Count: 11 sc.
- Gable Row 8: Ch 1, turn, sc2tog, sc in next 7 sts, sc2tog. Count: 9 sc.
- Gable Row 9: Ch 1, turn, sc2tog, sc in next 5 sts, sc2tog. Count: 7 sc.
- Gable Row 10: Ch 1, turn, sc2tog, sc in next 3 sts, sc2tog. Count: 5 sc.
- Gable Row 11: Ch 1, turn, sc2tog, sc in next st, sc2tog. Count: 3 sc.
- Gable Row 12: Ch 1, turn, insert the hook into each of the three stitches and draw up a loop from each; yarn over and draw through all four loops. Count: 1 st. Fasten off.
- Block the facade to approximately 12.5 cm wide and 11.5–12 cm high. Cut two amber organza pieces approximately 3.5 × 6 cm. Turn under their raw edges and sew one behind each window opening on the WS.
Door, Window Details, and Wreath
- Door Row 1: With DK deep red yarn, ch 8. Sc in the second chain from the hook and each chain across. Count: 7 sc.
- Door Rows 2–9: Ch 1, turn, and sc in each st. Count: 7 sc per row.
- Door Row 10: Ch 1, turn, sc2tog, sc in next 3 sts, sc2tog. Count: 5 sc.
- Door Row 11: Ch 1, turn, sc2tog, sc in next st, sc2tog. Count: 3 sc. Fasten off.
- Sew the door over the central opening with its bottom level with the wall foundation. Sew the small gold button securely to one side of the door.
- Door arch: With DK cream yarn, ch 24 and sl st in the second chain and each chain across. Count: 23 sl sts. Sew this cord around the door’s two sides and curved top, easing the upper curve.
- Window outlines, make two: With DK ochre yarn, ch 33 and sl st in the second chain and each chain across. Count: 32 sl sts. Sew one cord around each rectangular window opening.
- Window mullions: Embroider one vertical ochre line through the center of each window, securing it to each cream chain bar. Add one horizontal ochre crossbar halfway up each window.
- Round attic window: With DK ochre yarn, ch 12 and join into a ring. Ch 1, work 18 sc around the ring, and sl st to the first sc. Count: 18 sc. Fasten off.
- Cut a 2.5 cm amber organza circle and sew it behind the attic-window ring. Sew the ring to the gable below the apex. Embroider a vertical and horizontal ochre cross across its center. This surface window catches the surrounding light; the side windows provide the main transparent openings.
- Wreath spray: With DK forest green yarn, ch 13. Sl st in the second chain. Repeat (ch 4, sl st in the second chain and next 2 chains, sl st in next foundation chain) eleven times. Count: 11 small branches along a 12-stitch stem. Fasten off.
- Sew the spray in a shallow curve above the door. Embroider seven red French-knot berries, keeping all thread ends on the WS.
Ochre Roof and Bell Tower
- Roof Row 1, make two panels: With DK ochre yarn, ch 20. Sc in the second chain and each chain across. Count: 19 sc.
- Roof Rows 2–5: Ch 1, turn, and sc in each st. Count: 19 sc per row. Fasten off with a long sewing tail.
- Block each roof panel to approximately 9.5 × 2.3 cm. Place one long edge along each gable slope. Let the panels project slightly beyond the eaves, with the remaining width extending behind the facade. Sew their upper short ends together at the ridge, then sew their front long edges to the gable.
- Roof snow Row 1, make two: With DK cream yarn, ch 20. Sc in the second chain and each chain across. Count: 19 sc.
- Roof snow Row 2: Ch 1, turn, sc in first st. Repeat (BO in next st, sc in next st) nine times. Count: 9 bobbles and 10 sc. Fasten off. Push the bobbles toward the RS.
- Sew one snow strip along each front roof slope, placing the straight edge against the ochre panel and the bobbles outward.
- Bell-tower arch Row 1: With DK cream yarn, ch 14. Sc in the second chain and each chain across. Count: 13 sc.
- Bell-tower arch Rows 2–3: Ch 1, turn, and sc in each st. Count: 13 sc per row. Fasten off.
- Curve the strip into an inverted U approximately 3 cm wide and 3 cm high. Sew its ends just behind the cottage roof ridge. Suspend the bell from the center of the arch using strong thread.
- Tower cap: With DK cream yarn, ch 12 and sl st in the second chain and each chain across. Count: 11 sl sts. Fold into a shallow inverted V and sew over the arch, leaving its ends projecting slightly.
- Anchor the tower’s upper back to a mesh intersection with cream thread so it stays upright.
Two Layered Snowy Fir Trees
- Lower tier Row 1, make two: With DK forest green yarn, ch 14. Sc in the second chain and each chain across. Count: 13 sc.
- Lower tier Row 2: Ch 1, turn, sc2tog, sc in next 9 sts, sc2tog. Count: 11 sc.
- Lower tier Row 3: Ch 1, turn, sc2tog, sc in next 7 sts, sc2tog. Count: 9 sc.
- Lower tier Row 4: Ch 1, turn, sc2tog, sc in next 5 sts, sc2tog. Count: 7 sc.
- Lower tier Row 5: Ch 1, turn, sc2tog, sc in next 3 sts, sc2tog. Count: 5 sc.
- Lower tier Row 6: Ch 1, turn, sc2tog, sc in next st, sc2tog. Count: 3 sc.
- Lower tier Row 7: Ch 1, turn, draw up one loop in each of the 3 sts, yarn over, and draw through all 4 loops. Count: 1 st. Fasten off.
- Middle tiers, make two: Work Lower Tier Rows 2–7 as a separate triangle, beginning with ch 12 and 11 sc for its foundation row. Then work the rows containing 9, 7, 5, 3, and 1 st. Each middle tier has six rows.
- Upper tiers, make two: Begin with ch 10 and 9 sc for the foundation row. Then work the lower-tier decrease rows containing 7, 5, 3, and 1 st. Each upper tier has five rows.
- Branch fringe: On each triangle, join green yarn at the left foundation corner with the RS facing. Work along the foundation edge, repeating (sl st in next foundation stitch, ch 3, sl st in the second chain and next chain) once per foundation stitch. Make 13 branch tips on each lower tier, 11 on each middle tier, and 9 on each upper tier. Fasten off.
- Trunk Row 1, make two: With DK brown yarn, ch 4 and work 3 sc.
- Trunk Rows 2–18: Ch 1, turn, and sc in each st. Count: 3 sc per row. Fasten off.
- Assemble each tree with its trunk vertical. Place the lower tier with its bottom edge 1 cm above the trunk bottom. Place the middle tier 2 cm above the lower tier’s bottom, then the upper tier 2 cm above the middle tier’s bottom. Sew each tier through its upper half only, leaving the fringed edges raised.
- Snow clusters: For each tree, use DK cream yarn to embroider nine short snow clusters: four across the lower tier, three across the middle tier, and two across the upper tier. Make each cluster from three loose satin stitches. Add four cream stitches over the tree tip.
Padded Snowbank
- Round 1: With bulky cream yarn and the 5 mm hook, work 6 sc in an MR. Work in a spiral. Count: 6 sc.
- Rounds 2–78: Sc in every st for each round. Count: 6 sc per round. Add very small amounts of stuffing as the tube grows.
- Fit the tube around the top of the olive lower wall. At the stated gauge, it should measure approximately 60 cm. Its ends should meet without stretching the base.
- Final round: Work sc2tog three times. Count: 3 sts. Fasten off, draw the tail through the remaining stitches, and close.
- Join the two tube ends into a ring with a ladder stitch. Sew the ring around the lantern at the green-to-cream transition, placing the join at the back.
- Snow scallops: Work into the 72 base stitches immediately below the tube. Join bulky cream yarn, ch 1, and repeat (sc in next st, skip 2 sts, 5 dc in next st, skip 2 sts) twelve times. Sl st to the first sc and fasten off. Count: 12 sc and 60 dc, forming 12 scallops. Ease the scallops over the tube’s front edge.
Reinforced Red Handle
- Make three strands: With bulky deep red yarn, ch 61. Sl st in the second chain and each chain across. Count: 60 sl sts per strand. Leave 25 cm tails at both ends.
- Lay the three strands together and braid them around the cotton cord. Aim for a finished handle approximately 50 cm long, leaving the cord ends extending slightly beyond the braid.
- Fold each cord end back by 2 cm and wrap firmly with red yarn. Sew the folded sections closed so no loose cord remains exposed.
- Place the handle ends at opposite sides of the top ring. Overlap each end by approximately 4 cm down the outside of the olive band. Sew through the braid, around the rigid ring, and through the band with multiple passes.
- Wrap each attachment with red yarn to create a neat collar. Shape the handle into an arch about 14 cm above the rim. Treat it as a decorative handle only.
Finishing
- Center the cottage on the front, with the door bottom resting just behind the padded snowbank. Sew its lower edge and side piers to the mesh. Add discreet anchoring stitches behind the gable and roof ends, keeping the window openings clear.
- Place one tree on each side of the cottage, with the trunks disappearing behind the snowbank. Curve the trees gently around the lantern and sew through the trunks and the upper portions of the tiers.
- Arrange the LED wire inside the mesh, placing a few lights behind each side window and spreading the rest around the back and sides. Use loose thread loops to retain the wire without piercing its insulation.
- Keep the battery pack inside the lantern near the open top, supported by the frame with its own removable strap or clip. Ensure you can reach its switch and battery compartment without disturbing the cottage.
- Weave in all yarn ends. Check the bell, button, star frames, and handle attachments. Set the lantern upright, straighten the roof snow, and open the tree layers gently with your fingertips.
The little cottage should sit comfortably within its snowy border, with the two fir trees framing the doorway. Turn on the lights and adjust their positions until both side windows glow and the cream mesh remains visible around the scene.
Lift the finished lantern underneath its base whenever you move it. For storage, remove the batteries and cushion the roof, bell tower, and trees with tissue so their shaped details keep their form.
Tips for Success
- Mark the center front before attaching the rib covers. The cottage needs a clear space between the two front ribs.
- Block the cottage before making its roof placement permanent. A straight foundation and even gable slopes make the roof sit cleanly.
- Keep stuffing in the snow tube light. A soft tube follows the round base more smoothly than a firmly packed one.
- Sew the stars at several points so their frames cannot twist into the mesh openings.
- Leave the lower half of every tree tier unattached to preserve the layered branch effect.
Common Mistakes to Avoid
- Pulling the mesh tight enough to distort the frame: redistribute all 24 arches and block them before securing the top.
- Working into the window chains on Wall Rows 3–12: chain across the openings and work only into the eight solid stitches. Fill the spaces only on Row 13.
- Covering the windows with dense backing: use a single layer of amber organza and keep its seams outside the openings.
- Sewing the roof strips flat against the mesh: allow their width to extend behind the facade so the cottage retains its shallow dimensional shape.
- Using the handle to hang the finished lantern: display this version on a surface and support its base when moving it.
Ways to Customize This Pattern
- Replace olive and red with navy and silver-gray while keeping cream snow and warm amber windows.
- Use plain cream-covered star frames for a softer look, or wrap the frames in ochre before adding cream edging for a warmer center.
- Add a second cottage to the back using the same wall, gable, roof, and door instructions; allow extra DK yarn and keep access to the battery pack clear.
- Make removable trees by sewing each assembled trunk and upper tier to small thread loops on the mesh.
- Omit the bell and embroider a small cream star inside the tower arch for a quiet display.
Frequently asked questions
This pattern is fitted to a rounded frame with a 20 cm base and rim and a 26 cm belly. A straight jar will change the fit and proportions. For this version, use the specified frame and keep the top open for light and battery access.
The two side windows are open chain-ladder sections backed with amber organza. LEDs positioned behind them produce the window glow. The circular attic window is a surface detail that catches light from the surrounding lantern.
The braided handle is decorative. The crochet covering and attachments are not specified as a load-bearing suspension system. Display the lantern on a stable surface and move it with your hands underneath the base.
Remove the lights and batteries, then spot-clean the crochet with a barely damp cloth. The assembled frame, organza, bell, and shaped details make machine washing unsuitable. Let every part dry fully before replacing the lights.
Check the frame height and block the 18 mesh rounds to approximately 24 cm before sewing. If the mesh still cannot reach without distorting the frame, remake the mesh with a slightly larger hook while retaining all 24 arches in each round.
The finished Snowy Cottage Christmas Crochet Lantern Pattern

