Spiral Crochet Christmas Baubles – Free Advanced Ornament Pattern
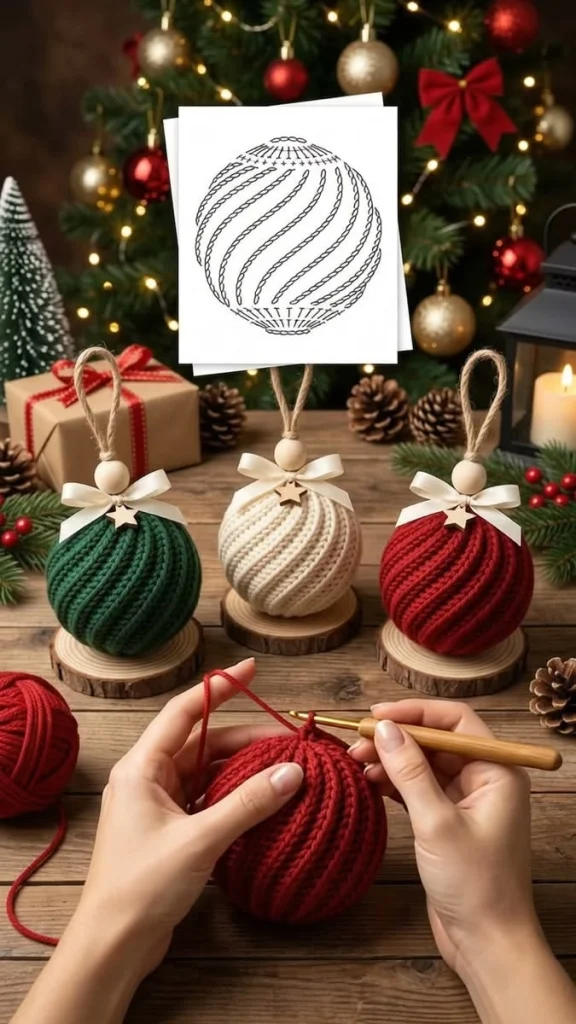
Create a beautiful collection of handmade Christmas ornaments with this free advanced spiral crochet bauble pattern. These elegant decorations feature raised diagonal ribs, a perfectly rounded silhouette, and charming finishing details including natural wooden beads, ivory satin bows, and rustic hanging loops.
Made in classic forest green, warm ivory, and deep Christmas red, these textured crochet ornaments bring a timeless handmade touch to Christmas trees, festive garlands, and holiday gift wrapping.
Pattern Information
- Skill Level: Advanced
- Finished Size: Approximately 8 cm in diameter
- Construction: Shaped spherical body with spiral ribbing, stuffing, hanging loop, bead, and decorative bow
- Yarn: DK-weight cotton
- Hook Size: 3 mm
- Colors: Forest green, ivory, and deep red
- Terminology: US crochet terms
- Estimated Time: 2–3 hours per ornament
Materials Needed
- DK cotton yarn in forest green
- DK cotton yarn in warm ivory
- DK cotton yarn in deep Christmas red
- 3 mm crochet hook
- Polyester fiberfill stuffing
- Natural wooden beads with large holes
- Ivory satin ribbon, approximately 6–10 mm wide
- Natural jute twine or cotton cord
- Small wooden star charms (optional)
- Stitch markers
- Tapestry needle
- Scissors
Crochet Abbreviations
- MR: Magic ring
- ch: Chain
- sc: Single crochet
- sl st: Slip stitch
- inc: Increase (2 sc in one stitch)
- dec: Invisible single crochet decrease
- BLO: Back loop only
- FLO: Front loop only
- FO: Fasten off
- st: Stitch
Special Technique: Raised Spiral Ribbing
The distinctive feature of these ornaments is the diagonal spiral texture wrapping around the entire spherical surface.
To create the raised appearance, the ornament is worked in continuous rounds using back-loop-only single crochet stitches. After the sphere is complete, decorative raised spiral lines are added by working surface slip stitches along diagonal paths.
This two-stage method allows the ornament to maintain its round shape while producing clearly defined, evenly spaced spiral ridges.
1. Crochet the Spherical Ornament Body
Choose forest green, ivory, or deep red yarn. Use a 3 mm crochet hook.
Work in continuous rounds without joining unless otherwise instructed. Place a stitch marker at the beginning of each round.
Upper Dome
- Round 1: Work 6 sc into a MR. (6)
- Round 2: Inc in each stitch around. (12)
- Round 3: *1 sc, inc* repeat 6 times. (18)
- Round 4: *2 sc, inc* repeat 6 times. (24)
- Round 5: *3 sc, inc* repeat 6 times. (30)
- Round 6: *4 sc, inc* repeat 6 times. (36)
- Round 7: *5 sc, inc* repeat 6 times. (42)
- Round 8: *6 sc, inc* repeat 6 times. (48)
- Round 9: *7 sc, inc* repeat 6 times. (54)
- Round 10: *8 sc, inc* repeat 6 times. (60)
Middle Section
- Rounds 11–19: Work 1 sc in BLO of each stitch around. (60)
Maintain even tension throughout this section. The BLO construction creates subtle horizontal ridges that will help guide the decorative spiral embroidery.
Lower Dome
- Round 20: *8 sc, dec* repeat 6 times. (54)
- Round 21: *7 sc, dec* repeat 6 times. (48)
- Round 22: *6 sc, dec* repeat 6 times. (42)
- Round 23: *5 sc, dec* repeat 6 times. (36)
- Round 24: *4 sc, dec* repeat 6 times. (30)
- Round 25: *3 sc, dec* repeat 6 times. (24)
Begin stuffing the ornament firmly but evenly. Shape the filling into a smooth sphere, avoiding lumps or flattened areas.
- Round 26: *2 sc, dec* repeat 6 times. (18)
- Round 27: *1 sc, dec* repeat 6 times. (12)
- Round 28: Dec around. (6)
Fasten off, leaving a long yarn tail. Thread the tail through the remaining front loops and pull tightly to close the opening.
Weave in the end securely.
2. Create the Raised Spiral Texture
Using the same yarn color and a 3 mm crochet hook, create decorative diagonal ridges around the completed sphere.
- Position the ornament with its top facing upward.
- Mark eight evenly spaced points around the upper dome.
- Insert the hook beneath a surface stitch near the first marked point.
- Pull up a loop of matching yarn.
- Work surface slip stitches diagonally downward, following a gently curving spiral path.
- Continue toward the lower dome, maintaining an even diagonal angle.
- Fasten off and weave the yarn ends inside the ornament.
- Repeat from the remaining marked points to create eight evenly spaced spiral ridges.
Keep each raised line approximately the same thickness and spacing. The spiral ridges should curve smoothly around the ornament rather than forming straight vertical stripes.
3. Add Extra Definition to the Spiral Ridges
For the pronounced twisted-cord appearance shown in the finished ornaments, add a second layer of decorative crochet over each spiral line.
- Join matching yarn at the beginning of one spiral ridge.
- Work a chain-like surface stitch along the existing raised line.
- Keep the yarn tension slightly relaxed to create a rounded ridge.
- Continue along the full spiral path.
- Repeat for each of the remaining ridges.
This technique creates the luxurious rope-like texture that gives the ornaments their distinctive handcrafted appearance.
4. Crochet the Hanging Loop
Use natural cotton cord, jute twine, or matching yarn.
- Cut approximately 25 cm of cord.
- Fold the cord in half to form a loop.
- Insert both loose ends through the top center of the ornament.
- Secure the ends firmly inside the crocheted body.
- Adjust the loop to approximately 8–10 cm in length.
The hanging loop should be centered and strong enough to support the completed ornament.
5. Add the Wooden Bead
- Thread one natural wooden bead onto the hanging loop.
- Slide the bead downward until it rests against the top of the crochet ornament.
- Secure the bead with a small hidden knot if necessary.
The wooden bead adds a beautiful rustic contrast to the rich crochet texture.
6. Create the Ivory Satin Bow
Cut approximately 20–25 cm of ivory satin ribbon.
- Form two equal ribbon loops.
- Cross the loops and tie them into a neat bow.
- Adjust both loops until they are symmetrical.
- Trim the ribbon tails diagonally.
- Attach the bow directly beneath the wooden bead.
For extra security, use a small hand stitch through the center of the bow.
7. Attach the Wooden Star Charm
For an additional decorative detail, attach a small natural wooden star beneath the satin bow.
- Thread a short piece of cotton cord through the star charm.
- Position the star beneath the bow center.
- Tie securely to the ornament hanging loop.
- Trim any excess cord.
This finishing detail complements the natural wooden bead and adds a charming farmhouse-inspired touch.
8. Make the Forest Green Ornament
Follow the complete ornament instructions using deep forest green cotton yarn.
Use matching green yarn for the spiral ridges, then finish with a natural wooden bead, ivory satin bow, and rustic hanging loop.
The rich green shade creates a classic botanical look that pairs beautifully with evergreen branches.
9. Make the Warm Ivory Ornament
Repeat the same pattern using warm ivory cotton yarn.
Use matching ivory yarn for the decorative spiral texture.
Add the wooden bead, satin bow, and hanging loop in the same way as the green ornament.
The soft ivory shade highlights the raised crochet stitches and creates a delicate, elegant decoration.
10. Make the Deep Red Ornament
Follow the same instructions using deep Christmas red yarn.
Maintain consistent tension to ensure the red ornament matches the size and shape of the other two.
Complete the ornament with a wooden bead, ivory satin bow, and natural hanging cord.
The deep red shade adds a warm traditional accent to the finished ornament collection.
11. Final Assembly and Shaping
- Check that all spiral ridges are evenly spaced.
- Adjust the stuffing to maintain a rounded spherical shape.
- Secure any loose yarn ends.
- Ensure each hanging loop is firmly attached.
- Position the wooden beads at the top center.
- Arrange the satin bows neatly.
- Attach optional wooden star charms.
- Gently shape each ornament by hand.
Make one ornament in each color to create a coordinated three-piece Christmas decoration set.
Advanced Crochet Tips
- Use tightly twisted cotton yarn for crisp stitch definition.
- Maintain consistent tension across all three ornaments.
- Use stitch markers to keep the spiral ridges evenly spaced.
- Avoid overstuffing, which can distort the raised texture.
- Use the same hook size for all ornaments to maintain consistent dimensions.
- Experiment with slightly thicker yarn for more pronounced decorative ridges.
- Keep the hanging loops identical in length for a coordinated appearance.
- Reinforce the top attachment point to prevent stretching.
Creative Color Variations
- Traditional Christmas: Forest green, deep red, and ivory.
- Winter Wonderland: Ice blue, white, and silver gray.
- Rustic Farmhouse: Oatmeal, taupe, and natural cream.
- Elegant Holiday: Burgundy, champagne, and dark emerald.
- Pastel Christmas: Dusty pink, sage green, and soft ivory.
- Nordic Minimalist: White, charcoal, and muted beige.
Frequently Asked Questions
Are these crochet Christmas ornaments beginner-friendly?
This pattern is designed for advanced crocheters because it combines spherical shaping, invisible decreases, surface crochet, and decorative spiral-ridge construction.
Can I use acrylic yarn instead of cotton?
Yes. Acrylic yarn can be used, although cotton generally produces sharper stitch definition and a more structured finish.
How do I make the ornaments larger?
Use thicker yarn and a larger crochet hook, or increase the number of shaping rounds while maintaining the spherical proportions.
Can I make these ornaments without stuffing?
Stuffing is recommended to maintain the rounded shape and support the raised spiral texture.
Can I use different colors for the spiral ridges?
Yes. Contrasting yarn can create a bold decorative effect, although matching colors produce the elegant monochromatic appearance shown in the reference design.
Can I sell finished ornaments made from this pattern?
Yes. You may sell handmade ornaments created using these original instructions.
Final Thoughts
These Spiral Crochet Christmas Baubles are a beautiful way to bring handmade charm to seasonal decorating.
The raised diagonal ribbing, rich traditional colors, natural wooden beads, delicate ivory satin bows, and rustic hanging loops create a coordinated ornament collection that feels both timeless and elegant.
Whether displayed on a Christmas tree, incorporated into a festive garland, or given as a handmade gift, these textured crochet baubles are a rewarding project for experienced crocheters.
Save this free spiral crochet Christmas bauble pattern to Pinterest and share it with your crochet-loving friends!

