Teal Blossom Crochet Shoulder Bag Pattern
Advanced
For experienced crocheters who enjoy complex shaping, fine detail, and ambitious construction
Weekend Project
A satisfying weekend make — start Friday, finish Sunday, enjoy forever.
Handmade Gift
A beautiful keepsake — free forever. Read online or print at home.
About This Teal Blossom Crochet Shoulder Bag Pattern
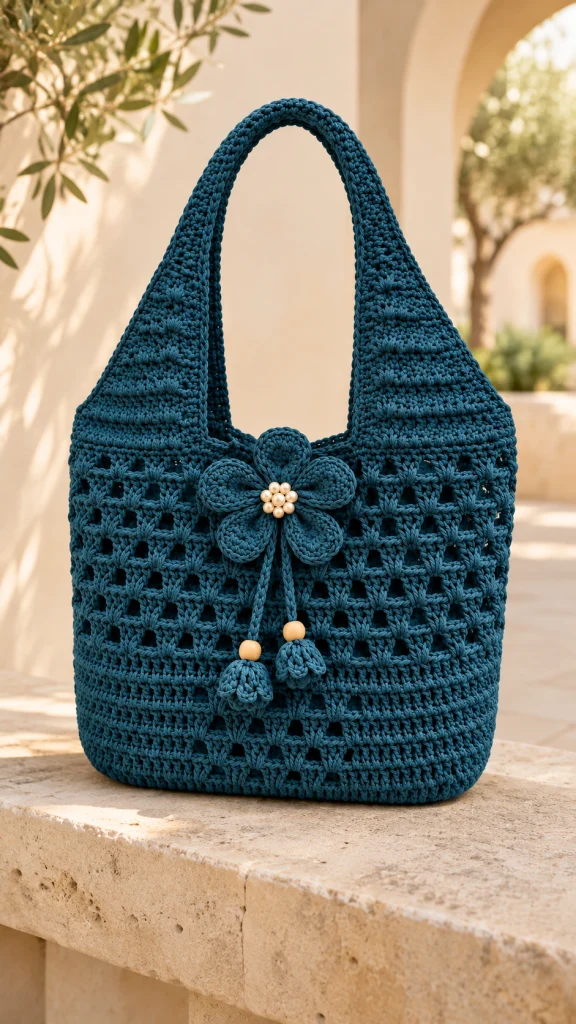
The Teal blossom crochet bag pattern combines an open lattice body with broad, textured handle roots and a dimensional flower. Deep teal cotton, a cluster of pearl beads, and two hanging flower buds give this practical shoulder bag its distinctive finish.
A firm rectangular base supports the mesh body, while four tapered handle sections join into two comfortable shoulder handles. The flower and dangling cords sit at the center front. A fabric lining keeps small belongings secure without hiding the openwork.
Allow approximately 18–24 hours, plus blocking and lining. This advanced project suits crocheters comfortable with counted shaping, bobbles, working into row ends, and sewing crochet components together. Measurements are targets based on the stated gauge; this original pattern has not been physically tested.
Materials
- Approximately 650–750 m of category 4 cotton yarn in deep teal; choose a firmly twisted yarn.
- 4 mm crochet hook for the base, body, and handles.
- 3.5 mm crochet hook for the flower, cords, and buds.
- Seven 8 mm pearl-style beads with sewing holes.
- Two 16 mm wooden beads with holes large enough for the crochet cords.
- Approximately 60 × 90 cm of lightweight woven cotton for the lining.
- Matching sewing thread and sewing needle.
- Tapestry needle, scissors, tape measure, and removable stitch markers.
- Blocking mat and rustproof pins.
Abbreviations
chchainscsingle crochetdcdouble crochetsl stslip stitchststitchsc2togsingle crochet two stitches togetherincwork 2 sc in one stitchBO5-double-crochet bobble: work five unfinished dc in one stitch, then yarn over and draw through all six loopsRSright sideWSwrong sideRectangular base
- With the 4 mm hook, ch 49. Row 1: sc in the second chain from the hook and each remaining chain. Turn. 48 sc.
- Rows 2–12: ch 1, sc in all 48 stitches, turn. 48 sc per row. The base should measure approximately 32 × 7 cm. Do not fasten off.
- Perimeter round: ch 1; work 48 sc across the last row, 12 sc evenly down the first short edge, 48 sc across the underside of the foundation, and 12 sc up the remaining short edge. Join with a sl st to the first sc. 120 sc. Work the short-edge stitches into row ends; do not add extra corner stitches.
- Mark the four transitions between the 48-stitch long edges and 12-stitch short edges. Keep these markers aligned as the body grows.
Lattice body and upper band
- Body round 1: ch 3, dc in the same stitch, ch 2, skip 2 stitches; repeat dc in the next stitch, ch 2, skip 2 stitches around. Join to the first dc. 40 dc and 40 ch-2 spaces; 120 stitch positions.
- Body rounds 2–3: ch 3, dc in the first dc, ch 2; repeat dc in the next dc, ch 2 around, passing over each intervening ch-2 space. Join to the first dc. 40 dc and 40 ch-2 spaces per round.
- Body round 4: ch 1; repeat sc in the next dc, 2 sc in the next ch-2 space around. Join to the first sc. 120 sc.
- Body rounds 5–8: repeat rounds 1–4 once. The mesh-start round is worked into the solid round exactly as round 1. Counts remain 40 dc and 40 spaces on mesh rounds, and 120 sc on the solid round.
- Body rounds 9–12: repeat rounds 1–4 once, with the same counts.
- Body rounds 13–16: repeat rounds 1–4 once, with the same counts.
- Body rounds 17–20: repeat rounds 1–4 once, with the same counts.
- Body rounds 21–24: repeat rounds 1–4 once, with the same counts. Measure the body; target approximately 27 cm above the base.
- Upper band rounds 1–3: ch 1, sc in each stitch around, join to the first sc. 120 sc per round. Fasten off after round 3. Target total bag height is approximately 29 cm.
- On the upper band, mark the front 48 stitches, side 12 stitches, back 48 stitches, and remaining side 12 stitches. On each 48-stitch section, mark the first 18 stitches and last 18 stitches as handle roots, leaving 12 stitches between them.
Four shaped handle sections
- Make one section on each marked 18-stitch handle root. Join yarn so row 1 is worked with the WS facing; bobbles are pushed toward the RS. Turn after every row. Each section begins with 18 stitches.
- Row 1: ch 1; sc across, replacing stitches 4, 8, 12, and 16 with BO. 18 stitches.
- Row 2: ch 1, sc2tog, sc in the next 14 stitches, sc2tog. 16 stitches.
- Row 3: ch 1; sc across, replacing stitches 4, 8, and 12 with BO. 16 stitches.
- Row 4: ch 1, sc2tog, sc in the next 12 stitches, sc2tog. 14 stitches.
- Row 5: ch 1; sc across, replacing stitches 4, 8, and 12 with BO. 14 stitches.
- Row 6: ch 1, sc2tog, sc in the next 10 stitches, sc2tog. 12 stitches.
- Row 7: ch 1; sc across, replacing stitches 4 and 8 with BO. 12 stitches.
- Row 8: ch 1, sc2tog, sc in the next 8 stitches, sc2tog. 10 stitches.
- Row 9: ch 1; sc across, replacing stitches 4 and 8 with BO. 10 stitches.
- Row 10: ch 1, sc2tog, sc in the next 6 stitches, sc2tog. 8 stitches.
- Rows 11–34: ch 1, sc in all 8 stitches, turn. 8 sc per row. Leave a 35 cm sewing tail after row 34.
- Repeat rows 1–34 on the remaining three roots, keeping every bobble on the bag exterior. Four sections completed.
- Join the two sections attached to the front panel at their narrow ends, matching all 8 stitches and using a firm whipstitch through both loops. Repeat for the two back sections. These seams sit at the tops of the two handles. Check that neither handle twists.
Handle and opening edging
- With the RS facing and the 4 mm hook, join yarn beside a handle root. Work sc around each continuous opening boundary, placing one sc in every exposed upper-band stitch and one sc in each handle row end. At each top seam, work one sc over the seam rather than adding a corner group. Join and fasten off.
- Repeat until every exposed handle edge and upper-band edge has one edging round. At tight inside corners, use sc2tog across the corner to prevent a projecting bump; at smooth curves, retain one stitch per row end.
- Check both handles flat. If an edge draws inward, remove that edging section and work a little more loosely. Weave in the edging tails securely.
Five-petal flower
- Make five petals with the 3.5 mm hook. Petal round 1: ch 7; sc in the second chain and next 4 chains, 3 sc in the last chain; working along the opposite side, sc in the next 4 chains, then 2 sc in the same chain that holds the first sc. Join. 14 sc.
- Petal round 2: ch 1, inc in the first stitch, sc in the next 4 stitches, inc in each of the next 3 stitches, sc in the next 4 stitches, inc in each of the final 2 stitches. Join. 20 sc.
- Petal round 3: ch 1, sc in the first 7 stitches, inc in each of the next 2 stitches, sc in the next 11 stitches. Join. 22 sc. Fasten off, leaving a 30 cm tail. The paired increases form the broad outer tip.
- Pinch the foundation end of each petal and sew a short fold through its first three stitches. Arrange all five narrow ends in a circle, with the broad tips pointing outward and adjacent edges slightly overlapping.
- Sew the five folded bases together firmly. Aim for a flower approximately 11–12 cm across; do not sew the outer petal tips flat.
- Sew one pearl bead at the flower center, then six beads around it. Pass the sewing thread through every bead several times and secure it behind the flower.
Hanging cords and flower buds
- With the 3.5 mm hook, make one cord by chaining 39 and working a sl st in the second chain and every chain back. 38 sl st. Make a second cord with ch 31 and 30 sl st. Leave sewing tails at both ends.
- For each bud, make three small petals. Small-petal round 1: ch 5; sc in the second chain and next 2 chains, 3 sc in the final chain; working on the opposite side, sc in the next 2 chains, then 2 sc in the chain holding the first sc. Join. 10 sc.
- Small-petal round 2: ch 1, inc in the first stitch, sc in the next 2 stitches, inc in each of the next 3 stitches, sc in the next 2 stitches, inc in each of the final 2 stitches. Join. 16 sc. Fasten off with a sewing tail. Make six small petals in total.
- For each bud, overlap three petals into a loose cup with their foundation ends together at the top and rounded ends pointing downward. Sew the upper ends together and tack adjacent side edges only near the top, leaving the lower tips free.
- Thread one wooden bead onto each cord. Sew the lower cord end securely through the gathered top of one bud, then slide the bead down to cover that join. Repeat for the second cord and bud.
- Sew the upper cord ends behind the large flower so the buds hang at different heights. Keep these cords decorative; they do not close the bag.
Lining and final assembly
- Block the bag and handles to their target dimensions without stretching the mesh. Let every piece dry fully before measuring for the lining.
- Measure the bag’s blocked width, height, and depth. Cut two lining rectangles: each rectangle is the bag width plus depth plus 2 cm wide, and bag height plus half the depth plus 2 cm tall. For a 32 × 29 × 8 cm bag, cut two rectangles measuring 42 × 35 cm.
- Place lining pieces with right sides together. Sew the side and bottom seams with 1 cm allowances. At each lower corner, align the side seam with the bottom seam and sew across a line equal to the bag depth; for an 8 cm depth, the line extends 4 cm to either side of the aligned seams. Trim excess corner fabric, leaving a 1 cm allowance.
- Fold the lining’s top edge 1 cm toward its wrong side. Place the lining inside the bag with its wrong side against the crochet, settle the boxed corners into the base, and hand-sew the folded edge just below the upper band. Use small stitches into the backs of the crochet stitches.
- Center the flower on the front upper band, between the front handle roots. Sew through the flower’s central backing and the solid band in several directions. Keep the outer petals raised and keep the lining clear of the decorative stitching.
Weave each yarn end through several firm stitches, reverse direction, and trim. Lay the handles together to check their lengths, then smooth the petals and let the two buds fall freely down the front.
For everyday use, carry modest loads and support the base when setting the bag down. Wash according to the yarn label, protecting the beads and reshaping the bag while damp.
Tips for Success
- Count 40 dc anchors on every mesh round; count the anchors separately from the spaces.
- Push bobbles outward before working the following row so all four handle roots have matching texture.
- Block the handles without hanging weights from them; cotton stretches further under a load.
- Fit the lining after blocking so it supports the base without pulling on the lattice.
Common Mistakes to Avoid
- Counting the beginning ch-3 as an additional dc creates an extra mesh column. Join to the first actual dc.
- Adding corner increases to the base perimeter changes the body count. The perimeter must contain exactly 120 sc.
- Joining a front section to a back section changes the handle arrangement. Join the two front sections together and the two back sections together.
- Sewing only through mesh chains can tear or distort the flower attachment. Anchor it through the solid upper band.
Ways to Customize This Pattern
- Use ivory or warm sand cotton while keeping teal for the flower and buds.
- For a taller bag, add one complete four-round body repeat before the upper band; allow extra yarn and measure the lining again.
- For shorter handles, work rows 11–28 on all four sections instead of rows 11–34.
- Replace the pearl cluster with a securely sewn decorative button, keeping the same five-petal flower.
Frequently asked questions
Yes, if it produces the stated gauge and bends comfortably in the handles. Make both a mesh swatch and a tapered handle swatch; dense cord can make the bobbles heavy and stiff.
A lining is strongly recommended because the lattice openings can let small items escape. The boxed lining also helps distribute the contents across the rectangular base.
Add or remove the same number of straight rows on all four handle sections. Changing each section by four rows changes the drop by approximately 2 cm at the stated row gauge; check the fit before sewing the top seams.
No. The flower and beaded cords are decorative, and the bag has an open top. A closure would need a separate reinforced attachment inside the solid upper band.
The finished Teal Blossom Crochet Shoulder Bag Pattern

