Terracotta, Cream & Taupe Crochet Bedspread – Free Advanced Textured Square Blanket Pattern
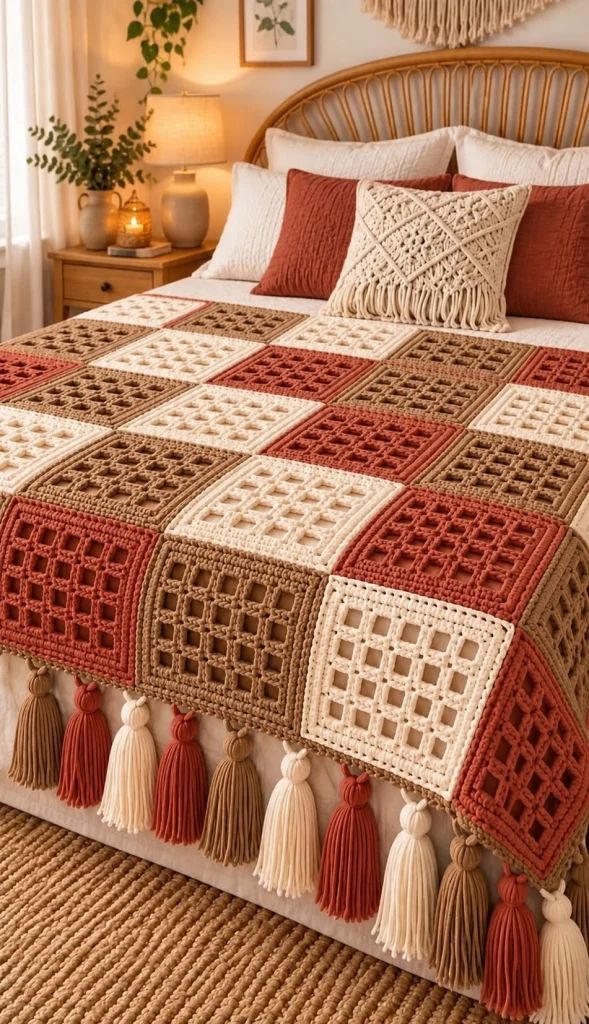
Bring warmth, texture, and timeless bohemian elegance into your bedroom with this beautiful terracotta, cream, and taupe crochet bedspread. Featuring raised lattice squares, sculpted crochet borders, alternating earthy colors, and luxurious tassel edging, this handmade blanket creates a sophisticated statement piece for a cozy bedroom.
The design combines three complementary shades: warm terracotta, soft ivory cream, and natural taupe brown. Each square features a geometric openwork lattice framed by thick textured borders. The squares are joined into a repeating patchwork arrangement, creating a structured yet inviting bedspread with beautiful dimensional details.
A coordinating cream pillow with decorative diagonal crochet bands and fringe completes the look. The oversized tassels along the lower edge give the blanket its distinctive bohemian character.
This free advanced crochet bedspread pattern is ideal for experienced crocheters who enjoy modular construction, geometric stitch patterns, raised textures, and elegant finishing techniques.
Pattern Overview
- Skill Level: Advanced
- Finished Size: Approximately 210 × 240 cm
- Square Size: Approximately 30 × 30 cm after blocking
- Square Layout: 7 columns × 8 rows
- Total Squares: 56
- Colors: Terracotta, cream, and taupe
- Construction: Individual textured squares joined into a rectangular bedspread
- Decorative Edging: Raised border with oversized tassels
- Matching Accessory: Optional textured crochet pillow
- Yarn Weight: Bulky-weight cotton blend
- Hook Sizes: 5 mm, 5.5 mm, and 6 mm
- Terminology: US crochet terms
- Estimated Time: 65–90 hours
Materials
- Approximately 2,000–2,400 g cream bulky-weight yarn
- Approximately 1,800–2,200 g terracotta bulky-weight yarn
- Approximately 1,800–2,200 g taupe bulky-weight yarn
- 5 mm crochet hook for detailed edging
- 5.5 mm crochet hook for textured squares
- 6 mm crochet hook for foundation sections
- Large tapestry needle
- Stitch markers
- Sharp scissors
- Measuring tape
- Blocking mats and rustproof pins
- Optional pillow insert, approximately 45 × 45 cm
- Optional matching fabric for pillow backing
- Optional tassel-making tool
Yarn Recommendation: Choose a soft but structured bulky cotton-blend yarn. A smooth yarn with clear stitch definition will highlight the raised lattice pattern and the thick sculpted borders.
Crochet Abbreviations
- ch: Chain
- sc: Single crochet
- hdc: Half double crochet
- dc: Double crochet
- tr: Treble crochet
- sl st: Slip stitch
- st: Stitch
- sp: Space
- inc: Increase
- dec: Decrease
- FLO: Front loop only
- BLO: Back loop only
- FPdc: Front post double crochet
- BPdc: Back post double crochet
- FO: Fasten off
- rep: Repeat
Special Techniques
Raised Lattice Stitch
The openwork squares feature a grid of raised vertical and horizontal crochet bars.
The vertical bars are formed using double crochet stitches, while horizontal connections are created with chain spaces.
Additional surface crochet is worked over selected bars to create a thicker dimensional appearance.
Raised Ribbed Border
The square borders use alternating front-post and back-post double crochet stitches.
This creates the structured frame visible around each geometric square.
Decorative Surface Crochet
Surface slip stitches are worked along selected lattice bars and square borders to emphasize the geometric design.
Part 1: Crochet the Textured Lattice Squares
Each square features a geometric openwork center surrounded by a thick raised border.
Make 56 squares in total, distributing the three colors throughout the bedspread.
Foundation Row
Using a 5.5 mm crochet hook, ch 35.
Row 1
Dc in fourth ch from hook.
Dc in each remaining chain.
Ch 3 and turn.
Row 2: First Openwork Row
Dc in next 3 stitches.
*Ch 2, skip 2 stitches, dc in next 3 stitches.*
Repeat across until the final edge stitches.
Ch 3 and turn.
Row 3: Lattice Formation
Dc in next 3 stitches.
*Ch 2, skip the next ch-2 space, dc in next 3 stitches.*
Repeat across.
Ch 3 and turn.
Rows 4–15
Repeat Row 3 to create the geometric lattice.
Maintain consistent tension so the openings remain evenly sized.
The square should develop a regular grid of raised vertical bars and open spaces.
Row 16: Upper Foundation
Ch 3 and turn.
Work dc across, placing 2 dc into each ch-2 space.
FO.
Part 2: Create the Raised Geometric Texture
The reference design features thick, sculpted lattice bars that give the squares a dimensional woven appearance.
Step 1: Vertical Surface Bars
Attach matching yarn to the bottom of the first vertical lattice column.
Work surface slip stitches upward along the existing dc stitches.
Keep the surface stitches slightly loose to avoid pulling the square inward.
Repeat along each vertical column.
Step 2: Horizontal Surface Bars
Attach yarn at the left side of a horizontal lattice row.
Work surface slip stitches across the horizontal connections.
Repeat across the square.
Step 3: Reinforce the Intersections
At each lattice intersection, work one additional surface slip stitch to secure the crossing bars.
Maintain a consistent raised texture throughout the square.
Part 3: Crochet the Thick Square Borders
The thick framed borders are an important feature of this bedspread.
Round 1: Foundation Border
Attach matching yarn to any corner.
Work sc evenly around the square.
At each corner, work (sc, ch 2, sc).
Join with a sl st.
Round 2: First Raised Border
Ch 3.
Work dc around.
At each corner ch-2 space, work (2 dc, ch 2, 2 dc).
Join with a sl st.
Round 3: Ribbed Texture
Ch 3.
Alternate FPdc and BPdc along each side.
At each corner, work (2 dc, ch 2, 2 dc).
Join with a sl st.
Round 4: Sculpted Outer Edge
Work sc around, placing (sc, ch 2, sc) in each corner.
FO and weave in ends.
Block the square to approximately 30 × 30 cm.
Part 4: Crochet the Three Color Variations
The bedspread uses the same lattice square pattern in three complementary colors.
Terracotta Squares
Make 19 squares in warm terracotta.
This earthy reddish-orange shade adds warmth and contrast.
Cream Squares
Make 19 squares in soft ivory cream.
The lighter color emphasizes the openwork lattice and balances the deeper shades.
Taupe Squares
Make 18 squares in natural taupe brown.
This neutral shade creates depth and connects the terracotta and cream sections visually.
Total: 56 textured crochet squares.
Part 5: Arrange the Patchwork Layout
Lay all 56 squares on a clean, flat surface before joining.
Arrange them into seven columns and eight rows.
Alternate the colors so the same shade does not dominate neighboring sections.
Use the following suggested arrangement:
| Row | Square Colors |
|---|---|
| 1 | Terracotta, Taupe, Cream, Terracotta, Taupe, Cream, Terracotta |
| 2 | Taupe, Cream, Terracotta, Taupe, Cream, Terracotta, Taupe |
| 3 | Cream, Terracotta, Taupe, Cream, Terracotta, Taupe, Cream |
| 4 | Terracotta, Taupe, Cream, Terracotta, Taupe, Cream, Terracotta |
| 5 | Taupe, Cream, Terracotta, Taupe, Cream, Terracotta, Taupe |
| 6 | Cream, Terracotta, Taupe, Cream, Terracotta, Taupe, Cream |
| 7 | Terracotta, Taupe, Cream, Terracotta, Taupe, Cream, Terracotta |
| 8 | Taupe, Cream, Terracotta, Taupe, Cream, Terracotta, Taupe |
This arrangement creates a balanced, repeating color pattern similar to the photographed bedspread.
Part 6: Join the Crochet Squares
The individual squares are joined with a flat, reinforced seam.
Step 1: Join Each Row
Place two squares side by side with their right sides facing upward.
Insert the hook through the corresponding inner loops of both squares.
Join using slip stitches.
Continue until all seven squares in the first row are connected.
Repeat for the remaining seven rows.
Step 2: Connect the Rows
Place two completed rows together.
Align the square corners carefully.
Join using the same slip-stitch technique.
Repeat until all eight rows are connected.
Step 3: Reinforce the Intersections
At each point where four squares meet, secure the intersection with additional stitches.
This helps prevent stretching and maintains the geometric structure.
Part 7: Crochet the Outer Bedspread Border
The outer border gives the blanket a clean, structured finish.
Round 1
Attach taupe yarn to any corner.
Work sc evenly around the entire bedspread.
Work 3 sc into each corner.
Round 2
Ch 3.
Work dc around.
Work 5 dc into each corner stitch.
Round 3
Work alternating FPdc and BPdc around to create a raised ribbed border.
Round 4
Work sc around, keeping the edges flat.
FO and weave in ends.
Part 8: Make the Oversized Decorative Tassels
The oversized tassels are one of the most distinctive elements of this crochet bedspread.
Use terracotta, cream, and taupe yarn to create alternating tassels along the lower edge.
Step 1: Prepare the Yarn
Cut approximately 35 strands of yarn, each measuring 35 cm.
Fold the strands in half.
Step 2: Form the Tassel Head
Wrap a separate strand of yarn tightly around the folded bundle approximately 3 cm below the top.
Secure with a double knot.
Step 3: Create the Rounded Top
Wrap additional yarn around the upper section to create a rounded decorative head.
Secure the wrapping neatly.
Step 4: Finish the Tassel
Trim the lower strands evenly.
The finished tassel should measure approximately 16–18 cm.
Step 5: Attach to the Bedspread
Attach the tassels evenly along the lower edge.
Space them approximately 12–15 cm apart.
Alternate the three colors in a repeating sequence:
Taupe → Terracotta → Cream → Taupe → Terracotta → Cream
Continue across the entire lower edge.
Part 9: Crochet the Matching Decorative Pillow
The coordinating pillow features a cream crochet front with diagonal raised bands and a decorative fringe.
Pillow Front
Using cream yarn and a 5.5 mm hook, ch 57.
Row 1
Dc in fourth ch from hook.
Dc in each remaining chain.
Rows 2–30
Ch 3 and turn.
Work dc across.
Continue until the panel measures approximately 45 × 45 cm.
Diagonal Decorative Bands
Using surface crochet, create diagonal raised lines across the front panel.
Work the bands from opposite corners to form a repeating diamond pattern.
For a thicker decorative effect, work a second row of surface slip stitches beside each diagonal line.
Pillow Back
Make a second plain cream panel using the same dimensions.
Assembly
Place the front and back panels together with right sides facing outward.
Join three sides using sc.
Insert the pillow form.
Close the final side with sc.
Decorative Fringe
Cut cream yarn strands approximately 22 cm long.
Fold each strand in half.
Attach along the lower front edge using a lark’s head knot.
Trim the fringe evenly.
Part 10: Blocking and Final Finishing
- Lay the completed bedspread on a clean, flat surface.
- Check that all squares are aligned.
- Lightly mist the blanket with water.
- Adjust the borders to maintain straight edges.
- Pin the corners if necessary.
- Allow the blanket to dry completely.
- Fluff and straighten the decorative tassels.
- Inspect all joining seams.
- Weave in remaining yarn ends.
- Arrange the matching pillow on the bed.
Advanced Crochet Techniques Used
- Geometric lattice crochet
- Raised surface crochet
- Front-post and back-post stitches
- Openwork construction
- Modular square assembly
- Textured ribbed borders
- Flat slip-stitch joining
- Corner shaping
- Large-scale blanket construction
- Decorative tassel making
- Diagonal surface crochet
- Coordinating pillow construction
- Blocking and shaping
Tips for a Professional Finish
- Make a gauge swatch before starting the full bedspread.
- Use the same yarn brand and weight for all three colors.
- Keep the lattice openings consistent.
- Block every square before joining.
- Use stitch markers at square corners.
- Maintain even tension in the joining seams.
- Keep the raised borders uniform.
- Use a soft but durable yarn for comfortable bedding.
- Attach tassels securely to prevent loosening.
- Trim all tassels to the same length.
- Avoid pulling the joining seams too tightly.
- Check the overall dimensions throughout assembly.
Frequently Asked Questions
Is this crochet bedspread suitable for beginners?
This is an advanced pattern because it includes raised lattice stitches, modular construction, decorative surface crochet, and detailed finishing techniques.
How many crochet squares do I need?
The pattern uses 56 squares arranged in seven columns and eight rows.
Can I make the blanket larger?
Yes. Add more rows or columns of squares to increase the dimensions.
Can I use different colors?
Absolutely. The geometric design works beautifully in neutral, pastel, or contrasting color palettes.
What yarn is best for this bedspread?
A soft bulky-weight cotton blend is recommended for its texture, durability, and stitch definition.
Are the tassels optional?
Yes. The bedspread can be finished with a simple crochet border if you prefer a more minimalist appearance.
Can I make the squares smaller?
Yes. Use a thinner yarn and smaller hook, or reduce the number of lattice repeats.
How do I prevent the blanket from stretching?
Maintain consistent tension, use reinforced joining seams, and avoid overly loose stitches.
Can I make the matching pillow in other colors?
Yes. Terracotta or taupe would also coordinate beautifully with the bedspread.
Can I sell finished bedspreads made from this pattern?
Yes. You may sell handmade finished items created using this original pattern. Designer credit is appreciated.
Care Instructions
- Wash gently in cool water.
- Use mild detergent.
- Choose a delicate machine cycle only if the yarn label permits.
- Avoid bleach.
- Do not wring or twist.
- Support the blanket when wet.
- Lay flat to dry whenever possible.
- Reshape the squares while damp.
- Comb the tassels gently with your fingers.
- Store folded in a dry, ventilated space.
Final Thoughts
This terracotta, cream, and taupe crochet bedspread combines geometric precision with cozy handmade texture. The raised lattice squares, thick framed borders, harmonious earthy colors, and oversized tassels create a beautiful bohemian statement for any bedroom.
The matching textured pillow adds a coordinated finishing touch, making this project an impressive addition to a handmade home décor collection.
Love this free crochet bedspread pattern? Save it to Pinterest and share it with your crochet friends for more beautiful handmade blanket inspiration!

