Vintage Christmas Crochet Bauble Ornaments: Free Crochet Pattern
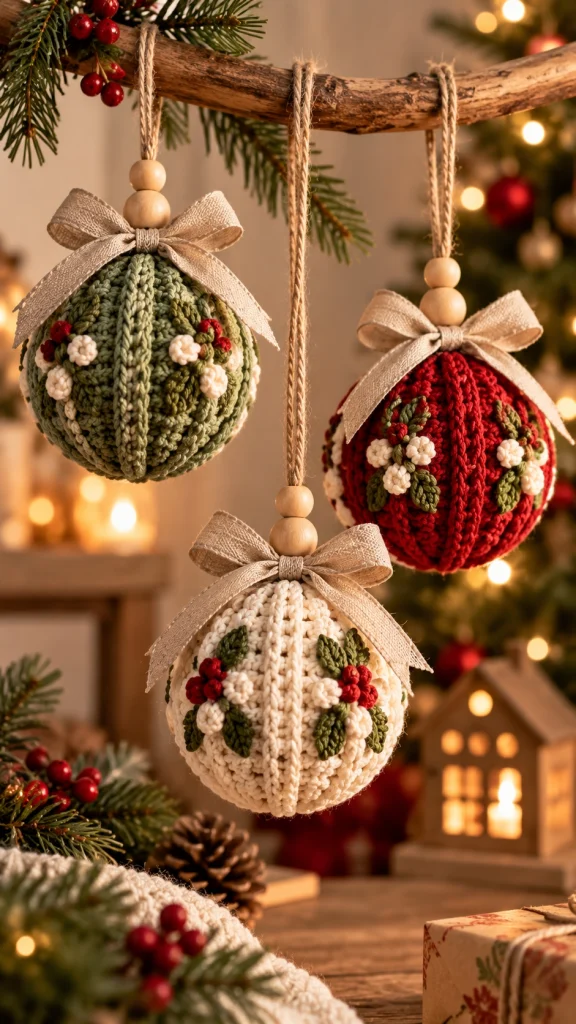
Bring a touch of nostalgic holiday elegance to your Christmas tree with these beautiful vintage Christmas crochet bauble ornaments. Featuring richly textured crochet, delicate botanical flowers, festive berries, and charming rustic bows, these handmade decorations combine traditional Christmas colors with timeless farmhouse style.
This coordinated collection includes three stunning ornaments in muted sage green, deep Christmas red, and warm ivory. Each bauble features a rounded crochet body decorated with raised vertical ribs, miniature flowers, embroidered greenery, and tiny red berries.
Natural wooden beads and soft beige linen bows add a rustic finishing touch, while simple jute hanging cords make the ornaments perfect for Christmas trees, decorative branches, festive garlands, and handmade holiday gifts.
The combination of soft cotton yarn, dimensional crochet details, and botanical embroidery creates an elegant handcrafted appearance that works beautifully with traditional, Scandinavian, cottagecore, and farmhouse Christmas decor.
In this complete tutorial, you will learn how to crochet a rounded bauble foundation, create raised vertical ribs, make miniature flowers and leaves, add berry clusters, and assemble three coordinated Christmas ornaments.
Pattern at a Glance
Finished dimensions depend on yarn thickness, hook size, stuffing, and crochet tension.
Materials and Supplies
- Approximately 50–75 g of DK-weight cotton yarn in muted sage green.
- Approximately 50–75 g of DK-weight cotton yarn in deep Christmas red.
- Approximately 50–75 g of DK-weight cotton yarn in warm ivory.
- Small amounts of olive-green and forest-green yarn for leaves.
- Small amounts of cream yarn for miniature flowers.
- Small amounts of burgundy yarn for berry details.
- 3 mm crochet hook for the bauble bodies.
- 2.5 mm crochet hook for miniature floral decorations.
- Polyester fiberfill for stuffing.
- Yarn needle and embroidery needle.
- Stitch markers.
- Sharp scissors.
- Measuring tape.
- Natural jute cord or strong cotton cord for hanging.
- Six unfinished wooden beads with holes large enough for the hanging cord.
- Beige linen or cotton ribbon for three decorative bows.
- Optional small embroidery scissors for detailed finishing.
- Optional fabric stiffener for decorative flowers.
Yarn recommendation: Cotton yarn is ideal for these ornaments because it provides excellent stitch definition and helps the raised ribs and floral details maintain their shape.
Gauge and Preparation
Using a 3 mm crochet hook and DK-weight cotton yarn, aim for approximately 20 single crochet stitches and 22 rounds per 10 cm.
The finished bauble should measure approximately 9–11 cm across, depending on your tension and stuffing.
Use a slightly smaller hook than the yarn label recommends to create a firm fabric that prevents the stuffing from showing through.
Make a small gauge swatch before beginning if you want all three ornaments to have matching dimensions.
Abbreviations
All instructions use US crochet terminology. Work the bauble bodies in continuous rounds unless otherwise specified. Use a stitch marker to identify the first stitch of each round.
Part 1: Crochet the Basic Christmas Bauble Sphere
The rounded crochet foundation is used for all three ornaments. Make one sphere in sage green, one in Christmas red, and one in warm ivory.
Begin the bauble
Using your chosen main color and a 3 mm crochet hook, make a magic ring.
Round 1: Work 6 sc into the magic ring. 6 sc.
Round 2: Inc in every stitch around. 12 sc.
Round 3: (Sc 1, inc) repeat six times. 18 sc.
Round 4: (Sc 2, inc) repeat six times. 24 sc.
Round 5: (Sc 3, inc) repeat six times. 30 sc.
Round 6: (Sc 4, inc) repeat six times. 36 sc.
Round 7: (Sc 5, inc) repeat six times. 42 sc.
Round 8: (Sc 6, inc) repeat six times. 48 sc.
Round 9: (Sc 7, inc) repeat six times. 54 sc.
Rounds 10–19: Sc in every stitch around. 54 sc.
Shape the lower half
Round 20: (Sc 7, dec) repeat six times. 48 sc.
Round 21: (Sc 6, dec) repeat six times. 42 sc.
Round 22: (Sc 5, dec) repeat six times. 36 sc.
Round 23: (Sc 4, dec) repeat six times. 30 sc.
Begin stuffing the bauble evenly.
Round 24: (Sc 3, dec) repeat six times. 24 sc.
Round 25: (Sc 2, dec) repeat six times. 18 sc.
Add more stuffing, keeping the sphere rounded without stretching the stitches.
Round 26: (Sc 1, dec) repeat six times. 12 sc.
Round 27: Dec six times. 6 sc.
FO, leaving a long tail. Thread the tail through the remaining front loops, pull closed, and weave in securely.
Repeat the same instructions for the remaining two colors.
Part 2: Create the Raised Vertical Crochet Ribs
The prominent raised ribs are one of the most distinctive features of these vintage-inspired Christmas ornaments. They give the baubles a beautiful segmented appearance similar to traditional glass Christmas decorations.
For this version, the ribs are crocheted separately and sewn onto the finished sphere.
Measure the rib length
Using a measuring tape, measure the curved distance from the top center of the bauble to the bottom center.
For a medium-sized ornament, this measurement may be approximately 14–16 cm.
Crochet one raised rib
Using the same color as the bauble body, ch 31.
Row 1: Sc in the second chain from the hook and across. 30 sc.
Row 2: Ch 1, turn, and sc in BLO across. 30 sc.
Row 3: Ch 1, turn, and sc in BLO across. 30 sc.
FO, leaving a long tail for sewing.
Adjust the foundation chain length if necessary so the strip follows the curved surface of your bauble.
Attach the ribs
- Mark the top and bottom centers of the sphere.
- Position one rib vertically between the two centers.
- Sew the long edges of the strip to the bauble using small discreet stitches.
- Keep the center of the strip slightly raised.
- Repeat around the sphere, spacing the ribs evenly.
- Use approximately six ribs per ornament.
The ribs should follow the rounded surface naturally without pulling the ornament out of shape.
Part 3: Crochet the Miniature Ivory Flowers
Small ivory flowers add a delicate vintage botanical appearance to the baubles. Their raised petals create beautiful contrast against the textured crochet backgrounds.
Mini flower pattern
Using ivory yarn and a 2.5 mm crochet hook, make a magic ring.
Round 1: Work 5 sc into the ring. Join with a sl st.
Round 2: Repeat five times: sl st into the next stitch, ch 3, work 2 dc into the same stitch, ch 3, and sl st into the same stitch.
Continue until five small petals are formed.
FO and leave a long sewing tail.
Make approximately twelve to fifteen miniature flowers for the three ornaments.
For additional texture, add a small cream or golden French knot to the center of selected flowers.
Part 4: Crochet the Small Green Botanical Leaves
Green leaves frame the flowers and give the ornaments their traditional Christmas botanical character.
Small leaf instructions
Using olive-green or forest-green yarn, ch 8.
Round 1: Starting in the second chain from the hook, work 1 sc, 1 hdc, 3 dc, 1 hdc, and 1 sc.
Ch 1 at the tip.
Continue along the opposite side of the foundation chain using the same stitch sequence in reverse order.
Join with a sl st.
FO, leaving a long tail for sewing.
Make approximately eighteen to twenty-four leaves in different shades of green.
Gently shape each leaf into a pointed oval before attaching it to the ornament.
Part 5: Crochet the Tiny Red Berries
Small red berries bring cheerful Christmas color to the floral arrangements.
Mini berry instructions
Using deep red or burgundy yarn, make a magic ring.
Round 1: Work 6 sc into the ring.
Round 2: Sc in every stitch around. 6 sc.
FO, leaving a long tail.
Pull the tail through the remaining stitches and shape the small crochet piece into a rounded berry.
Make approximately twenty-four to thirty berries for the collection.
For smaller berry details, use red embroidery thread and French knots instead of crocheting individual berries.
Part 6: Create the Botanical Flower Clusters
Each bauble features miniature floral arrangements positioned between the raised vertical ribs.
Assemble one floral cluster
- Position one ivory flower on the bauble surface.
- Arrange two small green leaves behind the flower.
- Add two or three miniature red berries near the leaves.
- Sew the flower securely to the crochet body.
- Attach the leaves using small stitches along their centers.
- Secure the berries in a compact cluster.
- Weave in all loose yarn ends.
Repeat the floral arrangement at several positions around each bauble.
Keep the decorations slightly asymmetrical for a natural vintage botanical appearance.
Part 7: Design Variation One — Sage Green Floral Bauble
The sage-green ornament features a soft botanical palette with delicate cream flowers and rich green leaves.
Decoration layout
- Use the sage-green crochet sphere as the foundation.
- Attach six matching sage-green raised ribs.
- Position small ivory flowers between selected ribs.
- Add olive-green leaves around the flowers.
- Place miniature red berry clusters near the upper and middle sections.
- Leave some areas undecorated to showcase the crochet texture.
This variation is especially beautiful on Christmas trees decorated with natural wood, ivory ornaments, and warm white lights.
Part 8: Design Variation Two — Classic Red Christmas Bauble
The deep red ornament creates a rich traditional Christmas appearance with delicate cream flowers and contrasting green foliage.
Decoration layout
- Use the deep Christmas red crochet sphere.
- Attach six raised ribs in matching red yarn.
- Position several ivory flowers between the ribs.
- Arrange olive-green leaves around the flowers.
- Add small red berries and embroidered botanical details.
- Keep the floral clusters evenly distributed around the ornament.
The combination of rich red crochet and delicate cream flowers creates a timeless festive ornament.
Part 9: Design Variation Three — Warm Ivory Botanical Bauble
The ivory ornament features a soft neutral background with richly colored green leaves and red berry clusters.
Decoration layout
- Use the warm ivory crochet sphere.
- Attach six raised ivory ribs.
- Position small ivory flowers between the ribs.
- Add forest-green and olive-green leaves around the flowers.
- Place bright red berries near the leaves.
- Use subtle embroidery to create additional botanical branches.
This variation works beautifully with rustic, Scandinavian, and neutral Christmas decorations.
Part 10: Add the Decorative Botanical Embroidery
Small embroidered details help connect the flowers, leaves, and berries into cohesive botanical arrangements.
Embroider the stems
- Thread an embroidery needle with olive-green yarn or embroidery floss.
- Begin near the base of a floral cluster.
- Work short backstitches to create a curved stem.
- Add small diagonal stitches along the stem.
- Secure the thread neatly inside the bauble.
Add tiny berry details
- Thread the needle with burgundy embroidery thread.
- Make small French knots near the embroidered stems.
- Group the knots in clusters of three.
- Repeat around selected floral arrangements.
Avoid overcrowding the ornament surface. The raised crochet ribs should remain clearly visible.
Part 11: Make the Rustic Jute Hanging Loops
Natural jute hanging cords give the ornaments their charming farmhouse-inspired appearance.
Hanging loop instructions
- Cut a length of jute cord approximately 30–35 cm long.
- Fold the cord in half to form a hanging loop.
- Thread both ends through the top center of the crochet bauble.
- Secure the ends with a strong knot inside or beneath the upper crochet stitches.
- Reinforce the attachment with several stitches using matching yarn.
- Adjust the loop to the desired hanging length.
Repeat for all three ornaments.
Part 12: Add the Natural Wooden Beads
Two unfinished wooden beads above each bauble create a beautiful rustic finishing detail.
Wooden bead attachment
- Choose two natural wooden beads for each ornament.
- Thread both beads onto the folded hanging cord.
- Slide the beads down until they rest above the crochet sphere.
- Adjust the cord so the beads sit neatly together.
- Secure the beads with a small knot if necessary.
Make sure the wooden beads are firmly attached and cannot slide off the hanging cord.
Part 13: Make the Beige Linen Bows
Soft beige linen bows give the ornaments an elegant vintage Christmas appearance.
Bow instructions
- Cut a piece of beige linen or cotton ribbon approximately 25–30 cm long.
- Form two equal loops.
- Cross the loops and tie a small decorative bow.
- Adjust the bow until both loops are symmetrical.
- Trim the ribbon tails neatly.
- Position the bow directly beneath the wooden beads.
- Secure it to the hanging cord with a small stitch or knot.
Repeat for all three ornaments.
For a completely crocheted version, replace the linen ribbon with a narrow ivory crochet strip.
Part 14: Optional Crochet Ribbon Bow
If you prefer to make every decorative element from yarn, crochet a matching bow using ivory cotton.
Crochet bow panel
Using ivory yarn, ch 21.
Row 1: Sc in the second chain from the hook and across. 20 sc.
Rows 2–5: Ch 1, turn, and sc across.
FO and weave in the ends.
Shape the bow
- Fold the rectangular panel into two loops.
- Pinch the center tightly.
- Wrap a separate length of yarn around the center.
- Sew the wrap securely.
- Attach the bow beneath the wooden beads.
Part 15: Final Assembly and Finishing
Once all decorative components are attached, inspect each ornament carefully.
- Check that the bauble spheres are evenly stuffed.
- Adjust the raised vertical ribs into straight, symmetrical positions.
- Secure all floral decorations.
- Inspect the green leaves and berry clusters.
- Weave in all loose yarn ends.
- Check the jute hanging loops.
- Ensure the wooden beads are firmly attached.
- Adjust the linen bows into symmetrical shapes.
- Gently reshape the baubles by hand.
- Trim any loose embroidery threads.
- Test the hanging loops before displaying the ornaments.
Customization Ideas
1. Create a Scandinavian Christmas collection
Use ivory, oatmeal, muted sage green, and natural wood accents for a soft Nordic-inspired holiday aesthetic.
2. Make an elegant burgundy collection
Replace the bright Christmas red with deep burgundy and add small golden embroidery details.
3. Add miniature snowflakes
Replace some floral clusters with tiny ivory snowflakes for a winter-inspired design.
4. Create personalized Christmas ornaments
Embroider initials, small dates, or meaningful symbols between the raised ribs.
5. Make miniature gift toppers
Use thinner yarn and a smaller hook to create tiny baubles for decorating wrapped Christmas gifts.
6. Create a matching Christmas garland
Connect several finished baubles using a long crochet chain or decorative jute cord.
Care Instructions
- Dust the ornaments gently with a soft brush.
- Spot-clean small stains using a damp cloth when appropriate for the yarn.
- Avoid machine washing ornaments with wooden beads or linen bows.
- Do not twist or wring the raised crochet ribs.
- Allow damp ornaments to dry completely.
- Store each bauble in a protective box.
- Use tissue paper to protect the floral decorations.
- Keep the ornaments away from direct heat, open flames, and moisture.
Frequently Asked Questions
Are these Christmas crochet bauble ornaments beginner-friendly?
The basic crochet spheres are suitable for confident beginners, but the raised ribs, miniature flowers, embroidery, and decorative assembly make the complete project better suited to intermediate crocheters.
What yarn works best for crochet Christmas baubles?
DK-weight cotton yarn is recommended because it provides clear stitch definition and helps the baubles maintain their rounded shape. Acrylic yarn can also be used for softer ornaments.
Can I make the baubles without wooden beads?
Yes. Simply attach the hanging loops directly to the top of the crochet spheres and add the decorative bows beneath the loops.
How can I make the raised ribs more prominent?
Use slightly thicker yarn for the rib strips, add an extra row, or work the strips using back-loop-only stitches for additional texture.
Can I change the ornament colors?
Absolutely. Burgundy, dusty rose, olive green, cream, gold, and soft gray are all beautiful alternatives for a coordinated Christmas collection.
Can I use these crochet baubles as handmade gifts?
Yes. These ornaments make lovely handmade Christmas gifts, festive gift toppers, and keepsake decorations for friends and family.
Final Thoughts
These vintage Christmas crochet bauble ornaments combine timeless holiday colors, richly textured stitches, and delicate botanical details into a beautiful handmade Christmas collection.
The sage-green, deep red, and warm ivory baubles complement one another perfectly, while the raised vertical ribs, miniature flowers, embroidered leaves, red berries, wooden beads, and rustic linen bows create an elegant vintage-inspired appearance.
Whether you hang them on your Christmas tree, display them on decorative branches, or give them as thoughtful handmade gifts, these crochet baubles are a wonderful way to celebrate the warmth and creativity of the holiday season.
Enjoyed this pattern? Save it to your Christmas crochet inspiration board and share your finished vintage bauble ornaments with fellow crochet lovers.

