Vintage Crochet Christmas Tree Ornaments – Free Advanced Pattern
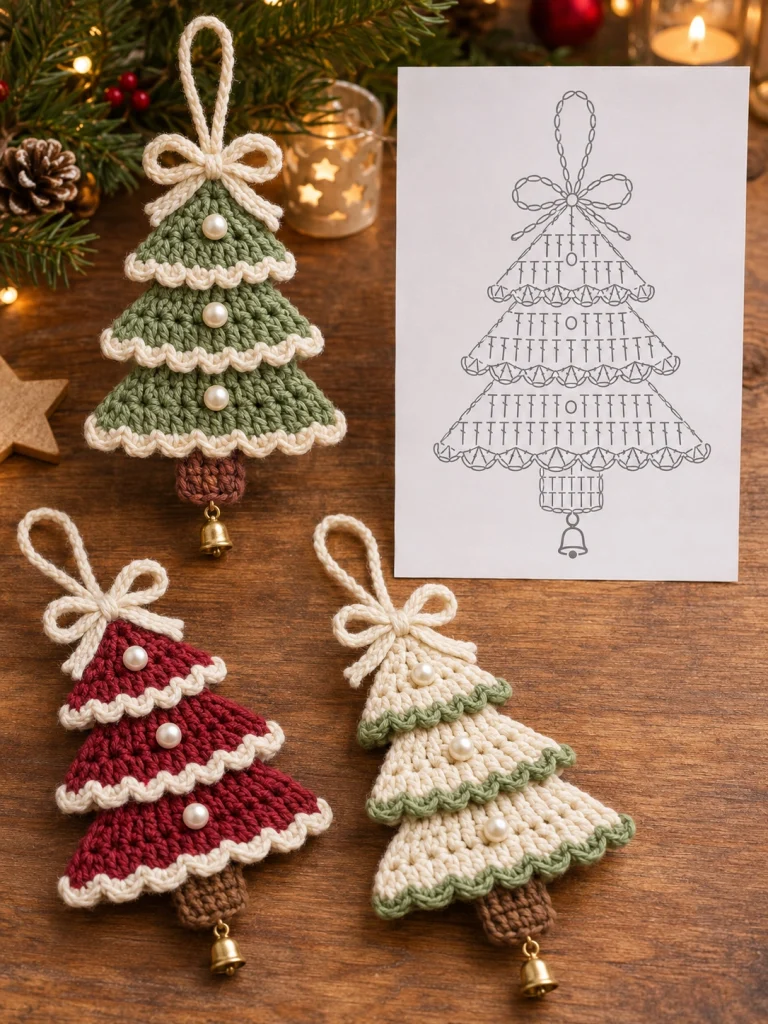
Decorate your Christmas tree with these charming handmade crochet Christmas tree ornaments! Featuring three beautiful color combinations—sage green with ivory trim, deep Christmas red with cream edging, and warm ivory with soft green accents—these miniature trees bring a timeless, elegant touch to holiday decorating.
Each ornament features three overlapping triangular crochet layers, delicate scalloped borders, pearl decorations, a textured brown trunk, a handmade crochet bow, a hanging loop, and a tiny golden bell. The layered construction creates a beautiful dimensional appearance while keeping the ornaments lightweight enough to hang on Christmas branches, wreaths, garlands, or gift packages.
This advanced crochet pattern combines precise triangular shaping, textured stitches, decorative edging, layered assembly, and miniature finishing details. Make a matching set of three or experiment with your favorite festive colors!
Pattern Details
- Skill Level: Advanced
- Finished Size: Approximately 15–17 cm tall and 10–12 cm wide, excluding the hanging loop
- Construction: Three separate tree tiers, trunk, decorative bow, and hanging loop
- Yarn Weight: DK cotton yarn
- Crochet Hook: 3 mm
- Terminology: US crochet terms
- Colors: Sage green, burgundy red, ivory, soft olive green, and brown
- Estimated Time: 3–5 hours per ornament
Materials Needed
- DK cotton yarn in sage green
- DK cotton yarn in deep Christmas red
- DK cotton yarn in warm ivory
- DK cotton yarn in soft olive green
- Small amount of brown cotton yarn
- 3 mm crochet hook
- 2.5 mm crochet hook for decorative details
- 9 small pearl beads, approximately 6–8 mm
- 3 miniature gold bells
- Tapestry needle
- Scissors
- Stitch markers
- Sewing needle and matching thread
- Optional fabric stiffener
- Optional thin felt backing
Important: The beads and bells are small parts. These ornaments are decorative items, not toys, and should be kept away from young children and pets.
Crochet Abbreviations
- ch: Chain
- sc: Single crochet
- hdc: Half double crochet
- dc: Double crochet
- tr: Treble crochet
- sl st: Slip stitch
- st: Stitch
- sp: Space
- inc: Increase
- dec: Decrease
- sc2tog: Single crochet two together
- BLO: Back loop only
- FLO: Front loop only
- FO: Fasten off
- RS: Right side
- WS: Wrong side
1. Crochet the Small Top Tree Tier
The smallest triangular tier forms the pointed top of the Christmas tree. Work it from the tip downward, increasing symmetrically to create a neat triangular shape.
Using your chosen main color and a 3 mm crochet hook:
Row 1: Ch 2. Work 2 sc in the second chain from the hook. (2 sc)
Row 2: Ch 1, turn. Work 2 sc in each stitch. (4 sc)
Row 3: Ch 1, turn. Work 2 sc in the first stitch, sc in the next 2 stitches, 2 sc in the last stitch. (6 sc)
Row 4: Ch 1, turn. Work 2 sc in the first stitch, sc across to the final stitch, 2 sc in the last stitch. (8 sc)
Rows 5–8: Repeat Row 4, increasing by 2 stitches in each row. (16 sc after Row 8)
Row 9: Ch 1, turn. Sc in each stitch across. (16 sc)
Fasten off, leaving a long tail for assembly.
Top Tier Scalloped Edging
Attach ivory yarn to the lower-left corner of the triangle.
Work the following along the bottom edge:
*Sl st in the next stitch, 3 hdc in the next stitch.* Repeat across the bottom edge.
Fasten off and weave in the ends.
The scalloped border should create a soft, slightly raised decorative edge.
2. Crochet the Middle Tree Tier
The middle section is slightly wider than the top tier, creating the layered silhouette seen in the finished ornaments.
Using the same main color:
Row 1: Ch 2, work 2 sc in the second chain. (2)
Row 2: Ch 1, turn, 2 sc in each stitch. (4)
Row 3: Ch 1, turn, 2 sc in the first stitch, sc across to the final stitch, 2 sc in the last stitch. (6)
Rows 4–12: Repeat Row 3, increasing by 2 stitches each row. (24 sc after Row 12)
Row 13: Ch 1, turn. Sc across. (24)
Fasten off.
Middle Tier Decorative Border
Attach your contrasting trim color to the lower edge.
Work alternating slip stitches and groups of 3 hdc to form small scallops.
Keep the stitches evenly spaced so the border remains smooth and symmetrical.
Fasten off and weave in the ends.
3. Crochet the Large Bottom Tree Tier
The largest triangular section creates the broad base of the ornament and gives the tree its traditional Christmas silhouette.
Using the main tree color:
Row 1: Ch 2, work 2 sc in the second chain. (2)
Row 2: Ch 1, turn. Work 2 sc in each stitch. (4)
Row 3: Ch 1, turn. Work 2 sc in the first stitch, sc across, 2 sc in the final stitch. (6)
Rows 4–16: Repeat Row 3, increasing by 2 stitches in every row. (32 sc after Row 16)
Row 17: Ch 1, turn. Sc across. (32)
Fasten off, leaving a long sewing tail.
Bottom Tier Scalloped Edging
Attach ivory or soft green yarn at the lower-left corner.
Work the following edging across the bottom:
*Sl st in the next stitch, skip 1 stitch, 5 hdc in the next stitch, skip 1 stitch.* Repeat across.
Adjust the spacing at the final corner if necessary.
Fasten off and weave in the ends.
The finished bottom tier should have a slightly curved, decorative edge resembling a row of snowy branches.
4. Add Textured Crochet Details
The reference ornaments feature raised crochet stitches that give the tree sections a beautiful handmade texture.
To create a more dimensional finish, work decorative surface stitches across the triangular tiers.
- Thread a tapestry needle with matching yarn.
- Work small diagonal stitches following the crochet rows.
- Keep the stitches evenly spaced.
- Use slightly raised embroidery stitches to emphasize the layered texture.
- Secure all ends on the wrong side.
For an alternative textured appearance, replace selected single crochet rows with half double crochet rows while maintaining the same stitch count.
5. Crochet the Brown Tree Trunk
Each ornament features a short rectangular brown trunk beneath the lowest tier.
Using brown yarn and a 3 mm crochet hook:
Row 1: Ch 9. Sc in the second chain from the hook and across. (8 sc)
Rows 2–7: Ch 1, turn. Sc across. (8 sc)
Fasten off, leaving a long sewing tail.
For a thicker trunk, make a second identical rectangle.
Place both rectangles together and join around the edges with sc.
Leave the upper edge open until the trunk is attached to the tree.
6. Crochet the Decorative Hanging Bow
The handmade ivory bow is one of the most recognizable details of these ornaments. It sits above the tree and forms an elegant finishing accent.
Bow Loops – Make 2
Using ivory yarn and a 2.5 mm hook:
Foundation: Ch 25.
Row 1: Sl st in the second chain from the hook and in each remaining chain.
Fasten off, leaving a long tail.
Fold the strip into a loop and sew the ends together.
Repeat for the second loop.
Bow Tails – Make 2
Ch 16.
Work sl st along the chain.
Fasten off.
Repeat to make the second tail.
Bow Assembly
- Position the two loops horizontally.
- Place the tails beneath the loops.
- Wrap ivory yarn around the center several times.
- Secure the bow with a knot on the back.
- Shape the loops gently with your fingers.
The finished bow should be approximately 5–6 cm wide.
7. Crochet the Hanging Loop
Using ivory yarn:
Ch 30.
Sl st in the second chain from the hook and across.
Fasten off, leaving a long tail.
Fold the strip in half to form a hanging loop.
Sew both ends securely behind the top of the ornament.
Position the crochet bow over the attachment point to hide the joining stitches.
8. Assemble the Three Tree Layers
Lay all three triangular tiers on a flat surface with the right sides facing upward.
- Position the largest triangle at the bottom.
- Place the middle triangle above it, overlapping the upper section of the large triangle.
- Position the smallest triangle at the top.
- Align the center points of all three layers.
- Adjust the overlap until the scalloped edges remain clearly visible.
- Pin the layers together temporarily.
- Using matching yarn, sew through the overlapping sections.
- Keep the lower scalloped edges free so they can lift slightly.
- Attach the brown trunk behind the center of the bottom tier.
- Secure the hanging loop and decorative bow at the top.
The finished tree should have three distinct overlapping sections with a dimensional, layered appearance.
9. Add the Pearl Decorations
Each Christmas tree ornament features three elegant pearl decorations, one positioned on each tree tier.
Using a sewing needle and strong matching thread:
- Position one pearl near the center of the top tier.
- Attach the second pearl to the middle tier.
- Attach the third pearl to the lower tier.
- Secure each pearl with several small stitches.
- Hide the thread ends behind the crochet layers.
Use cream-colored or white pearls to recreate the vintage appearance of the reference ornaments.
10. Attach the Miniature Gold Bell
The small gold bell adds a charming finishing detail beneath the brown tree trunk.
- Thread a small length of strong sewing thread through the bell’s attachment ring.
- Position the bell at the bottom center of the trunk.
- Sew securely through the lower edge of the crochet trunk.
- Check that the bell hangs straight.
- Secure the thread with several knots.
The bell should hang freely without pulling the trunk out of shape.
11. Create the Three Color Variations
Version 1: Sage Green Christmas Tree
- Main Tree: Muted sage green
- Scalloped Trim: Warm ivory
- Bow: Ivory
- Trunk: Chestnut brown
- Decorations: White pearls and gold bell
This soft green version is perfect for rustic farmhouse, woodland, and vintage Christmas decorating.
Version 2: Burgundy Red Christmas Tree
- Main Tree: Deep burgundy red
- Scalloped Trim: Cream
- Bow: Ivory
- Trunk: Warm brown
- Decorations: White pearls and gold bell
The burgundy version creates a rich traditional Christmas look that pairs beautifully with gold ornaments and warm fairy lights.
Version 3: Ivory Christmas Tree
- Main Tree: Warm ivory
- Scalloped Trim: Soft olive green
- Bow: Ivory
- Trunk: Chestnut brown
- Decorations: White pearls and gold bell
The ivory version is ideal for elegant neutral Christmas trees, cottagecore decorations, and soft winter color palettes.
12. Blocking and Finishing
Blocking helps the ornaments maintain their triangular shape and keeps the decorative scallops neat.
- Lay the ornament on a clean blocking mat.
- Gently shape the three triangular tiers.
- Pin the corners and scalloped edges into position.
- Lightly mist the crochet fabric with water.
- Allow the ornament to dry completely.
- Remove the pins and reshape the bow.
- Check that the pearls and bell are securely attached.
For a firmer ornament, apply a small amount of fabric stiffener to the back of the crochet tree, avoiding the pearls and decorative bow.
Optional: Add a thin felt backing to help the ornament maintain its shape.
13. Creative Ways to Use These Ornaments
- Hang them on your Christmas tree.
- Decorate a festive crochet garland.
- Attach them to wrapped Christmas presents.
- Use them as handmade stocking decorations.
- Hang them from decorative cabinet handles.
- Create matching Christmas wreath accents.
- Use them as holiday party favors.
- Make personalized handmade gifts for friends and family.
- Decorate a rustic farmhouse Christmas display.
- Create a coordinated set for a Christmas craft market.
14. Advanced Crochet Tips
- Use a consistent yarn weight for all three tiers.
- Count stitches carefully when increasing triangular sections.
- Keep the side edges symmetrical.
- Use stitch markers to identify the center of each tier.
- Block the pieces before assembling.
- Keep the scalloped edges loose enough to create dimension.
- Use a smaller hook for neat decorative bows.
- Hide joining stitches behind overlapping layers.
- Use matching thread to attach pearl beads.
- Secure bells carefully to prevent accidental detachment.
15. Care and Storage
- Spot-clean gently with cool water.
- Avoid machine washing ornaments with beads and bells.
- Do not wring or twist the crochet fabric.
- Lay flat to dry.
- Reshape the scalloped edges while damp.
- Store flat in a dry decorative box.
- Separate ornaments with tissue paper to protect the bows.
- Avoid placing heavy decorations on top.
Frequently Asked Questions
Are these crochet Christmas tree ornaments beginner-friendly?
This pattern is designed for advanced crocheters because it includes multiple shaped components, layered construction, decorative scalloped borders, and detailed assembly.
How big are the finished ornaments?
Each ornament measures approximately 15–17 cm tall and 10–12 cm wide, depending on yarn, hook size, and tension.
Can I make these ornaments smaller?
Yes. Use thinner cotton yarn and a smaller crochet hook to create miniature versions.
Can I make them without pearls?
Absolutely! Replace the pearls with small embroidered French knots, crochet bobbles, or miniature buttons.
Can I replace the gold bells?
Yes. You can use small tassels, wooden beads, or leave the bottom of the trunk undecorated.
What yarn works best?
DK-weight cotton yarn provides excellent stitch definition and helps the ornaments hold their shape.
Can I make a matching Christmas garland?
Yes. Crochet several ornaments and attach them along a long decorative chain, leaving equal spaces between each tree.
Can I sell finished ornaments made from this pattern?
Yes, you may sell handmade finished ornaments created using this original pattern. Credit to Cozy Crochet Patterns is appreciated.
Final Thoughts
These Vintage Crochet Christmas Tree Ornaments combine delicate handmade details with timeless Christmas charm. The three overlapping crochet tiers, soft scalloped borders, elegant pearl decorations, ivory bows, and tiny gold bells create beautiful decorations that can be treasured year after year.
Whether you choose sage green, burgundy red, warm ivory, or a completely new color palette, these miniature crochet Christmas trees are a lovely addition to handmade holiday decorating.
Make a matching set for your own Christmas tree or create a thoughtful handmade gift for someone special.
Save this free crochet Christmas tree ornament pattern to Pinterest and share it with your crochet-loving friends!
Pattern note: This is an original, image-inspired design rather than a verified transcription of the pictured crochet chart. The instructions have not been sample-tested. Make a test ornament and adjust shaping, stitch counts, and assembly as needed.

