Vintage Crochet Daisy Bedspread Pattern
Beginner Friendly
Perfect for those just starting their crochet journey, with clear instructions and simple techniques
Single-Day Project
A satisfying project you can complete in a single afternoon or evening.
Handmade Gift
A beautiful keepsake — free forever. Read online or print at home.
About This Vintage Crochet Daisy Bedspread Pattern
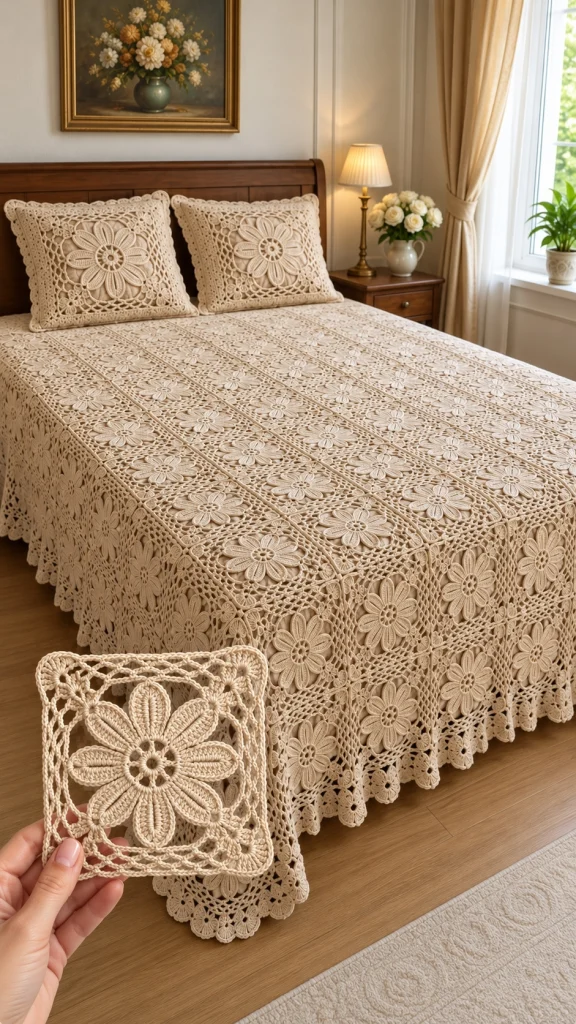
This crochet daisy bedspread pattern creates a timeless floral bed cover made from individual square motifs, each featuring a large dimensional daisy surrounded by delicate open crochet work.
The repeating cream-on-cream design gives the finished bedspread a beautiful vintage heirloom look. The same floral motif can also be used for matching pillow covers, cushions, throws or smaller decorative pieces.
Materials
- Cream or ivory cotton yarn approximately 3,000–5,000 g depending on bed size
- 3–4 mm crochet hook adjust to yarn
- Yarn needle 1
- Stitch markers optional
- Scissors 1 pair
- Blocking mats recommended
- Rust-resistant blocking pins as needed
Abbreviations – US Terms
MRmagic ringchchainsl stslip stitchscsingle crochethdchalf double crochetdcdouble crochettrtreble crochetspspaceststitchFOfasten offPart 1 – Begin the Daisy Center
Using cream yarn, make a MR.
Round 1: ch 3, work 15 dc into MR. Join with sl st to top of beginning ch-3. (16 sts)
Round 2: ch 1, sc in same st, ch 3, skip next st, sc in next st. Repeat around to create 8 ch-3 spaces.
Join with sl st to first sc.
Part 2 – Crochet the First Daisy Petal
Each petal is worked into one ch-3 space.
Into the first ch-3 space work:
1 sc, 1 hdc, 3 dc, 3 tr, 3 dc, 1 hdc, 1 sc.
This creates one long rounded petal.
Repeat the same sequence into every remaining ch-3 space.
You should have 8 large petals.
Part 3 – Define the Petal Edges
Work around each petal with a round of sc.
Place approximately:
1 sc in each stitch, 2 sc near the rounded tip, then 1 sc down the opposite side.
Slip stitch between neighboring petals.
Repeat around all 8 petals.
FO and weave in the tail.
Part 4 – Create the Foundation Behind the Flower
Join yarn behind the petals at the flower center.
Round 1: *ch 5, anchor with sc between the next two petals.* Repeat around.
You should create 8 loops behind the flower.
These loops form the foundation for converting the circular flower into a square motif.
Part 5 – Begin Squaring the Motif
Work into the back loops created in the previous round.
Alternate shorter side sections with larger corner sections.
For each side loop:
3 dc, ch 2, 3 dc.
For each corner loop:
3 dc, ch 3, 3 dc.
Continue around, making sure four clear corners begin to form.
Part 6 – Build the Open Lace Background
Continue around the square using chains and small stitch groups.
A simple repeating sequence is:
*ch 3, skip 2 sts, sc in next st* along each side.
At each corner work:
sc, ch 5, sc into the corner space.
This creates the delicate open mesh visible around the large daisy.
Part 7 – Strengthen the Square
Work another round around the motif.
Into each side ch-space work:
2 sc, ch 2, 2 sc.
Into each corner space work:
3 sc, ch 3, 3 sc.
Keep the corners relaxed so the motif remains perfectly square.
Part 8 – Add the Outer Square Border
Work one final structural round around the square.
Side: sc evenly across each side.
Corner: sc, ch 2, sc into each corner space.
Join with sl st.
FO, leaving a long tail if you plan to sew the motifs together.
Part 9 – Block the Daisy Squares
Lightly dampen each finished motif.
Pin the four corners first, then straighten each side.
Arrange the petals so they remain symmetrical.
Allow the motifs to dry completely before removing the pins.
Part 10 – Determine the Bedspread Size
Measure the top of your mattress and decide how much crochet you want to drape over the sides.
For an heirloom-style bedspread like this one, allow approximately 35–50 cm / 14–20 in of drop on the visible sides and foot of the bed.
Divide the required finished width and length by the blocked size of one square to determine how many motifs you need.
Example Motif Layout
If one blocked square measures approximately 20 cm / 8 in:
Twin: approximately 8 × 11 motifs.
Full: approximately 10 × 11 motifs.
Queen: approximately 11 × 12 motifs.
King: approximately 13 × 12 motifs.
Add extra rows if you want a longer decorative drop.
Part 11 – Arrange the Motifs
Lay all finished squares on a large clean surface.
Turn each flower so the petals face in the same orientation.
Check that the motifs are approximately equal in size.
Arrange them into the required number of rows before beginning the joining process.
Part 12 – Join the Squares
Place two motifs side by side with right sides facing upward.
Using matching yarn, join through corresponding edge stitches with sl sts or sc.
Work evenly from one corner to the next.
Do not pull the joining yarn too tightly.
Continue until an entire horizontal row has been assembled.
Part 13 – Join the Rows
Once all horizontal rows are complete, arrange them in their final order.
Join the long edges using the same method.
Match every square intersection carefully.
The four corners of neighboring motifs should meet neatly without gaps or puckering.
Part 14 – First Bedspread Border Round
Join yarn at any outer corner.
Work sc evenly around the entire bedspread.
At every outer corner work:
sc, ch 2, sc.
Join with sl st.
This round creates a stable foundation for the decorative edging.
Part 15 – Openwork Border
Round 1: ch 1, sc in same st, *ch 4, skip approximately 3 sts, sc in next st*. Repeat around.
Adjust slightly near the corners so the pattern fits evenly.
Round 2: Into each ch-4 space work 1 sc, ch 4, 1 sc.
Continue around.
Part 16 – Crochet the Floral Scalloped Edge
For each scallop, work into the next chain space:
1 sc, 1 hdc, 3 dc, 1 hdc, 1 sc.
Slip stitch into the next joining point.
Repeat around the bedspread.
For a more decorative floral appearance, alternate larger scallops with tiny picots.
Part 17 – Optional Picot Detail
At the highest point of each scallop:
ch 3, sl st into first ch.
Continue the remainder of the scallop.
This gives the edge a delicate vintage lace finish.
Part 18 – Matching Crochet Pillow Covers
The same daisy square can be used to create the matching pillows.
For a large decorative cushion, join 4 motifs in a 2 × 2 arrangement.
Add several rounds of the same open lace pattern until the panel reaches the desired cushion size.
Create a simple crochet or fabric back panel and attach it around three sides.
Add buttons, ties or an envelope opening to make the cover removable.
Part 19 – Finishing the Bedspread
Weave in every remaining yarn end securely.
Inspect all joining seams.
Lay the entire bedspread flat and gently straighten the floral motifs.
For the best final result, lightly block the complete bedspread once more.
Color Ideas
Vintage heirloom: warm ivory or antique cream.
Classic: pure white.
Cottage: soft sage with cream flowers.
Romantic: dusty rose with ivory borders.
Neutral: oatmeal, beige or natural cotton.
Floral: cream background with individually colored daisy centers.
Care Instructions
Hand washing is recommended for a large handmade crochet bedspread.
Use cool or lukewarm water with a mild detergent.
Do not wring the crochet.
Press excess water gently between towels and dry flat whenever possible.
Store folded in a dry place away from direct sunlight.
Frequently Asked Questions
Yes. Because the design is modular, simply crochet fewer daisy squares. The same pattern works for a baby blanket, throw, sofa cover or full-size bedspread.
Yes, but the motifs will become larger and heavier. Make one test square first and calculate the final dimensions before crocheting the remaining motifs.
The exact number depends on your mattress size, desired side drop and the blocked measurement of your individual motif. Always measure one finished square before calculating the final layout.
No. They are optional, but using the same large daisy motif creates a coordinated vintage bedroom set.
Yes. Experienced crocheters can use a join-as-you-go method on the final motif round. Beginners may find it easier to block all squares first and join them afterward.
The finished Vintage Crochet Daisy Bedspread Pattern

