Vintage Crochet Mandala Handbag with Wooden Handles Pattern
Beginner Friendly
Perfect for those just starting their crochet journey, with clear instructions and simple techniques
Single-Day Project
A satisfying project you can complete in a single afternoon or evening.
Handmade Gift
A beautiful keepsake — free forever. Read online or print at home.
About This Vintage Crochet Mandala Handbag with Wooden Handles Pattern
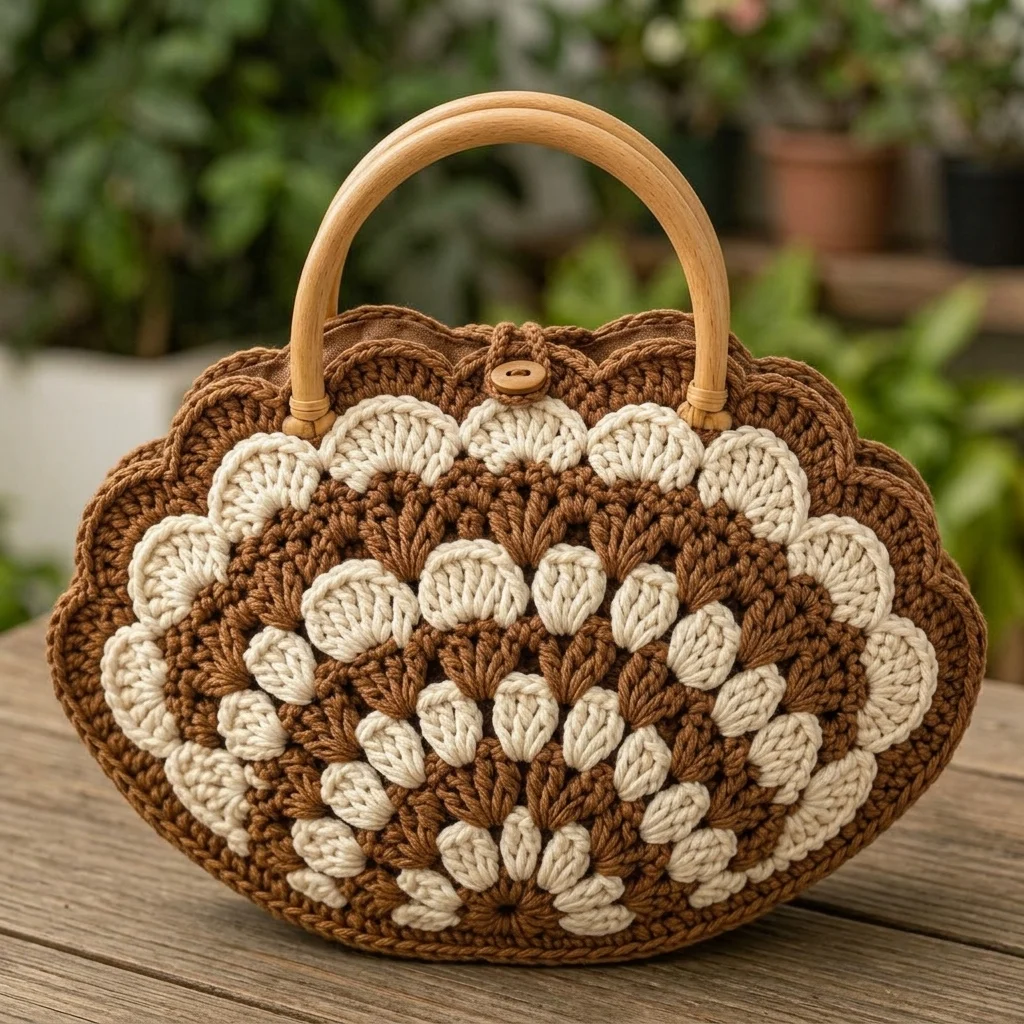
This crochet mandala handbag pattern creates a beautiful structured oval bag with a warm vintage look. The front and back feature a large dimensional floral mandala worked in rich caramel brown and natural cream, finished with a deep scalloped border and rounded wooden handles.
The raised puff and cluster stitches give the bag its distinctive layered texture while the simple two-color palette keeps the design elegant and wearable.
Materials
- Worsted / Medium #4 cotton yarn in warm caramel brown 300-350 g
- Worsted / Medium #4 cotton yarn in natural cream 180-220 g
- 4.0 mm crochet hook 1
- Round wooden handbag handles 2
- Wooden button, approximately 20-25 mm 1
- Cotton fabric for lining optional
- Magnetic snap optional
- Yarn needle 1
- Scissors 1 pair
- Stitch markers 4
Abbreviations
MRmagic ringchchainsl stslip stitchscsingle crochethdchalf double crochetdcdouble crochettrtreble crochetFPdcfront post double crochetpuffpuff stitchincincreaseststitchFOfasten offSpecial Stitches
Puff stitch: Yarn over, insert hook into indicated stitch, yarn over and pull up a loop. Repeat 4 more times in the same stitch. Yarn over and pull through all loops, then ch 1 to close.
3-dc cluster: Work 3 incomplete dc into the same stitch, leaving the final loop of each dc on the hook. Yarn over and pull through all remaining loops.
Shell: Work 5 dc into the same stitch.
Finished Measurements
- Width: approximately 36 cm / 14 in
- Height without handles: approximately 27 cm / 10.5 in
- Depth: approximately 7-9 cm / 3-3.5 in
- Wooden handle: approximately 18-20 cm diameter
Front Mandala Panel
Begin with brown yarn.
R1: Make a MR. Ch 3, work 11 dc into MR. Join with sl st. (12 dc)
R2: Ch 3, dc in same st. Work 2 dc in each st around. Join. (24 dc)
FO brown.
Round 3 – First Cream Petals
Join cream yarn.
R3: *Puff in next st, ch 1, skip 1 st.* Repeat around.
Join with sl st. (12 cream puffs)
FO cream.
Round 4 – Brown Petal Bases
Join brown yarn into any ch-1 space.
R4: Ch 3, 2 dc in same space, ch 1. Work 3 dc in every ch-1 space around.
Join with sl st.
Round 5 – Second Cream Petal Ring
Join cream yarn between two brown clusters.
R5: *Puff, ch 2, puff in next space, ch 2.* Repeat around.
Join.
The cream stitches should sit prominently above the brown background.
Round 6 – Expanding Brown Ring
Join brown yarn.
R6: Work 3-dc clusters into each ch-2 space, placing ch 2 between clusters.
At regular intervals, work two clusters into one space to increase the circumference without causing the panel to cup.
Round 7 – Small Cream Petals
Join cream yarn into a ch-2 space.
R7: *Puff in space, ch 2.* Repeat around.
Join and FO.
Round 8 – Brown Texture
Join brown yarn.
Work alternating groups of:
3 dc, ch 1, 3 dc, ch 1
around the panel.
Increase evenly approximately every fourth repeat.
Round 9 – Cream Raised Petals
Join cream yarn.
Work one puff stitch between each brown cluster.
For the larger cream petals, work:
2 puff stitches into the same space with ch 1 between them.
Alternate single and double puff groups around the panel.
Round 10 – Brown Fan Ring
Join brown yarn.
Into each space between the cream petals work:
5 dc shell.
Place 1 sc between each shell.
Continue around, keeping the work flat.
Round 11 – Large Cream Scallops
Join cream yarn at the top of a brown shell.
*Skip 2 sts, 7 dc in next st, skip 2 sts, sc in next st.*
Repeat around.
This round creates the prominent cream scalloped ring visible near the outside of the mandala.
Round 12 – Brown Outer Foundation
Join brown yarn.
Work sc around the entire panel.
Across each cream scallop work:
sc, hdc, dc, dc, dc, hdc, sc.
Place additional increases where necessary to maintain the rounded shape.
Round 13 – Large Brown Scalloped Border
*Skip 2 sts, 7 dc in next st, skip 2 sts, sc in next st.*
Repeat around.
The outer shells should create a deep decorative edge around the entire handbag.
Shaping the Oval
Lay the panel flat.
Mark the left and right sides with stitch markers.
Across the upper and lower portions continue the shell pattern normally.
At both side markers, work slightly taller stitches:
hdc, dc, tr, tr, dc, hdc
This subtly stretches the circular mandala into the oval handbag shape.
Final Panel Edging
Using brown yarn, work one round of sc around the panel.
Work 3 sc into the tip of each large outer scallop.
FO.
Block gently into an oval approximately 36 x 27 cm.
Back Panel
Repeat all instructions for the front panel.
Make the second panel as close as possible to the dimensions of the first.
Block both panels together so they match exactly.
Bag Gusset
Using brown yarn, ch 16.
R1: Sc in second ch from hook and across. (15 sc)
R2: Ch 1, turn, sc across. (15)
Repeat R2 until the strip is long enough to travel from one upper side of the bag, around the bottom, to the opposite upper side.
For the sample size, approximately 75-85 cm is usually suitable.
Textured Gusset Option
For a more decorative side panel, alternate:
Row A: sc across.
Row B: *FPdc around next st, dc in next st.* Repeat across.
Continue alternating the two rows until the gusset reaches the required length.
Joining the Gusset
- Place the front panel with the right side facing outward.
- Pin the gusset from one upper side around the bottom to the opposite side.
- Join using sc through both layers.
- Repeat with the back panel.
- Keep the stitch tension even around the curves.
Top Opening
Join brown yarn at one upper side.
R1: Sc evenly around the entire opening.
R2: Ch 1, sc around.
R3: Work reverse sc / crab stitch around for a firm decorative edge.
Attaching the Wooden Handles
Center one wooden handle against the front panel.
Mark approximately 8-10 stitches underneath each end of the handle.
Using brown yarn, join yarn at the first marked stitch.
Work sc around the wooden handle and into the corresponding bag stitches.
Continue until the handle is firmly wrapped.
Repeat at the opposite side.
Attach the second handle to the back panel in exactly the same position.
Button Closure Tab
Using brown yarn, ch 7.
R1: Sc in second ch from hook and across. (6)
R2-R8: Ch 1, turn, sc across.
R9: Sc 2, ch 2, skip 2 sts, sc 2.
R10: Sc across, working 2 sc into the ch-2 space.
FO leaving a long tail.
Attaching the Closure
Sew the straight end of the closure tab to the center back of the bag.
Bring the tab over the opening toward the front.
Mark the corresponding position.
Sew the wooden button securely to the front panel.
Pass the button through the crocheted buttonhole.
Optional Fabric Lining
- Trace the bag panels onto cotton fabric.
- Add approximately 1.5 cm seam allowance.
- Cut two fabric panels and one gusset strip.
- Sew the fabric pieces together with right sides facing.
- Fold the upper raw edge inward.
- Insert the lining into the crochet bag.
- Hand stitch it just below the upper crochet edge.
Optional Inner Pocket
Cut a rectangle of lining fabric approximately 18 x 14 cm.
Fold and press the edges inward.
Hem the upper edge.
Sew the remaining three sides to the lining before inserting it into the handbag.
Blocking
Lightly dampen both crochet panels.
Shape the bag so the bottom is slightly flatter than the top.
Arrange the scallops evenly around the outer edge.
Allow the bag to dry completely before attaching the handles if possible.
Final Finishing
- Weave in all remaining yarn ends.
- Check the gusset seams.
- Reinforce both wooden handles.
- Shape every outer scallop with your fingers.
- Check that both mandala panels are centered.
- Attach the lining if using one.
- Test the button closure.
Frequently Asked Questions
Yes. Add additional expanding mandala rounds before working the final scalloped border. Make sure both panels contain exactly the same number of stitches.
Yes, but cotton is recommended because it gives the handbag more structure and better stitch definition.
Use tightly spun cotton yarn, crochet with a slightly smaller hook, add a fabric lining and insert lightweight bag stabilizer between the crochet and lining.
Yes. Bamboo, wood, acrylic or wrapped metal handles can all work. Choose handles large enough for comfortable carrying and reinforce every attachment point.
Absolutely. Cream and sage create a softer look, black and beige make the design more modern, while rust and ivory work beautifully for an autumn version.
No, but a lining is recommended if you plan to carry small or heavy items because it prevents stretching and keeps objects from slipping through decorative stitch spaces.
The finished Vintage Crochet Mandala Handbag with Wooden Handles Pattern

