Vintage Floral Crochet Hobo Bag Pattern
Beginner Friendly
Perfect for those just starting their crochet journey, with clear instructions and simple techniques
Single-Day Project
A satisfying project you can complete in a single afternoon or evening.
Handmade Gift
A beautiful keepsake — free forever. Read online or print at home.
About This Vintage Floral Crochet Hobo Bag Pattern
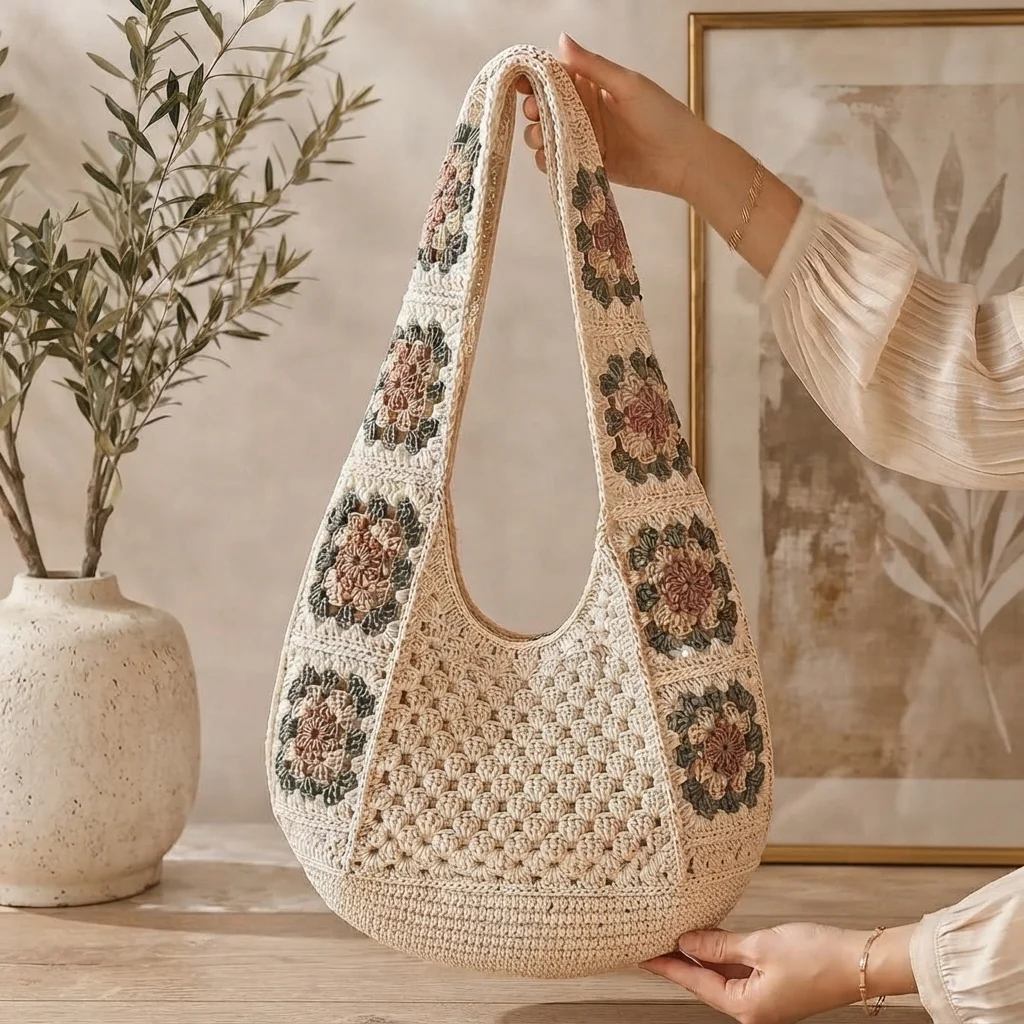
This crochet hobo bag pattern combines a softly rounded shoulder-bag silhouette with delicate vintage floral details. The main body is worked in warm cream using a dense textured stitch, while the wide shoulder strap is decorated with individual floral granny-square motifs in muted rose, taupe, olive and deep sage.
The result is a romantic boho bag that feels handmade without looking overly rustic. Its wide strap makes it comfortable to carry, while the rounded base gives plenty of room for everyday essentials.
Materials
- DK or light worsted cotton yarn – warm cream 450-550 g
- Muted dusty rose yarn 40-60 g
- Soft taupe yarn 40-60 g
- Dark olive or sage yarn 40-60 g
- Warm brown yarn 30-40 g
- 3.5-4 mm crochet hook 1
- Yarn needle 1
- Stitch markers 4
- Scissors 1 pair
- Cotton lining fabric – optional approximately 50 × 90 cm
- Magnetic snap – optional 1
Abbreviations
chchainsl stslip stitchscsingle crochethdchalf double crochetdcdouble crochettrtreble crochetststitchspspaceincincreasedecdecreasereprepeatFOfasten offFinished Size
- Bag width: approximately 38-42 cm
- Bag height: approximately 34-38 cm
- Base depth: approximately 10-12 cm
- Strap width: approximately 8-10 cm
- Total strap length: approximately 75-85 cm
The finished measurements can easily be adjusted by adding or removing rounds from the body and floral motifs from the strap.
Color Palette
For the soft vintage appearance shown in the inspiration, use understated botanical colors rather than bright shades:
- Warm ivory or natural cream for the main body
- Dusty rose for flower petals
- Muted mocha or mushroom brown
- Dark sage or olive green
- Soft beige for transitions and borders
You can also use leftover cotton yarn for the flowers, making this a lovely scrap-yarn project.
Bag Base
The bag begins with a firm oval base worked in continuous rounds.
- With cream yarn, ch 41.
- Round 1: Sc in 2nd ch from hook and across to the final ch.
- Work 5 sc into the final ch.
- Continue along the opposite side of the foundation chain.
- Work 4 sc into the first foundation ch to complete the opposite curve.
- Place a stitch marker at the beginning of the round.
- Round 2: Sc around, increasing evenly around both curved ends.
- Continue increasing at both ends for another 4-6 rounds until the oval measures approximately 10-12 cm deep.
Building the Bag Body
- Work one round of sc through the back loops only. This creates a subtle fold between the base and body.
- Continue working without increases.
- Work approximately 4-5 rounds of sc for a firm lower section.
- Begin the textured body stitch described below.
Textured Shell Stitch
The softly raised texture across the front and back is created using compact shell clusters.
- Ch 1.
- Sc in the first st.
- Skip 1 st.
- Work 5 dc into the next st.
- Skip 1 st.
- Sc into the next st.
- Repeat around.
- Join with sl st.
For the following round, place each shell into the sc between the shells of the previous round. This offsets the clusters and produces a dense, overlapping texture.
Shaping the Hobo Silhouette
The characteristic curved shape comes from gradually narrowing the upper portion of the bag.
- Work the body straight until it measures approximately 22-24 cm from the base.
- Place markers at both side edges.
- On the next round, make one decrease before and after each marker.
- Work 2 rounds without decreases.
- Repeat the decrease round.
- Continue this sequence until the upper opening measures approximately 30-32 cm across when laid flat.
Upper Edge
- Work 1 complete round of sc around the opening.
- Work another round of sc through both loops.
- Finish with one round of reverse single crochet or another firm decorative edging.
- FO and weave in securely.
Vintage Floral Granny Square
Make approximately 10-12 floral squares for the decorative shoulder strap.
Round 1 – Flower Center
- With dusty rose or taupe yarn, make a magic ring.
- Ch 2.
- Work 12 dc into the ring.
- Join with sl st.
- Pull the center closed.
Round 2 – Raised Petals
- Join the petal color.
- *Ch 2, 3 dc in same st, ch 2, sl st into next st.*
- Repeat around to form the flower.
- FO.
Round 3 – Leafy Background
- Join dark sage behind a petal.
- Ch 3.
- Work clusters between the petals.
- At four evenly spaced points, work 2 dc, ch 2, 2 dc to establish the square corners.
- Continue around and join.
Round 4 – Cream Border
- Join cream yarn in any corner.
- Ch 3.
- Dc evenly around.
- In each corner work 2 dc, ch 2, 2 dc.
- Join and FO.
Each finished motif should measure approximately 8-9 cm square.
Joining the Floral Strap
- Block all floral squares to the same dimensions.
- Arrange them in one long row.
- Alternate the floral colors along the strap.
- Using cream yarn, whip stitch or slip stitch the squares together.
- Continue until the strip reaches approximately 75-85 cm.
- Work one row of sc along both long edges.
- Work another row of sc if additional strength is needed.
Reinforcing the Shoulder Strap
Because crochet naturally stretches, reinforcing a wide bag strap is highly recommended.
- With cream yarn, crochet a plain strip approximately the same width and length as the floral strap.
- Use rows of sc for maximum stability.
- Place the plain strip behind the floral strip.
- Join both layers with sc around the entire perimeter.
- Keep your stitches relaxed so the strap remains flat.
This creates a beautiful floral front with a comfortable and durable underside.
Attaching the Strap
- Position one strap end approximately 7-9 cm down the left side of the bag.
- Position the opposite end at the same height on the right side.
- Pin or stitch-marker the pieces in place.
- Check the bag in front of a mirror to confirm the strap length.
- Using cream yarn and a yarn needle, sew each end securely to the bag.
- Stitch around the complete attachment area twice for extra strength.
Optional Fabric Lining
A lining helps prevent small objects from stretching through the crochet fabric.
- Lay the finished bag flat on your lining fabric.
- Trace around the body, leaving approximately 1.5 cm seam allowance.
- Cut two matching lining pieces.
- Sew the sides and bottom together.
- Fold the upper raw edge inward.
- Insert the lining into the crochet bag.
- Hand stitch it just below the upper crochet edge.
- Add an interior pocket before installing the lining if desired.
Optional Magnetic Closure
- Mark the center of the front and back upper edges.
- Install one half of the magnetic snap on each lining side.
- Reinforce the fabric behind each snap with a small square of interfacing.
- Finish attaching the lining after confirming both snap pieces align.
Finishing
- Weave in all remaining yarn ends.
- Check every strap join carefully.
- Lightly steam or wet block the floral motifs if your yarn allows it.
- Shape the rounded base with your hands.
- Allow the bag to dry completely before use.
Ways to Customize Your Crochet Hobo Bag
- Make every flower dusty rose for a romantic vintage version.
- Use rust, mustard and olive for an autumn bag.
- Try burgundy, forest green and cream for winter.
- Use pastel pink, sage and lavender for spring.
- Add wooden beads to the strap.
- Add a crochet tassel to one side.
- Make the strap longer for a crossbody version.
- Add an interior zipper pocket.
- Use one solid color for a minimalist version.
- Turn leftover granny squares into a matching coin purse.
Frequently Asked Questions
The basic body is straightforward, but the floral granny squares, shaping and strap construction make the complete project better suited to an intermediate crocheter or an adventurous beginner.
Cotton or a cotton blend is ideal because it provides structure and usually stretches less than very soft acrylic yarn. A tightly twisted yarn will also make the textured stitches and flowers more defined.
No, but lining is recommended if you plan to use the bag regularly. It reduces stretching and prevents keys, pens and other small objects from poking through the crochet stitches.
Yes. Simply add more floral squares before joining the strap to the bag. For a crossbody style, test the length against your body before permanently attaching it.
Use a dense stitch, reinforce the back of the decorative strap with a second crochet layer, and choose cotton yarn with relatively little elasticity.
Yes. Any square motif of approximately the same finished dimensions can be substituted. Keep all motifs equal in size so the strap remains straight.
Follow the care instructions for your chosen yarn and lining fabric. Hand washing in cool water and reshaping the bag while damp is generally the gentlest option for a structured handmade bag.
The finished Vintage Floral Crochet Hobo Bag Pattern

