Vintage Floral Hexagon Crochet Handbag – Free Advanced Pattern
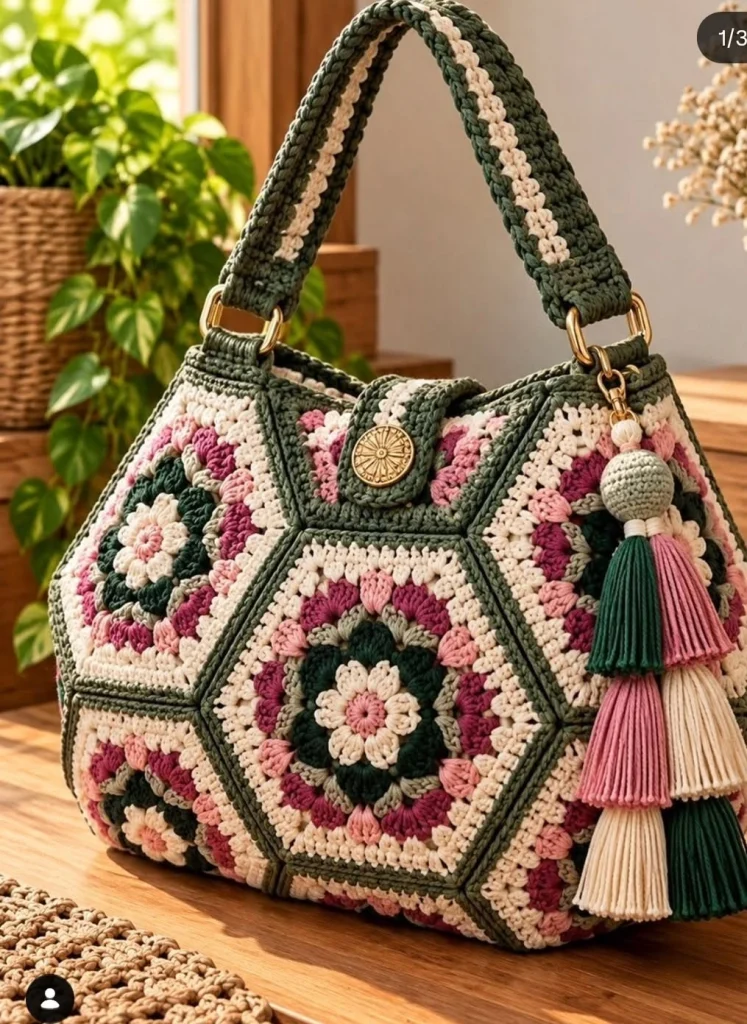
Create a stunning handmade accessory with this Vintage Floral Hexagon Crochet Handbag! Featuring beautiful raised flowers, intricate hexagon motifs, elegant olive green borders, and romantic pink and cream accents, this crochet bag combines vintage charm with modern sophistication.
The handbag features a structured, softly rounded silhouette made from interconnected floral hexagons. Each motif showcases a delicate cream flower with a dusty pink center, surrounded by deep forest green, burgundy, blush pink, and ivory crochet stitches.
A thick olive green shoulder strap, decorative gold hardware, secure button closure, and colorful handmade tassels complete this beautiful design.
Perfect for experienced crocheters, this advanced crochet handbag is an elegant accessory for everyday outings, special occasions, or thoughtful handmade gifts.
Pattern Details
- Skill Level: Advanced
- Finished Size: Approximately 32 cm wide × 25 cm high × 12 cm deep
- Construction: Floral hexagon motifs assembled into a structured handbag
- Main Motif: Raised six-petal flower hexagon
- Yarn Weight: DK cotton or light worsted cotton
- Crochet Hooks: 3.5 mm and 4.0 mm
- Strap: Reinforced crochet shoulder strap
- Closure: Crochet flap with decorative button
- Decoration: Multicolored tassels and gold hardware
- Terminology: US crochet terms
Materials Needed
- 250 g dark olive green cotton yarn
- 150 g warm ivory cotton yarn
- 100 g dusty rose cotton yarn
- 100 g burgundy cotton yarn
- 75 g blush pink cotton yarn
- 50 g sage green cotton yarn
- 3.5 mm crochet hook
- 4.0 mm crochet hook
- Two gold rectangular or D-shaped handle rings
- One decorative gold button, approximately 2–2.5 cm
- One small gold swivel clasp for the tassel charm
- Sturdy cotton fabric for lining
- Optional flexible bag stabilizer
- Matching sewing thread
- Tapestry needle
- Stitch markers
- Scissors
- Measuring tape
Yarn Recommendation: Use tightly twisted cotton yarn for excellent stitch definition and a structured finish. Avoid very stretchy yarn, as it may cause the handbag to lose its shape.
Crochet Abbreviations
- MR: Magic ring
- ch: Chain
- sc: Single crochet
- hdc: Half double crochet
- dc: Double crochet
- tr: Treble crochet
- sl st: Slip stitch
- st: Stitch
- sp: Space
- sk: Skip
- FO: Fasten off
- RS: Right side
- WS: Wrong side
- YO: Yarn over
1. Understanding the Floral Hexagon Design
The main feature of this crochet handbag is its collection of large floral hexagon motifs.
Each motif begins with a delicate six-petal flower worked in cream and dusty pink yarn.
The flower is surrounded by dark forest green stitches that create depth and contrast.
Additional rounds of sage green, burgundy, blush pink, and ivory form a decorative hexagon.
The outer edges are finished with dark olive green yarn, giving each motif a clean, defined border.
When assembled, the hexagons create a beautiful geometric pattern across the handbag.
2. Crochet the Floral Center
Round 1 – Magic Ring
Using dusty pink yarn, make a magic ring.
Ch 1.
Work 12 sc into the ring.
Pull the ring closed.
Join with a sl st to the first sc.
Fasten off.
You should have 12 stitches.
Round 2 – Petal Foundation
Join ivory yarn into any stitch.
Ch 3.
Skip 1 stitch.
Sl st into the next stitch.
Repeat around the ring.
You should have six ch-3 loops.
Round 3 – Raised Flower Petals
Sl st into the first ch-3 loop.
Work (sc, hdc, 3 dc, hdc, sc) into the loop.
Repeat in each remaining ch-3 loop.
Join with a sl st.
Fasten off.
You should have six rounded cream flower petals.
3. Add the Dark Green Background
Round 4 – Floral Contrast
Join dark forest green yarn behind the flower.
Work ch-4 loops between the six petals, anchoring each loop with a sl st at the base of the petals.
Continue until six loops are formed.
Join with a sl st.
Round 5 – Green Petal Frame
Work (sc, hdc, 3 dc, hdc, sc) into each ch-4 loop.
Repeat around the flower.
Join with a sl st.
This creates a second decorative layer behind the cream petals.
4. Build the Hexagon Shape
Round 6 – Sage Green Foundation
Join sage green yarn in a space between the green petals.
Ch 3.
Work 2 dc into the same space.
Ch 2.
Work 3 dc into the same space.
Repeat this corner group in each of the six spaces around the flower.
Join with a sl st.
You should now have six distinct corners.
Round 7 – Burgundy Accent
Join burgundy yarn at any corner.
Work (3 dc, ch 2, 3 dc) into the corner space.
Work 3 dc into each space between corners.
Repeat around the hexagon.
Join with a sl st.
Round 8 – Blush Pink Detail
Join blush pink yarn.
Work dc groups evenly around the hexagon.
At each corner, work (2 dc, ch 2, 2 dc).
Join with a sl st.
Round 9 – Ivory Border
Join ivory yarn.
Work one round of dc around the motif.
At each corner, work (2 dc, ch 2, 2 dc).
Join with a sl st.
Round 10 – Olive Green Outline
Join dark olive green yarn.
Work sc evenly around the hexagon.
At each corner, work (sc, ch 2, sc).
Join with a sl st and fasten off.
Weave in all ends securely.
Important: This is an original design interpretation inspired by the photograph, not an exact reconstruction of its stitch chart. Test one complete motif first and adjust the corner spacing and stitch counts to obtain a flat, regular hexagon.
5. Make the Remaining Floral Hexagons
Repeat the motif instructions until you have enough hexagons for your desired handbag size.
For the sample design, begin with approximately 12 full hexagons.
The exact number will depend on your gauge, the motif dimensions, and your preferred assembly layout.
Make additional partial motifs if necessary to fill gaps along the upper edge or bottom.
Keep the flower centers, outer borders, and hexagon dimensions consistent.
Block all motifs before assembly.
6. Plan the Handbag Layout
Lay the completed motifs on a flat surface.
Arrange them into two decorative panels for the front and back of the handbag.
Position the hexagons so the flowers form a balanced geometric arrangement.
The front panel should feature a prominent central floral hexagon.
Arrange the surrounding motifs diagonally to create the characteristic honeycomb appearance.
Use additional motifs along the sides and bottom to create the rounded handbag silhouette.
Take a photograph of your arrangement before joining.
7. Join the Floral Hexagons
Use dark olive green yarn to create visible, structured seams between the motifs.
Flat Slip Stitch Joining Method
- Place two hexagons side by side with their right sides facing upward.
- Insert the hook through the corresponding back loops of both motifs.
- Yarn over and pull through all loops to make a slip stitch.
- Continue joining along the shared edge.
- Repeat until the front panel is complete.
- Assemble the back panel using the same method.
- Join the side and bottom motifs to form the handbag body.
Keep the seams firm but flexible.
The olive green joining stitches should create neat geometric outlines around each floral motif.
8. Create the Structured Bottom
To improve stability, crochet a reinforced oval or rectangular bottom panel.
Using dark olive green yarn, chain enough stitches to match the desired base length.
Work sc rows until the panel reaches approximately 12 cm in width.
For additional structure, work two identical bottom panels and join them together.
Optional: Insert a flexible bag stabilizer between the layers.
Attach the bottom panel to the handbag body using slip stitches or a strong whipstitch seam.
Ensure that the bag stands evenly on a flat surface.
9. Crochet the Upper Handbag Band
Join dark olive green yarn along the upper opening.
Round 1
Work sc evenly around the entire opening.
Join with a sl st.
Rounds 2–5
Ch 1.
Work 1 sc into each stitch around.
Join with a sl st.
Repeat until the upper band measures approximately 3 cm.
Fasten off and weave in the ends.
This reinforced band helps maintain the handbag’s shape and supports the shoulder strap.
10. Crochet the Shoulder Strap
The shoulder strap features a thick olive green body with a decorative ivory stripe running along its center.
Using dark olive green yarn, ch 9.
Row 1
Sc into the second chain from the hook.
Sc across.
Turn.
Rows 2–4
Ch 1.
Sc across.
Turn.
Row 5 – Ivory Stripe
Work 3 sc in olive green.
Change to ivory yarn.
Work 2 sc.
Change back to olive green.
Work 3 sc.
Turn.
Remaining Rows
Continue the same color arrangement until the strap reaches approximately 65–75 cm.
Fasten off.
For extra strength, sew a narrow cotton webbing strip to the underside of the crochet strap.
Attach the strap ends securely around the gold handle rings.
Use several reinforced rows of stitching to prevent stretching.
11. Attach the Gold Hardware
Position one gold rectangular ring on each side of the handbag.
Secure each ring with a reinforced crochet tab.
Use olive green yarn and tightly worked sc stitches.
Fold the tabs around the rings and sew them firmly into the upper side seams.
Attach the completed shoulder strap to the rings.
Check that both sides are symmetrical and strong enough to support the weight of the handbag.
12. Crochet the Button Closure
Using olive green yarn, ch 7.
Work sc into the second chain from the hook and across.
Continue working sc rows until the flap measures approximately 7 cm long.
Create a buttonhole near the end of the flap by chaining 3 stitches and skipping the corresponding stitches.
Work one final sc row.
Fasten off.
Sew the flap to the center of the back upper band.
Attach a decorative gold button to the front of the handbag.
Ensure that the button fits securely through the buttonhole.
13. Make the Decorative Tassels
The colorful tassel charm is one of the most beautiful finishing details of this handbag.
Create tassels in olive green, dusty pink, blush pink, and ivory.
Tassel Instructions
- Cut a piece of cardboard approximately 10–12 cm long.
- Wrap yarn around the cardboard 35–45 times.
- Slide a separate yarn strand beneath the wrapped yarn and tie securely at the top.
- Remove the yarn bundle from the cardboard.
- Wrap another strand around the upper section to create the tassel neck.
- Cut the loops at the bottom.
- Trim the ends evenly.
- Repeat using the remaining colors.
Attach the tassels at staggered lengths to a small gold clasp.
Add a small crocheted bead or decorative yarn ball above the tassels.
Clip the finished charm to one of the handbag’s gold rings.
14. Add the Fabric Lining
A fabric lining helps protect the crochet stitches and gives the handbag a professional finish.
- Measure the interior dimensions of the assembled bag.
- Cut two fabric panels matching the front and back interior shape.
- Add approximately 1 cm seam allowance.
- Cut additional fabric pieces for the sides and bottom if needed.
- Sew the lining pieces together.
- Press the seams neatly.
- Insert the lining into the handbag with wrong sides together.
- Fold the upper raw edge inward.
- Hand-sew the lining to the inside of the upper crochet band.
Optional: Add a small interior pocket for keys, cards, or a phone.
15. Final Shaping and Finishing
Inspect all seams and reinforced attachment points.
Gently shape the handbag into its rounded structured silhouette.
Make sure the floral hexagons lie flat without excessive stretching.
Check that the shoulder strap hangs evenly.
Adjust the closure flap if necessary.
Trim any loose yarn ends.
Lightly steam-block the handbag from a safe distance if permitted by the yarn manufacturer.
Allow the bag to dry completely before use.
16. Advanced Crochet Tips
- Use tightly twisted cotton yarn for better structure.
- Keep all hexagon motifs the same size.
- Block motifs before joining.
- Use consistent stitch tension.
- Reinforce the strap attachment points.
- Consider using cotton webbing inside the shoulder strap.
- Use a fabric lining to prevent small objects from slipping through the crochet openings.
- Keep the olive green borders consistent across every motif.
- Test the handbag’s strength before carrying heavy objects.
- Use stitch markers to maintain symmetrical assembly.
17. Alternative Color Combinations
Beige, Caramel and Ivory
A sophisticated neutral combination for everyday elegance.
Dusty Blue, White and Gray
A soft vintage palette perfect for spring and summer.
Terracotta, Mustard and Cream
A warm bohemian-inspired combination with earthy tones.
Lavender, Blush and Ivory
A romantic pastel handbag with delicate floral details.
Black, Beige and Gold
A classic luxury-inspired version for evening outings.
18. How to Care for Your Crochet Handbag
- Spot clean whenever possible.
- Hand wash gently in cool water if needed.
- Use mild detergent.
- Avoid harsh rubbing around the floral motifs.
- Do not wring or twist the handbag.
- Reshape while damp.
- Air dry away from direct sunlight.
- Store with tissue paper inside to maintain its shape.
- Avoid carrying excessively heavy objects.
Frequently Asked Questions
Is this crochet handbag suitable for beginners?
This design is best suited for advanced crocheters because it involves floral hexagon construction, geometric assembly, reinforced straps, lining, and decorative finishing techniques.
What is the best yarn for this handbag?
Firm cotton yarn is recommended because it provides excellent stitch definition and helps the handbag maintain its structure.
Can I make the handbag larger?
Yes. Add more floral hexagon motifs or increase the number of rounds in each motif. Adjust the base, lining, and strap proportions accordingly.
Can I use a zipper instead of a button closure?
Absolutely. A zipper can be sewn into the fabric lining for additional security.
How many hexagons do I need?
The exact number depends on your gauge and layout. Start with approximately 12 motifs, then arrange them into front, back, and side sections before making additional pieces.
How can I make the shoulder strap stronger?
Use tight stitches and reinforce the underside with cotton webbing. Secure the strap tabs with multiple rows of stitching.
Can I remove the decorative tassels?
Yes. The tassels are optional and can be removed for a simpler, more minimalist handbag.
Should I add a fabric lining?
A lining is highly recommended because it improves durability, protects the crochet fabric, and prevents smaller items from slipping through the stitches.
Final Thoughts
This Vintage Floral Hexagon Crochet Handbag is a beautiful combination of traditional crochet techniques and modern handmade fashion.
Its intricate floral motifs, romantic color palette, elegant olive green borders, and decorative tassels create a distinctive accessory that is both stylish and practical.
Whether you make it for yourself, as a birthday gift, or as a special handmade creation, this floral crochet handbag is a rewarding project for experienced crochet enthusiasts.
Save this free floral hexagon crochet handbag pattern to Pinterest and share it with your crochet-loving friends!
Designer note: This is an original, untested pattern inspired by the reference photograph. It is not an exact reconstruction of the pictured handbag. Motif shaping, assembly layout, strap dimensions, and closure placement should be tested and adjusted before making the final bag.

