Vintage Floral Triangle Crochet Bedspread – Free Pattern
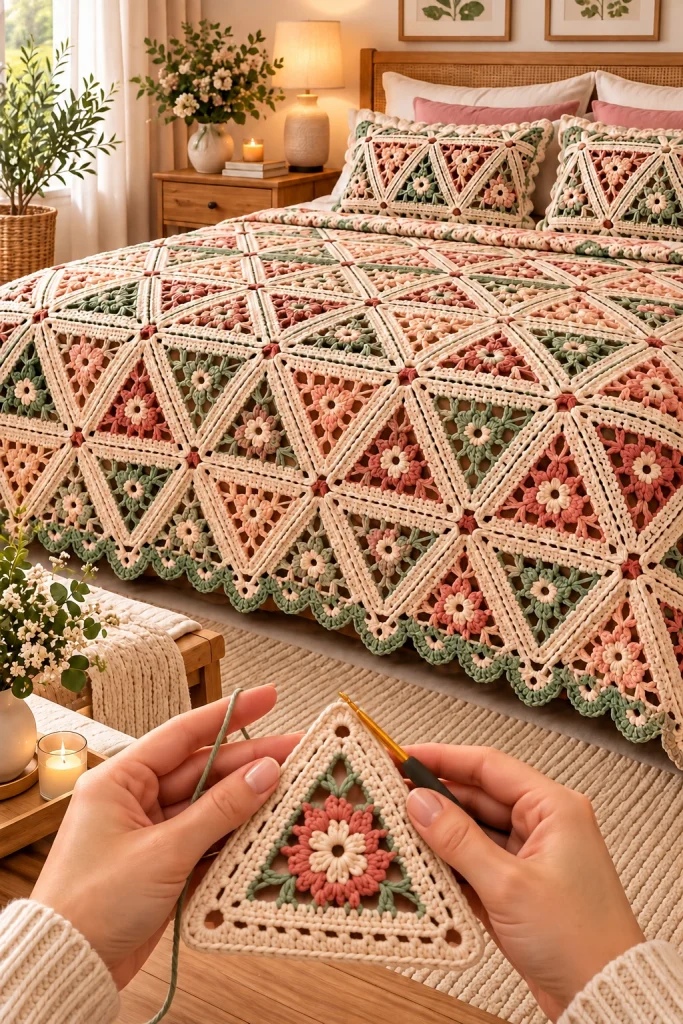
Bring romantic vintage charm into your bedroom with this beautiful floral triangle crochet bedspread pattern. Featuring delicate dusty pink blossoms, soft sage-green leaves, and elegant ivory borders, this handmade bedspread transforms simple crochet motifs into a luxurious floral patchwork design.
The intricate triangular arrangement creates a striking geometric pattern, while the raised crochet flowers add beautiful dimension and texture. Matching decorative pillow covers complete the coordinated bedroom look.
This original crochet pattern is inspired by the reference design and provides a practical method for creating individual floral triangle motifs, joining them into a bedspread, adding a decorative scalloped border, and making coordinating pillow covers.
Pattern at a Glance
Materials and Supplies
- Approximately 1800–2400 g of ivory or cream cotton-blend yarn for motif borders and joining.
- Approximately 500–700 g of dusty rose and peach cotton-blend yarn for flowers.
- Approximately 350–500 g of sage-green yarn for leaves and floral accents.
- Small amount of deeper terracotta yarn for contrasting flower centers and joining accents.
- 3.5 mm crochet hook for floral details.
- 4 mm crochet hook for triangle borders and joining.
- Yarn needle for sewing motifs.
- Stitch markers.
- Scissors.
- Measuring tape.
- Blocking mats and rustproof pins.
- Optional pillow inserts and backing fabric.
Abbreviations
Understanding the Floral Triangle Design
The bedspread is constructed from individual triangular crochet motifs. Each triangle contains a dimensional flower surrounded by small leaves and finished with an ivory openwork border.
Two principal color combinations create the vintage patchwork effect:
- Dusty rose triangles: Pink flowers with cream centers and sage-green foliage.
- Sage-green triangles: Cream or peach flowers surrounded by soft green leaves.
The triangular motifs are arranged in alternating orientations, forming larger geometric patterns across the bedspread.
Decorative joining stitches create the raised cream lines visible between the individual motifs.
Part 1: Crochet the Central Flower
Begin by making the dimensional flower that sits in the center of each triangle.
Five-Petal Flower Instructions
Using dusty pink or peach yarn and a 3.5 mm hook:
Round 1: Make a magic ring. Ch 1 and work 10 sc into the ring. Pull tight and join with a sl st. (10 sc)
Round 2: *Ch 3, skip 1 stitch, sl st in the next stitch.* Repeat five times to create five chain loops.
Round 3: Into each ch-3 loop, work:
- 1 sc
- 1 hdc
- 3 dc
- 1 hdc
- 1 sc
Repeat in each of the five loops to form five rounded petals.
Join with a sl st and fasten off.
Leave a long tail for attaching the flower to the triangle center.
Part 2: Make the Raised Flower Center
Flower Center Instructions
Using cream yarn:
Round 1: MR, 6 sc. (6)
Round 2: Work 2 sc in each stitch around. (12)
Join with a sl st and fasten off.
Sew the small cream circle into the middle of the pink flower.
For extra dimension, add a small amount of yarn underneath the center before attaching it.
Part 3: Crochet the Sage-Green Leaves
The delicate green leaves provide contrast and help create the botanical appearance of the design.
Small Leaf Instructions
Using sage-green yarn:
Foundation: Ch 8.
Starting in the second chain from the hook:
- Sl st in the first chain.
- Sc in the next chain.
- Hdc in the next chain.
- Dc in the next two chains.
- Hdc in the next chain.
- Work 3 sc in the last chain.
- Continue along the opposite side of the foundation chain, mirroring the stitches.
- Join with a sl st.
FO, leaving a long sewing tail.
Make three leaves for each floral triangle.
Arrange them around the flower in a balanced triangular composition.
Part 4: Crochet the Triangle Foundation
The triangular foundation is made separately, then decorated with the flower and leaves.
Triangle Foundation Instructions
Using ivory yarn:
Round 1: MR, ch 3 (counts as first dc), work 2 dc, ch 2, 3 dc, ch 2, 3 dc, ch 2 into the ring. Join with sl st to the top of beginning ch 3.
You now have three groups of 3 dc separated by three corner spaces.
Round 2: Sl st into the first corner space. Ch 3, work (2 dc, ch 2, 3 dc) into the same corner space. Ch 1. In each of the next two corner spaces, work (3 dc, ch 2, 3 dc), ch 1. Join.
Round 3: Sl st into the nearest corner space. Work (3 dc, ch 2, 3 dc) in each corner space. Between corners, work 3 dc in each ch-1 space, separating adjacent groups with ch 1. Join.
Rounds 4 onward: Continue the same triangular granny-stitch structure, increasing at all three corners.
Stop when each side measures approximately 18–20 cm after blocking.
Part 5: Add the Decorative Ivory Border
The raised ivory border gives each triangle its beautiful framed appearance.
Border Instructions
Attach ivory yarn at one corner.
Border Round 1: Work sc evenly along each side of the triangle, placing (sc, ch 2, sc) in every corner.
Border Round 2: Work hdc along each side, placing (2 hdc, ch 2, 2 hdc) in every corner space.
Border Round 3: Work sc around, maintaining the three pointed corners.
Join and fasten off.
Block the triangle gently so all three sides are straight and the corners are clearly defined.
Part 6: Attach the Floral Decorations
Floral Assembly
- Place the completed triangle flat with the right side facing upward.
- Position the large flower in the center.
- Arrange three sage-green leaves around the flower.
- Use yarn tails to sew the leaves securely to the triangle.
- Attach the flower over the inner ends of the leaves.
- Add small cream buds if desired.
- Secure all yarn tails on the wrong side.
For a more dimensional appearance, sew only the centers of the petals while leaving the outer edges slightly raised.
Part 7: Make the Different Color Variations
Alternate the colors to recreate the romantic patchwork effect.
Variation A: Dusty Rose Flower
- Dusty pink petals.
- Ivory flower center.
- Sage-green leaves.
- Ivory triangular border.
Variation B: Peach Flower
- Soft peach petals.
- Cream flower center.
- Muted olive leaves.
- Ivory triangular border.
Variation C: Sage Garden Triangle
- Soft green floral background accents.
- Small ivory flower.
- Dusty pink secondary blossoms.
- Ivory triangular border.
Part 8: Plan the Bedspread Layout
Before joining the motifs, arrange them on a clean floor or large table.
Alternate triangles pointing upward and downward so neighboring motifs fit together along their sides.
The arrangement should create larger diamond-like and geometric floral patterns.
Suggested Layout
- Measure the bed width and length.
- Decide how much overhang you want on each side.
- Measure the blocked height and side length of one triangle.
- Arrange the motifs into alternating up-and-down rows.
- Mix the pink, peach, and green color variations evenly.
- Photograph the arrangement before joining.
- Adjust the layout until the colors look balanced.
For a large bedspread, create a small sample panel first to confirm the joining method and overall dimensions.
Part 9: Join the Triangle Motifs
The cream joining seams are a major decorative feature of this bedspread.
Raised Joining Method
- Place two triangles together with their wrong sides facing each other.
- Align the corresponding corners and edge stitches.
- Attach ivory yarn at one corner.
- Work sc through the aligned edge stitches of both triangles.
- Continue along the entire shared side.
- Fasten off and secure the yarn.
- Repeat for all neighboring motifs.
Keep the raised seam on the right side to emphasize the geometric triangle outlines.
Use a consistent joining tension to prevent the finished bedspread from puckering.
Part 10: Create the Scalloped Outer Border
The bedspread in the reference image features a soft, decorative scalloped edge with green accents.
Outer Border Instructions
Attach sage-green yarn to the outer edge of the assembled bedspread.
Round 1: Work sc evenly around the perimeter, adjusting stitch placement around the triangular points.
Round 2: *Skip 2 stitches, work 5 dc in the next stitch, skip 2 stitches, sl st in the next stitch.* Repeat along suitable straight sections.
At corners and pointed edges, adjust the number of skipped stitches so the scallops remain evenly spaced.
Round 3: Optional: Add a delicate ivory edging using slip stitches or picots.
FO and weave in all ends.
Part 11: Crochet the Matching Pillow Covers
Matching floral pillows complete the coordinated bedroom set.
Pillow Cover Instructions
- Measure your pillow insert.
- Make enough matching triangle motifs to cover the front.
- Arrange the motifs in a rectangular layout.
- Join them using the same ivory raised seam method.
- Create a simple crochet or fabric backing panel.
- Join the front and back along three sides.
- Insert the pillow.
- Close the final side using buttons, a zipper, or a removable envelope closure.
For decorative rectangular pillows, use fewer motifs and arrange them horizontally.
Add an ivory border around the finished pillow cover for a coordinated look.
Part 12: Blocking the Finished Bedspread
Blocking Instructions
- Check the yarn label for appropriate washing instructions.
- Lightly dampen the completed bedspread if the fiber allows wet blocking.
- Spread it flat on a clean surface.
- Gently straighten the triangular motifs and joining seams.
- Pin the outer edges if necessary.
- Allow the bedspread to dry completely.
- Remove the pins and check the final dimensions.
Blocking helps the motifs lie evenly and improves the overall drape of the bedspread.
How to Customize Your Floral Bedspread
Soft Vintage Pink
Use blush pink, ivory, and sage green for a romantic cottage-inspired bedroom.
Classic Neutral
Replace the pink flowers with cream and beige for an elegant monochromatic bedspread.
Spring Garden
Combine lavender, pale yellow, peach, and mint-green flowers.
Autumn Cottage
Use terracotta, dusty rose, mustard, and olive-green yarn.
Elegant White
Make all the triangles and flowers in ivory with subtle raised textures.
Tips for a Beautiful Professional Finish
- Use the same yarn weight for all motifs.
- Block every triangle to a consistent size before joining.
- Make a sample motif before committing to the full project.
- Weave in yarn tails as you work.
- Use stitch markers to identify triangle corners.
- Keep the joining seams at a consistent tension.
- Arrange the colors before sewing the motifs together.
- Use washable yarn for a practical bedspread.
- Check the finished measurements frequently.
- Store completed motifs flat to prevent distortion.
Frequently Asked Questions
Is this floral triangle crochet bedspread suitable for beginners?
This project is best for intermediate crocheters who are comfortable working in rounds, making shaped motifs, and joining crochet pieces.
How many triangle motifs do I need?
The number depends on the size of your finished triangles and the dimensions of your bedspread. Make a blocked sample and calculate the required layout before beginning the full project.
What yarn is best for a crochet bedspread?
Soft cotton or cotton-blend yarn is a good choice because it provides stitch definition, durability, and comfortable drape.
Can I make this bedspread in one color?
Yes. An all-cream version creates a sophisticated vintage lace effect while preserving the raised floral texture.
Can I use this pattern for a smaller blanket?
Absolutely. Make fewer triangle motifs and arrange them into a baby blanket, lap blanket, or decorative throw.
Can the pillow covers be washed?
Yes, if made with washable yarn. Removable pillow covers are especially convenient for regular cleaning.
Care Instructions
- Follow the washing instructions on your yarn label.
- Wash gently using cool water and mild detergent.
- Avoid bleach and harsh chemicals.
- Do not wring or twist the fabric.
- Support the weight of the wet bedspread when lifting.
- Lay flat to dry whenever possible.
- Reshape the floral motifs while damp.
- Store folded in a clean, dry location.
Final Thoughts
This vintage floral triangle crochet bedspread brings together intricate geometric crochet, romantic flowers, and beautiful pastel colors in one memorable handmade project.
The combination of ivory triangle borders, dusty pink blossoms, sage-green foliage, and delicate scalloped edging creates a timeless bedroom accessory that feels both elegant and cozy.
Whether you make a full-size bedspread, a smaller decorative throw, or matching floral pillow covers, this design offers countless opportunities to personalize your crochet work.
Love this free crochet bedspread pattern? Save it to Pinterest and share it with your crochet friends for more beautiful handmade inspiration!

