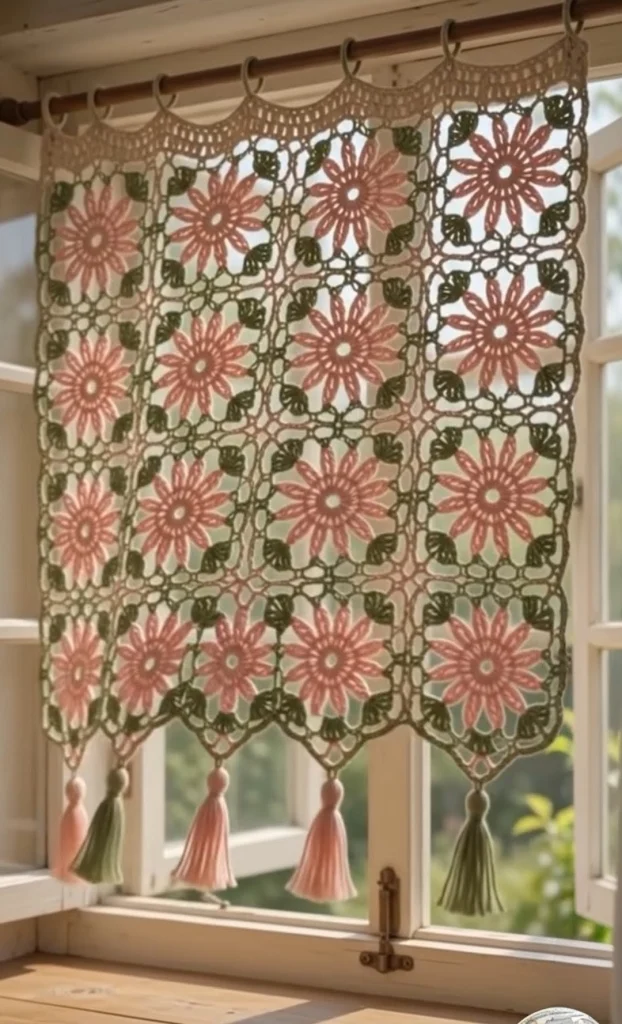
Vintage Pink Daisy Crochet Kitchen Curtain – Free Advanced Crochet Pattern
Bring a charming cottage-inspired touch to your kitchen with this beautiful vintage pink daisy crochet curtain. Featuring delicate dusty pink flowers, olive green leaves, ivory lace mesh, and decorative hanging tassels, this handmade window curtain creates a soft and romantic atmosphere.
This advanced crochet curtain pattern combines intricate floral motifs, delicate openwork lace, decorative scalloped edging, and elegant hanging loops. Each flower is surrounded by green leaf accents and connected through an airy lace framework that allows natural sunlight to filter beautifully through the window.
Perfect for farmhouse kitchens, cottagecore interiors, vintage-inspired homes, and romantic window decorations, this crochet curtain is both decorative and practical.
Pattern Information
- Skill Level: Advanced
- Finished Size: Approximately 80 cm wide × 110 cm long, including tassels
- Construction: Individual floral motifs joined with lace mesh
- Flower Motifs: 16 large daisy motifs arranged in four columns and four rows
- Techniques: Lace crochet, dimensional petals, motif joining, scalloped borders, curtain loops, and tassels
- Terminology: US crochet terms
- Style: Vintage cottagecore floral lace
Materials Needed
- Size 3 or size 5 cotton crochet thread in dusty pink
- Matching cotton thread in olive green
- Ivory or warm cream cotton crochet thread
- 2.0 mm or 2.5 mm crochet hook, adjusted for thread weight
- Tapestry needle
- Stitch markers
- Sharp scissors
- Measuring tape
- Blocking mat and rustproof pins
- Curtain rod suitable for the window
- Cardboard template for making tassels
Crochet Abbreviations
- MR: Magic ring
- ch: Chain
- sc: Single crochet
- hdc: Half double crochet
- dc: Double crochet
- tr: Treble crochet
- dtr: Double treble crochet
- sl st: Slip stitch
- sp: Space
- picot: Chain 3, slip stitch into the first chain
- rep: Repeat
- FO: Fasten off
1. Crochet the Pink Daisy Center
Each floral motif begins with a small circular center surrounded by elongated dusty pink petals.
Using dusty pink crochet thread:
Round 1: Make a magic ring. Ch 1, work 16 sc into the ring. Pull tight and join with sl st. (16 sc)
Round 2: Ch 3 (counts as first dc), dc in the same stitch, then work 2 dc in each remaining stitch. Join with sl st. (32 dc)
Round 3: Ch 1, sc in the first stitch. *Ch 5, skip 3 stitches, sc in the next stitch*; repeat around until eight ch-5 loops are formed. Join with sl st.
These chain loops form the foundation for the daisy petals.
2. Crochet the Elongated Daisy Petals
The long, narrow petals create the distinctive vintage floral appearance shown in the reference image.
Round 4: Sl st into the first ch-5 loop.
Work (sc, hdc, 2 dc, 2 tr, ch 3, 2 tr, 2 dc, hdc, sc) into the loop.
Repeat in each remaining loop.
You should now have eight large petals.
Round 5: Attach thread at the tip of the first petal.
Ch 7, sl st into the tip of the next petal.
Repeat around all eight petals.
Round 6: Into each ch-7 arch work:
(2 sc, 2 hdc, 3 dc, picot, 3 dc, 2 hdc, 2 sc).
Repeat around.
Fasten off and weave in the ends.
The completed flower should have an airy circular shape with delicate pointed petals.
3. Crochet the Olive Green Leaves
Each daisy motif features four decorative olive green leaf accents positioned around the outer corners.
Using olive green thread:
Row 1: Ch 9.
Row 2: Starting in the second chain from the hook, work sc, hdc, dc, 2 tr, dc, hdc, sc.
Ch 2 and continue along the opposite side of the foundation chain.
Work sc, hdc, dc, 2 tr, dc, hdc, sc.
Join with sl st.
Row 3: Work sc evenly around the leaf, adding a picot at the pointed tip.
Fasten off, leaving a long tail for attachment.
Make four leaves for each daisy motif.
For 16 floral motifs, prepare 64 leaves.
4. Create the Square Lace Framework
The ivory lace framework transforms each circular daisy into a decorative square motif suitable for joining into a curtain.
Attach ivory thread between two pink petals.
Round 1: Ch 6, sc between the next two petals. Repeat around.
Round 2: Work ch-7 arches between the previous chain spaces.
Round 3: Begin forming four corners by working (3 dc, ch 3, 3 dc) into every second chain arch.
Work ch-5 connecting arches between the corners.
Round 4: Work sc and chain spaces evenly around the square, maintaining four clearly defined corners.
Fasten off.
Each completed motif should have a central pink daisy, an airy ivory framework, and four decorative green leaves.
5. Attach the Green Leaf Accents
Position one olive green leaf near each corner of the square motif.
Use a tapestry needle and the long yarn tails to attach the leaves securely.
Angle the leaves toward the center of the flower.
Repeat for all four corners.
Ensure the leaves lie flat and do not cover the pink petals.
Repeat the entire process for all 16 motifs.
6. Join the Floral Motifs
Arrange the completed motifs into four columns and four rows.
Place all motifs with the right side facing upward.
Using ivory crochet thread, join the motifs with a decorative chain-lace seam.
Attach thread to the corner of the first motif.
Ch 3, sl st into the corresponding chain space of the neighboring motif.
Ch 3, sl st into the next chain space of the first motif.
Continue alternating between motifs to create an airy connecting seam.
Join the motifs horizontally first, then connect the rows vertically.
Keep the joining tension consistent to prevent the curtain from puckering.
7. Crochet the Outer Curtain Border
Once all motifs are connected, attach ivory thread to one corner of the curtain.
Round 1: Work sc evenly around the entire curtain, placing additional stitches at the corners when needed.
Round 2: Ch 3, skip 2 stitches, sc in the next stitch. Repeat around to create an openwork border.
Round 3: Work 5 dc into each chain arch, separated by sc stitches.
This creates a soft decorative scalloped border around the curtain.
Keep the top edge relatively straight to support the curtain hanging loops.
8. Create the Decorative Bottom Points
The bottom of the curtain features elegant pointed lace sections that extend beneath the floral motifs.
Attach ivory thread at the center of a bottom motif.
Row 1: Ch 7, sc into the next available chain space.
Row 2: Turn, ch 5, sc into the center of the previous arch.
Row 3: Turn, ch 3, work 3 dc into the chain space, ch 3, and 3 dc into the same space.
Row 4: Work a decorative picot at the pointed end.
Fasten off.
Repeat across the bottom edge, spacing the points evenly beneath the motifs.
9. Crochet the Curtain Hanging Loops
The curtain hangs from decorative crochet loops attached directly to the upper border.
Using ivory thread:
Loop 1: Attach yarn to the top edge. Ch 25, then sl st into the same attachment area to form a loop.
Loop 2: Work 30 sc around the chain loop to reinforce it.
Fasten off securely.
Repeat to create approximately eight evenly spaced hanging loops.
Adjust the chain length according to the diameter of your curtain rod.
The loops should be large enough to slide comfortably along the rod without stretching the lace.
10. Make the Pink and Green Tassels
The soft tassels add movement and a beautiful finishing detail to the bottom of the curtain.
Use dusty pink and olive green cotton thread.
Cut a cardboard template approximately 12 cm long.
Wrap the thread around the template 35–45 times.
Slide a separate piece of thread beneath the wrapped strands and tie securely at the top.
Remove the yarn bundle from the cardboard.
Wrap another piece of thread around the upper section to form the tassel head.
Cut the bottom loops and trim the strands evenly.
Make alternating pink and green tassels.
Attach one tassel to each selected decorative point along the bottom edge.
For a look similar to the reference image, use five prominent tassels with alternating colors.
11. Blocking the Crochet Curtain
Blocking is essential for achieving a neat, professional finish.
Gently soak the completed curtain in cool water.
Remove excess water by pressing it between clean towels.
Lay the curtain flat on a blocking mat.
Pin the outer edges into a rectangular shape.
Carefully straighten the floral motifs, green leaves, and lace connections.
Shape the bottom decorative points individually.
Allow the curtain to dry completely before removing the pins.
Do not stretch the lace excessively, as this can distort the floral motifs.
12. Hanging Your Finished Curtain
Slide the curtain rod through the crocheted hanging loops.
Distribute the loops evenly across the rod.
Adjust the curtain so the floral motifs hang straight.
Gently arrange the tassels to prevent tangling.
For a wider window, crochet additional columns of motifs.
For a longer curtain, add more rows before completing the border.
Advanced Crochet Tips
- Use smooth cotton thread for clear lace stitch definition.
- Maintain consistent tension across all floral motifs.
- Block each motif before joining for more accurate sizing.
- Use stitch markers to identify the four corners.
- Keep the green leaf accents symmetrical.
- Count chain arches carefully when joining motifs.
- Reinforce the hanging loops to support the curtain’s weight.
- Use the same hook size throughout the project.
- Check the curtain width against your window before final assembly.
- Attach tassels only after the curtain has been blocked.
Beautiful Color Variations
- Vintage Cottage: Dusty pink flowers, olive green leaves, ivory lace.
- Classic Daisy: White flowers, sage green leaves, cream lace.
- Romantic Rose: Blush pink flowers, eucalyptus green leaves, warm white lace.
- Sunflower Kitchen: Golden yellow flowers, forest green leaves, beige lace.
- French Country: Lavender flowers, sage green leaves, antique ivory lace.
- Autumn Cottage: Terracotta flowers, moss green leaves, oatmeal lace.
- Soft Spring: Peach flowers, pale green leaves, white lace.
Frequently Asked Questions
Is this crochet curtain suitable for beginners?
This is an advanced crochet pattern that requires experience with lace stitches, motif construction, joining techniques, and decorative finishing.
Can I adjust the curtain size?
Yes. Add or remove floral motifs to customize the width and length of the curtain.
What yarn works best for a crochet kitchen curtain?
Mercerized cotton crochet thread is ideal because it provides excellent stitch definition, durability, and a beautiful lace finish.
Can I make the curtain without tassels?
Yes. The scalloped lace border looks beautiful on its own, but tassels add a romantic decorative touch.
How do I wash the finished curtain?
Hand-wash gently in cool water using mild detergent. Reshape and dry flat to preserve the lace pattern.
Can I use this pattern for a bedroom window?
Absolutely. This floral lace curtain works beautifully in bedrooms, kitchens, dining rooms, and cottage-inspired interiors.
How can I make the curtain wider?
Simply crochet additional daisy motifs and join them into extra columns before working the outer border.
Final Thoughts
This Vintage Pink Daisy Crochet Kitchen Curtain combines delicate floral lace, soft dusty pink petals, olive green leaves, and elegant tassels to create a timeless handmade window decoration.
Whether you’re decorating a cozy farmhouse kitchen, creating a romantic cottagecore bedroom, or making a special handmade gift, this floral crochet curtain brings warmth, texture, and charm to any space.
Save this free crochet curtain pattern to Pinterest and share it with your crochet-loving friends!
Pattern note: This is an original, untested design inspired by the supplied photograph, not an exact reconstruction of its stitch chart. The floral motifs, lace joining, and sizing may require adjustments. Make and block one complete sample motif before committing to the full curtain.

