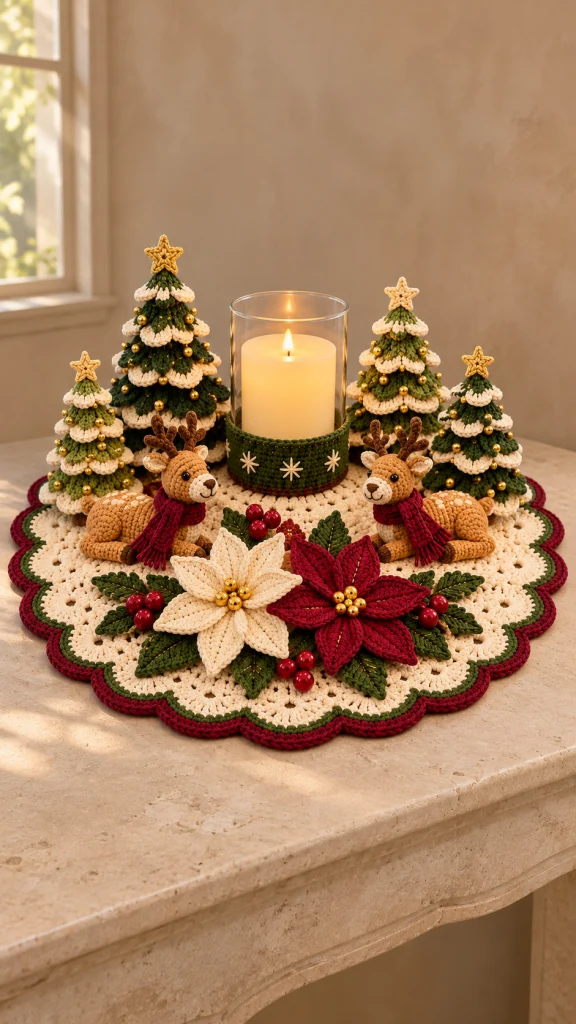
Woodland Christmas Crochet Centerpiece with Reindeer
Advanced
For experienced crocheters who enjoy complex shaping, fine detail, and ambitious construction
Weekend Project
A satisfying weekend make — start Friday, finish Sunday, enjoy forever.
Handmade Gift
A beautiful keepsake — free forever. Read online or print at home.
About This Woodland Christmas Crochet Centerpiece with Reindeer
This Christmas crochet centerpiece pattern brings snowy evergreen trees, two reclining reindeer and layered poinsettias together on a cream scalloped mat. Deep green foliage, burgundy edging and small gold accents give the arrangement the rich woodland character of a traditional holiday display.
This is an advanced home decor project assembled from several individual crochet components. The trees and reindeer are stuffed decorative elements, while the central glass cylinder wears a removable embroidered sleeve. Allow approximately 45–60 hours for crocheting and assembly, with additional time for blocking.
The instructions suit makers comfortable with counted shaping, working into reserved loops, small sewn pieces and dimensional embroidery. Arrange the finished pieces around a battery-operated LED pillar candle for a warm table display.
Materials
- DK cotton yarn: approximately 550 g cream, 300 g forest green, 100 g olive green, 120 g burgundy, 100 g caramel, 25 g dark brown and 20 g gold; quantities include a working allowance.
- 3.5 mm crochet hook for the mat, petals and leaves.
- 2.75 mm crochet hook for trees, reindeer, stars and candle sleeve.
- Polyester stuffing, approximately 200 g.
- Black embroidery cotton for eyes and dark brown embroidery cotton for noses and mouths.
- Gold embroidery thread for leaf veins and optional tree details.
- Approximately 60 gold beads, 6 mm across, for tree ornaments and flower centers.
- Approximately 15 burgundy beads, 8–10 mm across, for berry clusters.
- Tapestry needle, fine sewing needle and strong matching sewing thread.
- Stitch markers, scissors, measuring tape, blocking mat and rustproof pins.
- Four washable rigid plastic discs, cut to fit the finished tree bases, with all edges smoothed.
- Stable glass cylinder approximately 12 cm in outside diameter and at least 18 cm tall.
- Battery-operated LED pillar candle that fits freely inside the glass cylinder.
Abbreviations
chchainsl stslip stitchscsingle crochethdchalf double crochetdcdouble crochettrtreble crochetinc2 single crochet in one stitchdecsingle crochet 2 stitches togetherMRmagic ringBLOback loop onlyFLOfront loop onlyststitch or stitchesCream Circular Mat
- Round 1: With cream and the 3.5 mm hook, make an MR, ch 2, work 12 dc into the ring and sl st to the first dc. Tighten the ring. 12 st.
- Round 2: Ch 2, work 2 dc in each st; join. 24 st.
- Round 3: Ch 2, repeat [dc in next st, 2 dc in next st] 12 times; join. 36 st.
- Round 4: Ch 2, repeat [dc in next 2 st, 2 dc in next st] 12 times; join. 48 st.
- Round 5: Ch 2, repeat [dc in next 3 st, 2 dc in next st] 12 times; join. 60 st.
- Round 6: Ch 2, repeat [dc in next 4 st, 2 dc in next st] 12 times; join. 72 st.
- Round 7: Ch 2, repeat [dc in next 5 st, 2 dc in next st] 12 times; join. 84 st.
- Round 8: Ch 2, repeat [dc in next 6 st, 2 dc in next st] 12 times; join. 96 st.
- Round 9: Ch 2, repeat [dc in next 7 st, 2 dc in next st] 12 times; join. 108 st.
- Round 10: Ch 2, repeat [dc in next 8 st, 2 dc in next st] 12 times; join. 120 st.
- Round 11: Ch 2, repeat [dc in next 9 st, 2 dc in next st] 12 times; join. 132 st.
- Round 12: Ch 2, repeat [dc in next 10 st, 2 dc in next st] 12 times; join. 144 st.
- Round 13: Ch 2, repeat [dc in next 11 st, 2 dc in next st] 12 times; join. 156 st.
- Round 14: Ch 2, repeat [dc in next 12 st, 2 dc in next st] 12 times; join. 168 st.
- Round 15: Ch 2, repeat [dc in next 13 st, 2 dc in next st] 12 times; join. 180 st.
- Round 16: Ch 2, repeat [dc in next 14 st, 2 dc in next st] 12 times; join. 192 st. The plain circle should measure approximately 53 cm across.
- Round 17: Ch 1, repeat [sc in next st, skip next 3 st, 9 tr in next st, skip next 3 st] 24 times; join to first sc. 24 scallops, each containing 9 tr, separated by 24 sc; 240 st total. Fasten off.
- Round 18: Join forest green in any separating sc. Ch 1, repeat [sc in separating sc, sc in next 4 tr, 3 sc in next tr, sc in next 4 tr] 24 times; join. 288 sc. Fasten off.
- Round 19: Join burgundy in any valley stitch directly above a separating sc. Ch 1, repeat [sc in next 6 st, 3 sc in next st, sc in next 5 st] 24 times; join. 336 sc. Fasten off.
- Block the mat flat, opening each scallop evenly. Aim for approximately 60 cm across the outermost scallop tips. Let dry completely before adding the display.
Tree Cones and Bases
- Make four cones with the 2.75 mm hook: one tall forest-green cone starting with 60 st, one medium olive cone starting with 48 st and two small cones starting with 36 st, one olive and one forest green. Each cone is worked upward from an open bottom.
- Foundation: Ch 60 for tall, 48 for medium or 36 for small. Without twisting, sl st to the first ch. Round 1: Ch 1, sc in every ch; do not join. 60, 48 or 36 st. Mark the first stitch.
- Round 2: Sc around in BLO, leaving the front loops free for the lowest branch tier. 60, 48 or 36 st.
- Round 3: Sc around through both loops. 60, 48 or 36 st.
- Round 4: For tall repeat [sc in next 8 st, dec] 6 times, for medium repeat [sc in next 6 st, dec] 6 times, or for small repeat [sc in next 4 st, dec] 6 times. 54, 42 or 30 st.
- Rounds 5 and 6: Sc around each round. 54, 42 or 30 st per round.
- Round 7: For tall repeat [sc in next 7 st, dec] 6 times, for medium repeat [sc in next 5 st, dec] 6 times, or for small repeat [sc in next 3 st, dec] 6 times. 48, 36 or 24 st.
- Round 8: Sc around in BLO to reserve the next tier loops. 48, 36 or 24 st.
- Round 9: Sc around through both loops. 48, 36 or 24 st.
- Round 10: For tall repeat [sc in next 6 st, dec] 6 times, for medium repeat [sc in next 4 st, dec] 6 times, or for small repeat [sc in next 2 st, dec] 6 times. 42, 30 or 18 st.
- Rounds 11 and 12: Sc around each round. 42, 30 or 18 st per round.
- Round 13: For tall repeat [sc in next 5 st, dec] 6 times, for medium repeat [sc in next 3 st, dec] 6 times, or for small repeat [sc in next st, dec] 6 times. 36, 24 or 12 st.
- Round 14: Sc around in BLO to reserve tier loops. 36, 24 or 12 st.
- Round 15: Sc around through both loops. 36, 24 or 12 st.
- Round 16: For tall repeat [sc in next 4 st, dec] 6 times, for medium repeat [sc in next 2 st, dec] 6 times, or for small work 6 dec. 30, 18 or 6 st.
- Small trees only, round 17: Sc around. 6 st. Fasten off, thread through the front loops of the remaining 6 st and close the tip. Continue the following rounds only for tall and medium trees.
- Rounds 17 and 18, tall and medium: Sc around each round. 30 or 18 st per round.
- Round 19: For tall repeat [sc in next 3 st, dec] 6 times; for medium repeat [sc in next st, dec] 6 times. 24 or 12 st.
- Round 20: Sc around in BLO to reserve tier loops. 24 or 12 st.
- Round 21: Sc around through both loops. 24 or 12 st.
- Round 22: For tall repeat [sc in next 2 st, dec] 6 times; for medium work 6 dec. 18 or 6 st.
- Medium tree only, round 23: Sc around. 6 st. Fasten off and close the tip as for the small trees.
- Rounds 23 and 24, tall only: Sc around each round. 18 st per round.
- Round 25, tall only: Repeat [sc in next st, dec] 6 times. 12 st.
- Round 26, tall only: Sc around in BLO to reserve the top tier loops. 12 st.
- Round 27, tall only: Sc around through both loops. 12 st.
- Round 28, tall only: Work 6 dec. 6 st.
- Round 29, tall only: Sc around. 6 st. Fasten off and close the tip.
- Base round 1, make four: With the matching tree color, work 6 sc into an MR. 6 st.
- Base round 2: Inc 6 times. 12 st.
- Base round 3: Repeat [sc in next st, inc] 6 times. 18 st.
- Base round 4: Repeat [sc in next 2 st, inc] 6 times. 24 st.
- Base round 5: Repeat [sc in next 3 st, inc] 6 times. 30 st.
- Base round 6: Repeat [sc in next 4 st, inc] 6 times. 36 st. Stop here for both small bases, leaving sewing tails.
- Base round 7, medium and tall: Repeat [sc in next 5 st, inc] 6 times. 42 st.
- Base round 8, medium and tall: Repeat [sc in next 6 st, inc] 6 times. 48 st. Stop here for the medium base.
- Base round 9, tall: Repeat [sc in next 7 st, inc] 6 times. 54 st.
- Base round 10, tall: Repeat [sc in next 8 st, inc] 6 times. 60 st. Fasten off with a sewing tail.
- After adding the branch tiers, stuff each cone through its bottom opening. Cut a plastic disc approximately 3 mm smaller than its matching crocheted base and place it above the base inside the tree. Sew the base to the cone, matching one base stitch to each foundation stitch.
Snowy Branch Tiers and Stars
- Work each branch tier into one ring of reserved cone loops. Tall trees have tiers at rounds 2, 8, 14, 20 and 26; medium trees at rounds 2, 8, 14 and 20; small trees at rounds 2, 8 and 14.
- Tier round 1: Hold the tree upright with its tip pointing away from you. Join matching green yarn in any reserved loop. Ch 1, repeat [sl st in next loop, skip next 2 loops, 7 dc in next loop, skip next 2 loops] around; join to first sl st. Each repeat uses 6 loops. A 60-loop ring makes 10 shells, 48 makes 8, 36 makes 6, 24 makes 4 and 12 makes 2. Fasten off.
- Tier round 2: Join cream in any separating sl st. Ch 1, repeat [sl st in separating sl st, sc in next 3 dc, 3 sc in next dc, sc in next 3 dc] around; join. Each shell has 9 cream sc and one separating sl st. Fasten off. Gently pull each scallop downward over the cone.
- Star round 1, make eight matching star faces: With gold or cream, work 10 sc into an MR; join to first sc. 10 st.
- Star round 2: Repeat [ch 4, sl st in second ch from hook, sc in next ch, hdc in next ch, skip next ring st, sl st in next ring st] 5 times. Five points, using all 10 ring stitches. Fasten off.
- Pair the star faces with wrong sides together and sew around their edges. Keep them flat and unstuffed. Sew one double-sided star securely to each tree tip.
- Sew 24 gold beads to the tall tree, 16 to the medium tree and 10 to each small tree, spreading them across visible green branches. Alternatively, embroider gold French knots in the same positions.
Reindeer Bodies and Heads
- Make two complete reindeer with the 2.75 mm hook. Body round 1: With caramel, work 6 sc into an MR. 6 st.
- Body round 2: Inc 6 times. 12 st.
- Body round 3: Repeat [sc in next st, inc] 6 times. 18 st.
- Body round 4: Repeat [sc in next 2 st, inc] 6 times. 24 st.
- Body round 5: Repeat [sc in next 3 st, inc] 6 times. 30 st.
- Body round 6: Repeat [sc in next 4 st, inc] 6 times. 36 st.
- Body rounds 7–16: Sc around each round. 36 st per round.
- Body round 17: Repeat [sc in next 4 st, dec] 6 times. 30 st.
- Body round 18: Repeat [sc in next 3 st, dec] 6 times. 24 st. Begin stuffing firmly while keeping the underside slightly flat.
- Body round 19: Repeat [sc in next 2 st, dec] 6 times. 18 st.
- Body round 20: Repeat [sc in next st, dec] 6 times. 12 st.
- Body round 21: Work 6 dec. 6 st. Finish stuffing, fasten off and close the opening. The body lies with its long axis horizontal.
- Head round 1: With caramel, work 6 sc into an MR. 6 st.
- Head round 2: Inc 6 times. 12 st.
- Head round 3: Repeat [sc in next st, inc] 6 times. 18 st.
- Head round 4: Repeat [sc in next 2 st, inc] 6 times. 24 st.
- Head round 5: Repeat [sc in next 3 st, inc] 6 times. 30 st.
- Head rounds 6–10: Sc around each round. 30 st per round.
- Head round 11: Repeat [sc in next 3 st, dec] 6 times. 24 st.
- Head round 12: Repeat [sc in next 2 st, dec] 6 times. 18 st. Stuff the head.
- Head round 13: Repeat [sc in next st, dec] 6 times. 12 st.
- Head round 14: Work 6 dec. 6 st. Fasten off and close. The MR end becomes the crown and the closed end becomes the chin.
- Muzzle round 1: With cream, work 6 sc into an MR. 6 st.
- Muzzle round 2: Inc 6 times. 12 st.
- Muzzle round 3: Repeat [sc in next st, inc] 6 times. 18 st.
- Muzzle round 4: Sc around. 18 st. Fasten off with a sewing tail. Lightly stuff and sew to the lower front of the head over rounds 8–13, shaping it into a soft oval.
- Face embroidery: Stitch two black oval eyes across head rounds 7–8, with approximately 7 stitches between their inner edges. Embroider a dark brown triangular nose at the upper center of the muzzle, then a short vertical line and two small curved mouth stitches below it.
- Neck round 1: With caramel, work 6 sc into an MR. 6 st.
- Neck round 2: Inc 6 times. 12 st.
- Neck rounds 3–5: Sc around each round. 12 st per round. Fasten off with a long tail and stuff lightly. Sew the closed end to the upper front of the body, then sew the open edge to the underside of the head. Add a second circle of stitches through the neck and head for support.
Reindeer Legs, Ears, Tails and Antlers
- Leg round 1, make four per deer: With dark brown, work 6 sc into an MR. 6 st.
- Leg round 2: Repeat [sc in next st, inc] 3 times. 9 st.
- Leg round 3: Sc around. 9 st. Change to caramel.
- Leg rounds 4–12: Sc around each round. 9 st per round. Put a little stuffing in the hoof and lower leg; leave the upper half flexible. Fasten off with a sewing tail.
- Leg assembly: Flatten each open edge and sew through both layers. Sew two legs along each lower side of the body, with their hoof ends directed toward the head. Bend the rear pair gently at their unstuffed sections so all four legs rest beside the body.
- Ear round 1, make four total: With caramel, work 6 sc into an MR. 6 st.
- Ear round 2: Repeat [sc in next st, inc] 3 times. 9 st.
- Ear rounds 3 and 4: Sc around each round. 9 st per round.
- Ear round 5: Repeat [sc in next st, dec] 3 times. 6 st. Fasten off. Flatten without stuffing, add three cream satin stitches to the inner surface and pinch the base. Sew one ear to each side of the crown across head rounds 4–6.
- Tail round 1, make two: With cream, work 6 sc into an MR. 6 st.
- Tail round 2: Sc around. 6 st. Change to caramel.
- Tail round 3: Sc around. 6 st. Fasten off, flatten the opening and sew to the rear of the body.
- Antler main stem, make four: With dark brown, work 6 sc into an MR, then work 7 further rounds of 6 sc. Fasten off with a sewing tail. Do not stuff.
- Antler branches, make eight: With dark brown, work 4 sc into an MR, then work 3 further rounds of 4 sc. Fasten off with a sewing tail. Do not stuff.
- Antler assembly: Sew two branches to each main stem, one at stem round 4 and one at round 6, angled outward. Sew each open stem base firmly to the crown beside the MR, inside the ears. Keep antlers short enough to stand without wire.
- Spots: Embroider eight small cream spots on each back with pairs of short straight stitches, keeping the underside plain.
Burgundy Reindeer Scarves
- Make two with burgundy and the 2.75 mm hook. Row 1: Ch 41, sc in second ch from hook and each remaining ch. 40 st.
- Row 2: Ch 1, turn, sc in BLO across. 40 st.
- Row 3: Ch 1, turn, sc in BLO across. 40 st. Fasten off and weave in ends.
- Cut twelve 8 cm strands per scarf. Fold and knot six strands along each short end, then trim evenly.
- Wrap a scarf around each deer’s neck, cross the ends at the front and secure the overlap with two small burgundy stitches.
Layered Poinsettias
- Make one cream and one burgundy flower using the 3.5 mm hook. Each flower uses six large petals and five small petals, all in its own color.
- Large petal, first side: Ch 12. Starting in second ch from hook, work sl st, sc, hdc, dc, tr in next 3 ch, dc, hdc, sc, then 3 sc in the final ch. Eleven foundation chains have been used.
- Large petal, second side: Turn around the chain end and work into the unused underside loops of the next 10 chains: sc, hdc, dc, tr in next 3 ch, dc, hdc, sc, sl st. Join to the first sl st. 23 stitches around the petal, excluding the joining sl st. Fasten off with a 25 cm tail.
- Small petal, first side: Ch 10. Starting in second ch from hook, work sl st, sc, hdc, dc, tr, dc, hdc, sc, then 3 sc in the final ch.
- Small petal, second side: Work into the unused underside loops of the next 8 chains: sc, hdc, dc, tr, dc, hdc, sc, sl st. Join to the first sl st. 19 stitches around the petal, excluding the joining sl st. Fasten off with a sewing tail.
- Petal shaping: Treat the three-sc chain-end curve as the outer tip and the joined slip-stitch end as the base. Pinch the base of each petal and secure with two stitches. Lightly block the petals with a pointed outer silhouette.
- Flower backing, make two: Work 6 sc into an MR; round 2, inc 6 times, giving 12 st; round 3, repeat [sc in next st, inc] 6 times, giving 18 st. Join and fasten off.
- Flower assembly: Sew six large petals evenly around each backing, placing their bases at the backing center. Sew five small petals above them, offset between the lower petals. Secure five gold beads in each center. The finished flowers should measure approximately 15–18 cm across.
Leaves and Berry Sprigs
- Make twelve large leaves with forest green or olive using the large-petal instructions, including both sides. Make six small leaves using the small-petal instructions. Keep their bases flat instead of pinching them.
- Embroider a gold central vein from base to tip on each large leaf, followed by three short diagonal veins on either side. Keep the thread tension loose enough for each leaf to lie flat.
- Make five berry sprigs: For each sprig, overlap the bases of two large leaves and one small leaf and sew them together. Sew three burgundy beads over the joined bases.
- Reserve the remaining two large leaves for the lower edge of the poinsettia arrangement. Sew them underneath the flower backings with their tips extending outward.
- Arrange the five berry sprigs around the flowers, keeping beads and leaves clear of the central glass footprint. Sew sprigs to the flower backings where they touch, forming one removable floral cluster.
Embroidered Glass Sleeve
- Measure the glass circumference at the height the sleeve will cover. With forest green and the 2.75 mm hook, make a separate sc swatch. Multiply the circumference in centimeters by your stitches per centimeter, then round up to an even number. For a 12 cm diameter cylinder at 2 sc per centimeter, use 76 stitches.
- Foundation: Ch the calculated number and join without twisting. Round 1: Ch 1, sc in every chain; join to first sc. The example has 76 st. Check that this ring slides over the glass base before continuing.
- Rounds 2–13: Ch 1, sc in every st and join each round. Maintain the foundation stitch count, 76 st in the example. The sleeve should be approximately 6 cm tall. Fasten off.
- Lower trim: Join burgundy in a foundation-chain underside loop. Ch 1, sc once in each foundation chain; join and fasten off. 76 sc in the example.
- Upper trim: Join olive in any top-edge stitch. Ch 1, repeat [sl st in next st, ch 1] around; join and fasten off. 76 sl st and 76 ch-1 loops in the example.
- Embroidery: Flatten the empty sleeve and mark three evenly spaced positions across its front half. At each position, stitch a cream eight-spoke star approximately 2 cm across, with all spokes crossing at one center. Add small burgundy running stitches along the lower green round.
- Slide the sleeve onto the empty glass cylinder. It must sit flat without stretching tightly or lifting the cylinder. Place the LED candle inside after completing the arrangement.
Finishing and Display Assembly
- Weave in every yarn end and secure bead threads with multiple small stitches on the underside. Inspect each antler and head attachment, adding support stitches where a piece moves at its seam.
- Place the completely dry mat on a level table. Set the sleeved glass cylinder centrally so the full glass base rests on the flat portion of the mat.
- Arrange the tall tree behind and to the left of the glass, the medium tree behind and to the right, and the two small trees farther forward at the sides. Rotate each tree so its most even tiers face outward.
- Position the deer in front of the trees, one on each side, with their faces turned slightly toward the center. Adjust the sewn leg positions until each body rests steadily.
- Lay the joined cream and burgundy poinsettia cluster along the front edge, with leaves and berry sprigs radiating across the cream mat. Keep the central glass accessible for lifting.
Let the scalloped edge remain visible around the whole display. A little space between the deer, flowers and glass makes the individual shapes easier to see and keeps the arrangement easy to lift apart.
Store the mat flat and pack the three-dimensional pieces separately with tissue around the antlers and star points. Remove the glass and LED candle before moving the centerpiece.
Tips for Success
- Check the cream circle after rounds 6, 10 and 16. A slight ripple may block out; persistent ruffling or cupping calls for a gauge adjustment before adding the border.
- Mark every BLO tree round with a removable marker so the reserved loops remain easy to identify when adding branches.
- Keep stuffing out of the upper halves of the deer legs so the reclining pose bends naturally.
- Sew flower layers through their bases and backing discs, leaving the outer petal edges free to lift.
- Test the sleeve on the actual glass after its first round; glass cylinders often widen slightly near the bottom.
Common Mistakes to Avoid
- Counting the mat’s starting ch 2 as a dc adds unwanted stitches. Join into the first actual dc and count only the worked stitches.
- Working branch shells through both cone loops closes the reserved attachment line. Use only the unused front loops from the marked cone round.
- Placing the burgundy border increases away from scallop centers distorts the edge. Begin in a valley and put each three-sc group into the middle of the green crest.
- Overstuffing antlers or using long branches makes them sag. Leave the specified narrow tubes unstuffed and secure their bases with several stitches.
- Attaching petals by their outer tips produces a flat, crowded flower. Gather the slip-stitch bases and let the chain-end tips point outward.
Ways to Customize This Pattern
- Swap burgundy for cranberry red while keeping cream snow and two green shades for clear contrast.
- Replace all beads with embroidered French knots for an entirely textile finish.
- Make a smaller display by using only the two small trees and one deer on the same mat.
- Use a wider glass cylinder by recalculating the sleeve stitch count; check the full arrangement still fits inside the trees before assembly.
- Make the mat alone as a seasonal table accent, keeping the full 192-stitch circle and all three border rounds.
Frequently asked questions
Use a battery-operated LED candle for this arrangement. The crochet sleeve, trees, stuffing and floral pieces belong around a cool light source.
The shaped cone supports the tree, while shells worked into reserved front loops create overhanging branches. Separate cream edging gives each tier its snowy outline without changing the cone’s shaping counts.
For a proportional change, use a different yarn thickness and suitable hooks for every textile component, then make gauge samples. Recalculate the glass sleeve for the actual cylinder and cut new tree-base discs to fit the finished crochet.
Lift off the glass and separate the display. Hand-wash and block the mat according to the yarn label. Spot-clean the stuffed and beaded pieces, avoiding prolonged soaking around rigid base inserts.
This pattern is decorative home decor. Beads, separate accessories and rigid tree inserts make the finished arrangement unsuitable as a play set.
The finished Woodland Christmas Crochet Centerpiece with Reindeer

