Woodland Noel Crochet Candle Centerpiece Pattern
Advanced
For experienced crocheters who enjoy complex shaping, fine detail, and ambitious construction
Weekend Project
A satisfying weekend make — start Friday, finish Sunday, enjoy forever.
Handmade Gift
A beautiful keepsake — free forever. Read online or print at home.
About This Woodland Noel Crochet Candle Centerpiece Pattern
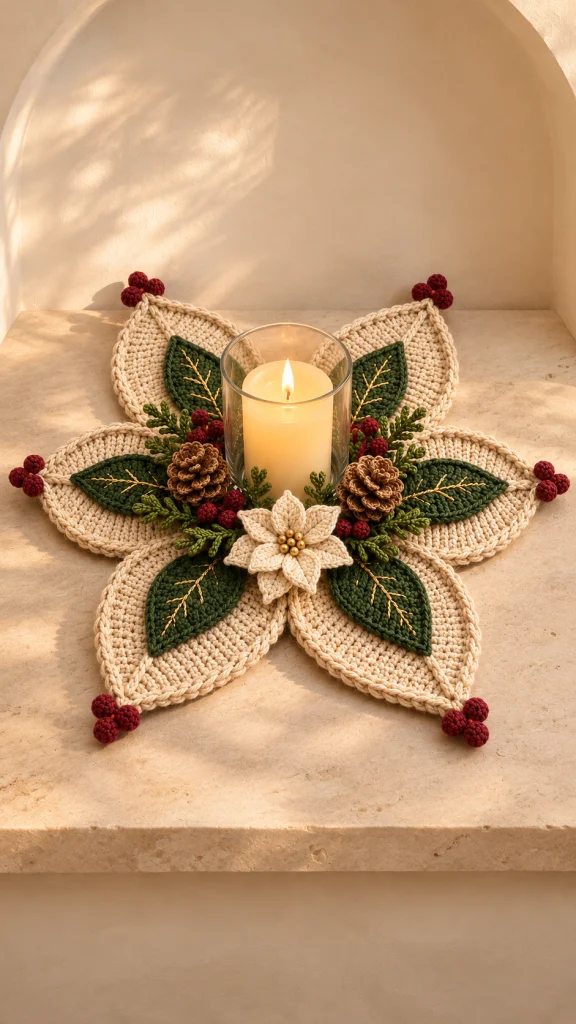
This crochet candle centerpiece pattern creates a six-point Christmas table decoration with broad cream petals, forest-green leaves, burgundy berries, two textured pinecones, and a layered ivory poinsettia. Gold embroidery picks out the leaf veins, while a raised cream edge gives each outer petal a defined outline.
The centerpiece is assembled from separately shaped pieces over a small central foundation. Its recognizable flower-shaped silhouette frames a clear glass hurricane, with the fullest embellishment arranged toward the front. Allow approximately 18–24 hours of crochet, embroidery, and assembly, plus time for blocking.
This advanced project suits crocheters comfortable with shaping, surface crochet, working into unused loops, and arranging dimensional appliqués. Use a battery-operated LED candle for display; the yarn, berries, and foliage must remain away from an open flame.
Materials
- DK cotton yarn in cream: approximately 220 g / 550 m.
- DK cotton yarn in forest green: approximately 85 g / 210 m.
- DK cotton yarn in olive green: approximately 30 g / 75 m.
- DK cotton yarn in burgundy: approximately 30 g / 75 m.
- DK cotton yarn in medium brown: approximately 30 g / 75 m.
- Fine gold embroidery thread: approximately 10 m.
- 3.5 mm crochet hook for the foundation, outer petals, and large leaves.
- 2.75 mm crochet hook for the flower, berries, pinecones, and foliage.
- Small quantity of polyester stuffing for berries.
- Seven gold beads, approximately 6 mm, and strong sewing thread.
- Tapestry needle and an embroidery needle suitable for the gold thread.
- Stitch markers, scissors, blocking mat, rustproof pins, and measuring tape.
- Clear glass hurricane with a flat base approximately 8–9 cm across, plus a battery-operated LED candle.
Abbreviations
chchainsl stslip stitchscsingle crochethdchalf double crochetdcdouble crochetinc2 single crochet in one stitchsc2togsingle crochet two stitches togetherMRmagic ringBLOback loop onlyFLOfront loop onlyRSright sideCentral Foundation — Make One
- With cream and the main hook, work round 1: 6 sc in MR. Tighten the ring. Work in a spiral and mark the first stitch. (6 sc)
- Round 2: Inc in each stitch. (12 sc)
- Round 3: Repeat [sc, inc] 6 times. (18 sc)
- Round 4: Repeat [2 sc, inc] 6 times. (24 sc)
- Round 5: Repeat [3 sc, inc] 6 times. (30 sc)
- Round 6: Repeat [4 sc, inc] 6 times. (36 sc)
- Round 7: Repeat [5 sc, inc] 6 times. (42 sc)
- Round 8: Repeat [6 sc, inc] 6 times. Sl st in the next stitch and fasten off. (48 sc; approximately 8.5 cm across)
- Place six markers around the edge, one every 8 stitches. These mark the six radial petal positions.
Cream Outer Petals — Make Six
- With cream and the main hook, ch 2. Row 1: Sc in the second chain from the hook. (1 sc)
- Row 2: Ch 1, work 3 sc in the stitch. (3 sc)
- Rows 3–12: Ch 1, inc in the first stitch, sc to the last stitch, inc in the last stitch. Work this increase row 10 times. Counts are 5, 7, 9, 11, 13, 15, 17, 19, 21, and 23 sc.
- Rows 13–16: Ch 1, sc in each stitch. Work 4 rows. (23 sc per row)
- Rows 17–26: Ch 1, sc2tog, sc to the last 2 stitches, sc2tog. Work this decrease row 10 times. Counts are 21, 19, 17, 15, 13, 11, 9, 7, 5, and 3 sc.
- Row 27: Ch 1, sc3 together as follows: draw up a loop in each of the 3 stitches, yarn over and pull through all 4 loops. (1 stitch)
- Edging round 1: Ch 1. Work 3 sc in the row-27 tip, 1 sc into each of the 25 row ends from rows 26 through 2 down the first side, 3 sc into the row-1 tip, then 1 sc into each of the 25 row ends from rows 2 through 26 up the second side. Join to the first sc. (56 sc)
- Edging round 2: Ch 1. Work 1 sc in each stitch, except work 3 sc in the middle stitch of each 3-sc tip group. Join to the first sc. (60 sc)
- Edging round 3: Ch 1. Working from left to right, reverse sc in every stitch around. Join and fasten off. (60 reverse sc)
- With the RS facing, surface sl st along the central column from the row-1 tip to the row-27 tip. Keep the chain relaxed so it does not shorten the petal. Fasten off on the back.
- Block all six petals to the same dimensions, approximately 18 × 13 cm. Designate the row-1 tip as the inner tip and the row-27 tip as the outer tip.
Forest-Green Leaves — Make Six
- With forest green and the main hook, ch 2. Row 1: Sc in the second chain from the hook. (1 sc)
- Row 2: Ch 1, 3 sc in the stitch. (3 sc)
- Rows 3–8: Ch 1, inc in the first stitch, sc to the last stitch, inc in the last stitch. Work 6 increase rows. Counts are 5, 7, 9, 11, 13, and 15 sc.
- Rows 9–12: Ch 1, sc in each stitch. Work 4 rows. (15 sc per row)
- Rows 13–18: Ch 1, sc2tog, sc to the last 2 stitches, sc2tog. Work 6 decrease rows. Counts are 13, 11, 9, 7, 5, and 3 sc.
- Row 19: Ch 1, draw up a loop in each of the 3 stitches, yarn over and pull through all 4 loops. (1 stitch)
- Edging: Ch 1, 3 sc in the row-19 tip, 1 sc into each of the 17 row ends from rows 18 through 2, 3 sc into the row-1 tip, then 1 sc into each of the 17 row ends from rows 2 through 18 on the other side. Join and fasten off, leaving a sewing tail. (40 sc)
- Block each leaf to approximately 12 × 9 cm. With gold thread, embroider a central vein in short backstitches. Add five diagonal branches on each side, spacing them evenly and ending each branch at least 1 cm inside the edge.
Burgundy Berries — Make Thirty
- With burgundy and the smaller hook, round 1: 6 sc in MR. Work in a spiral. (6 sc)
- Round 2: Inc in each stitch. (12 sc)
- Round 3: Sc in each stitch. (12 sc)
- Add a very small pinch of stuffing. Round 4: Sc2tog 6 times. (6 sc)
- Fasten off with a sewing tail. Thread the tail through the front loops of the remaining 6 stitches and pull closed. Set aside eighteen berries for six outer clusters and twelve berries for four inner clusters.
Layered Pinecones — Make Two
- With brown and the smaller hook, ch 25. Foundation row: Sc in the second chain from the hook and each chain across. (24 sc)
- Scale row: Ch 1 and turn. Working in FLO, repeat [sl st in the next stitch, skip 1 stitch, 5 dc in the next stitch, skip 1 stitch] 6 times. Each repeat consumes 4 foundation stitches. (6 scales; 30 dc and 6 sl st)
- Fasten off, leaving approximately 60 cm for sewing. The unused back loops form the straight lower edge of the strip.
- Roll the strip into a loose spiral with the scales facing outward and the unused-loop edge at the bottom. Start with a tight center, then place successive scales slightly lower and farther outward to form a squat cone approximately 4–5 cm across.
- Stitch through the unused loops and the base of each successive wrap. Secure every scale at its lower edge while keeping the rounded upper edge free. Flatten the underside with several crossing stitches, leaving a tail for attachment.
Olive Evergreen Sprigs — Make Eight
- With olive and the smaller hook, ch 13. Sl st in the second chain from the hook and in the next chain. (2 stem sl st; 10 foundation chains remain)
- First branch pair: Ch 5, sl st in the second chain from the hook and the next 3 chains, then sl st into the same stem chain from which the branch began. Repeat this branch once more from the same point. Sl st in each of the next 2 foundation chains. (2 branches; 8 foundation chains remain)
- Second branch pair: Work two branches exactly as above, then sl st in each of the next 2 foundation chains. (4 branches total; 6 foundation chains remain)
- Third branch pair: Work two branches exactly as above, then sl st in each of the next 2 foundation chains. (6 branches total; 4 foundation chains remain)
- Fourth branch pair: Work two branches exactly as above, then sl st in each of the final 4 foundation chains. (8 branches total)
- Fasten off with a sewing tail. Spread the two branches of each pair to opposite sides of the stem and gently block. Each sprig should measure approximately 6–7 cm long.
Cream Poinsettia — Make Six Large and Six Small Bracts
- Large bract, row 1: With cream and the smaller hook, ch 2, sc in the second chain from the hook. (1 sc)
- Large bract, row 2: Ch 1, 3 sc in the stitch. (3 sc)
- Large bract, row 3: Ch 1, inc, sc, inc. (5 sc)
- Large bract, row 4: Ch 1, inc, 3 sc, inc. (7 sc)
- Large bract, rows 5–6: Ch 1, sc across. (7 sc per row)
- Large bract, row 7: Ch 1, sc2tog, 3 sc, sc2tog. (5 sc)
- Large bract, row 8: Ch 1, sc2tog, sc, sc2tog. (3 sc)
- Large bract, row 9: Ch 1, draw up a loop in each of the 3 stitches, yarn over and pull through all 4 loops. (1 stitch)
- Large bract edging: Ch 1, 3 sc in the row-9 tip, 1 sc in each row end from rows 8 through 2, 3 sc in the row-1 tip, and 1 sc in each row end from rows 2 through 8 on the opposite side. Join and fasten off. (20 sc) Make six.
- Small bract, row 1: Ch 2, sc in the second chain from the hook. (1 sc)
- Small bract, row 2: Ch 1, 3 sc in the stitch. (3 sc)
- Small bract, row 3: Ch 1, inc, sc, inc. (5 sc)
- Small bract, rows 4–5: Ch 1, sc across. (5 sc per row)
- Small bract, row 6: Ch 1, sc2tog, sc, sc2tog. (3 sc)
- Small bract, row 7: Ch 1, draw up a loop in each of the 3 stitches, yarn over and pull through all 4 loops. (1 stitch)
- Small bract edging: Ch 1, 3 sc in the row-7 tip, 1 sc in each row end from rows 6 through 2, 3 sc in the row-1 tip, and 1 sc in each row end from rows 2 through 6 on the opposite side. Join and fasten off. (16 sc) Make six.
- Flower backing: Work 6 sc in MR, then inc in each stitch for the second round. Join and fasten off. (12 sc)
- Arrange the six large bracts evenly around the backing, with their row-1 bases meeting at the center. Sew each base securely to the backing.
- Place the six small bracts over the first layer, rotating them so their tips fall between the large tips. Sew their bases to the backing. Allow the outer halves of both layers to remain free.
- Sew one gold bead at the center and six beads around it. Pass the sewing thread through each bead and the backing twice, then secure the thread on the underside.
Layout and Structural Assembly
- Lay the foundation RS up. Arrange the six cream petals at equal 60-degree intervals, with their inner tips overlapping approximately 1.5–2 cm of the foundation. Position two petals toward the back, two to the sides, and two toward the front.
- Keep the outer tips approximately 21 cm from the center. Let neighboring cream edges touch or overlap by up to 1 cm near their lower halves. Adjust all six together until the overall width is approximately 42 cm.
- With cream yarn, sew each overlapping inner tip to the foundation using two rows of small stitches. Catch the back of the petal fabric so the stitches remain discreet.
- Join each pair of neighboring petals along approximately 3 cm of their touching inner side edges. Use small whipstitches through the undersides of the edging. These six short seams stabilize the radial layout while leaving the outer points separate.
- Place one green leaf on each cream petal, centered along its raised midrib. Set its inner tip just outside the foundation and its outer tip approximately 3 cm inside the cream outer tip.
- Sew each green leaf along its central vein and around its inner third. Leave the remaining edges lightly raised.
- Sew three berries together at each cream outer tip. Attach each berry separately through the tip edging, then join adjacent berries with a small hidden stitch. (6 clusters; 18 berries)
- Place the empty hurricane on the center. Mark its footprint with removable thread. Keep the footprint flat and free of beads, pinecones, and berry clusters.
- Arrange four inner clusters of three berries around the left, right, and front of the hurricane footprint. Stitch each berry through a cream petal or the foundation beneath it. (4 clusters; 12 berries)
- Arrange four olive sprigs on the left and four on the right, with their stems pointing toward the center and their tips spreading outward. Sew the stems and one point on each branch pair to the underlying fabric.
- Sew one pinecone at the front-left and one at the front-right of the marked footprint. Secure each through its base at four points.
- Center the poinsettia between the two front cream petals, in front of the hurricane footprint. Sew its backing firmly to the overlapping fabric beneath it, leaving all bract tips free.
Finishing
- Weave in every yarn end through several stitches on the underside, reverse direction, and trim. Remove all placement threads.
- Lay the centerpiece flat and damp-block the cream edges locally if necessary. Support the flower and pinecones with dry folded cloths so their layers retain their shape.
- When completely dry, place the hurricane on the flat central foundation and insert the LED candle. Confirm that the glass stands level and that no embellishment is trapped beneath its base.
Gently lift the green leaf edges and separate the pinecone scales with your fingertips. The finished arrangement should feel full around the front while keeping the six cream points clearly visible.
Move the centerpiece by supporting it from underneath. Remove the glass before lifting, cleaning, or storing the crochet.
Tips for Success
- Block the first cream petal before making the remaining five; matching its dimensions makes the radial layout much easier.
- Keep the reverse-sc edging relaxed. If the petal curls inward, remake that round with a slightly larger hook.
- Embroider the gold veins before attaching the leaves so the thread ends can be secured invisibly.
- Pin the complete arrangement around the actual hurricane before sewing any raised decoration.
- Use several small attachment stitches for each pinecone rather than one tight stitch that pulls the foundation upward.
Common Mistakes to Avoid
- Counting the turning chain as a stitch changes the shaping. Count only the worked stitches at the end of every row.
- Adding extra edging stitches along every row end creates ruffles. Use the stated one-stitch-per-row-end placement and reserve increases for the two tips.
- Pulling the surface midrib tight shortens the cream petal. Lay it flat while making each surface slip stitch.
- Rolling the pinecone strip into a narrow tube hides the scales. Widen each wrap and stitch the underside as you go.
- Sewing decorations beneath the hurricane makes it unstable. Preserve the marked central footprint throughout assembly.
Ways to Customize This Pattern
- Replace forest green with blue-green and burgundy with cranberry while retaining cream petals for the same winter silhouette.
- Use gold-thread French knots instead of beads for a fully textile flower center.
- Make a second poinsettia and place it at the back for a centerpiece viewed equally from both sides; make twelve additional bracts and one backing.
- For a coordinated larger version, use a heavier yarn and matching hooks for every component, then measure the new foundation before choosing a hurricane.
Frequently asked questions
This design is intended for a battery-operated LED candle. A glass hurricane does not make nearby yarn and dimensional foliage safe around an open flame.
Enlarge the foundation before assembly. For round 9, repeat [7 sc, inc] six times for 54 sc; for round 10, repeat [8 sc, inc] six times for 60 sc. Each additional round adds six stitches. Reposition the cream petals and all embellishments around the actual footprint, and expect the overall diameter to increase.
Check that each has 27 shaping rows and that the surface midrib is loose. Block the petals together to matching measurements before assembly. A petal that remains substantially shorter should be remade with consistent tension.
Remove the hurricane and spot-clean with cool water and mild detergent. If a full wash is necessary, hand-wash gently without wringing, reshape flat, and support the dimensional decorations while drying. Store flat in a box with tissue around the flower and pinecones.
The finished Woodland Noel Crochet Candle Centerpiece Pattern

